Check on forum.dinobot.tv. It has firmware to be updated by USB.
Posts by u4_support
-
-
Great job
-
Netflix 4k supported by u5pvr.
https://mega.nz/#!c6Z2XRDb!YmK…iCoKef6dPi2ungC5tDiD9lvZc
Customers who have already bought box please contact us for firmware update.
-
u5pvr will update to firmware next week with support of NetflixHD upto 1080p with easy operating with remote control.
-
Please check if Linux part of firmware is activated.
-
I believe you transferred m3u file to TVHeadEnd Linux and want to share in local router. Please check following issues:
-Formats of the file: The file supported by VLC might not be supported by TVH, please check TVheadEnd forum for support.
-Check with mobile app TVHClient if it works
-
Ready BlueTooth Remote
Finally, we are ready BT Voice Remote for U5PVR models
1. Power: Box power on / off
2. Settings: Button for initial Bluetooth pairing:
Press the button for about 5 seconds in the BT setting menu and the white LED will blink. This is the entry of the Bluetooth pairing mode,
At this time, if you select OK in U5 Remote item in the setting menu, pairing will be done.
3. Home button: Home button for moving to Android home.
4. 123: Virtual key for LIVE TV app.
1)Press the 123 button on the external app to go directly to the LIVE TV app.
2)Press the 123 button in the LIVE TV app to activate the virtual remote control button.
The various buttons on the remote control are operated by the software key like below photo.
5. Center Up / Down / Left / Right / OK key: This button is used for channel switching, movement and selection.
6. Back button: This button is used to go back and exit..
7. Menu button: The bar with three bars is the menu button.
8. Volume +/- button: Volume control button.
9. Microphone button: Used for microphone input.
Currently, it is linked with the leanback launcher's Search button.
Search button After selecting, press again to listen to the voice and convert it into letters.
If you have a voice search function such as Youtube, go to voice search button and press OK button.
when icon is changed like Red color, press voice button and talk will work. (This is same like Official Android TV)
Screen capture of virtual key.


After selecting the virtual keypad, you can also use the numeric keys and the key buttons of the existing IR remote via the up and down keys .
(this virtual keypad is currently only available in the LIVETV app)
In addition to this, we will link the voice search function demo YouTube video(Demonstrated by Korean).
We hope that you will be able to use a variety of remote controls if you move to Android 7 like Google Assistant. -
-
It is a pity that we can not find people to test in your area.
-
We have carried tuner test with professional test equipments to reach the market standards. But I do understand there will always be very weak TPs that a specific box could not pick up. Please let me know your setup of dish etc and the frequency you want to catch. We will arrange to try it out.
-
Finally it is coming hopefully within next week on GitHub.
-
-
-
Get Android TV remote from Google player.
https://play.google.com/store/apps/deta ... .tv.remote
Use your Android phone or tablet as a remote for your U5 PVR box.
Easily switch between d-pad and touchpad modes to navigate content and play games on your U5 PVR box.
Tap the mic to start a voice search, or use the keyboard to input text on U5 PVR box.
To get started, connect your Android phone or tablet to the same network as your U5 PVR box. -
-
Taking advantage of the rclone (http://www.rclone.org), U5pvr could set up local sync folder for Google Drive and share the content including 4K UHD recording. In addition, rclone also supports Amazon S3/Openstack Swift/Dropbox/Amazon Drive/Microsoft OneDrive/Yandex etc.
All the following steps will be carried out on your laptop SSH by login to U5pvr with any SSH application with root/u5pvr.
1. Installing rclone
First, rclone uses the fuse file system to mount the file system which should be installed first. And the unzip package to unzip the zip files.Apt-get install fuse unzip
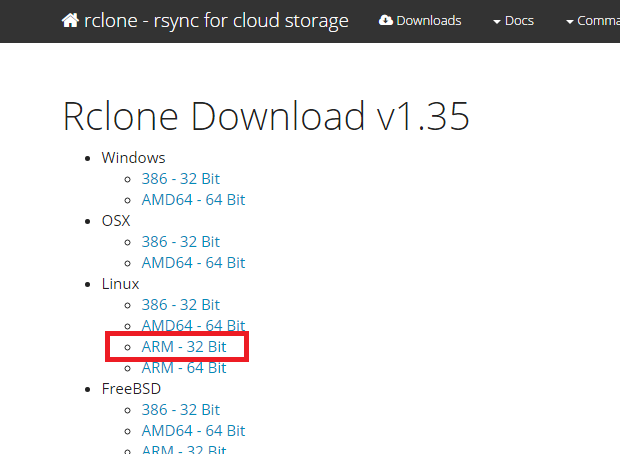
Next, download the rclone binary from http://www.rclone.org:
Wget http://downloads.rclone.org/rclone-v1.35-linux-arm.zip
To unzip the received file, type the following command:
# Unzip Enter rclone and press TAB key to autocomplete.
Unzip rclone-v1.35-linux-arm.zip
Cd cd rclone-v1.35-linux-arm
Once you unzip and navigate to the folder, move the binary file to the directory that is contained in your PATH environment variable so that it is convenient to run. It is moved to / usr / bin here as an example.
Cp rclone / usr / bin
# Permission is required, so set permissions below.
Chmod a + x / usr / bin / rclone
Next, check whether rclone runs normally.
If it is as below, it is installed normally.
Root @ u5pvr-debian: ~ # rclone version
2017/03/17 22:29:22 Config file "/root/.rclone.conf" not found - using defaults
Rclone v1.35
2. Link Google Drive
To create a mount folder, create a folder called / mnt / gdrive.
Mkdir / mnt / gdrive
Use the command below to connect Google Drive.
Root @ u5pvr-debian: ~ # rclone config
2017/03/17 22:32:17 Config file "/root/.rclone.conf" not found - using defaults
No remotes found - make a new one
N) New remote
S) Set configuration password
Q) Quit config
N / s / q> n
# Enter n as you need to create a new access point.
Name> Vivant (Enter any name preferred)
Type of storage to configure.
Choose a number from below, or type in your own value
1 / Amazon Drive
\ "Amazon cloud drive"
2 / Amazon S3 (also Dreamhost, Ceph, Minio)
\ "S3 \"
3 / Backblaze B2
\ "B2 \"
4 / Dropbox
\ "Dropbox \"
5 / Encrypt / Decrypt a remote
\ "Crypt"
6 / Google Cloud Storage (this is not Google Drive)
\ "Google cloud storage \"
7 / Google Drive
\ "Drive"
8 / Hubic
\ "Hubic \"
9 / Local Disk
\ "Local \"
10 / Microsoft OneDrive
\ "Onedrive"
11 / Openstack Swift (Rackspace Cloud Files, Memset Memstore, OVH)
\ "Swift \"
12 / Yandex Disk
\ "Yandex \"
Storage> 7
Google Application Client Id - leave blank normally.
Client_id>
Google Application Client Secret - leave blank normally.
Client_secret>
# Leave Client_id and Client_secret blank.
Remote config
Use auto config?
* Say Y if not sure
* Say N if you are working on a remote or headless machine or Y did not work
Y) Yes
N) No
Y / n> n
# Choose "No"
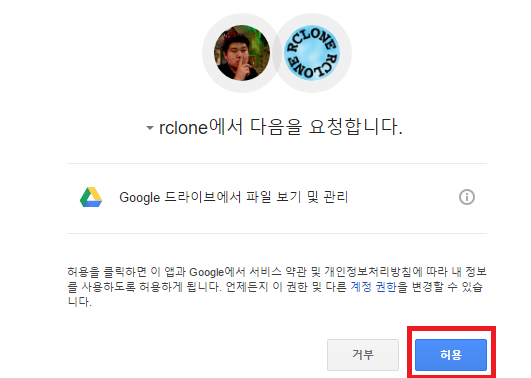
If your browser does not open automatically, go to https://accounts.google.com/o/oauth2/auth?client_id=20226415644.apps.googleusercontent.com&redirect_uri=urn%3Aietf%3Awg%3Aoauth%3A2. 0% 3Aoob & response_type = code & scope = https% 3A% 2F% 2Fwww.googleapis.com% 2Fauth% 2Fdrive & state = b02c34056754881ab1b1d15b4e5bf67d
Log in and authorize rclone for access
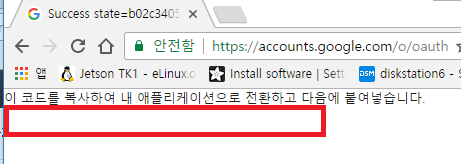
Enter verification code>
# Copy the link that appears on your screen and paste it to a browser if your browser does not open automatically. Login with your Google Drive username and password.
Screen should show to grant access to this point:
Copy and paste the code below.
If your browser does not open automatically, go to https://accounts.google.com/o/oauth2/auth?client_id=202264815644.apps.googleusercontent.com&redirect_uri=urn%3Aietf%3Awg%3Aoauth%3A2. 0% 3Aoob & response_type = code & scope = https% 3A% 2F% 2Fwww.googleapis.com% 2Fauth% 2Fdrive & state = b02c34056754881ab1b1d15b4e5bf67d
Log in and authorize rclone for access
Enter verification code> ----------------------------------------------
# Paste the code you copied from your browser.
--------------------
[Vivant]
Client_id =
Client_secret =
Token = {"access_token": "------------------------------------------ -------------------------------------------------- -------------------------------------------------- ----------------- "," token_type ":" Bearer "," refresh_token ":" ------------------ ---------------------------- "," expiry ":" 2017-03-17T23: 39: 37.623176291 + 09: 00 "}
--------------------
Y) Yes this is OK
E) Edit this remote
D) Delete this remote
Y / e / d> y
# Press y to confirm the setting.
Current remotes:
Name Type
==== ====
Vivant drive
E) Edit existing remote
N) New remote
D) Delete remote
S) Set configuration password
Q) Quit config
E / n / d / s / q> q
# When the setting is finished, press q to quit.
Root @ u5pvr-debian: ~ #
3. Mount Google Drive
Mount it with the command below.
# Share name set in last 2: (Skip) Enter the folder to mount.
# It is not in daemon format, so use nohup and & to keep it running even if the user shell exits.
Nohup rclone mount --allow-non-empty --allow-other --uid 1023 --gid 1028 --max-read-ahead 2G --acd-templink-threshold 0 --checkers 16 --quiet --stats 0 Djj9405: / mnt / gdrive / &
# On the other hand, uid and gid must be 1023 1028 because you have to match the Android file permissions.
The result of executing with the above command is as follows:
If you have any problems and you are forced to terminate the program, please refer to nohup.out in the current working folder to check the error contents.
Root @ u5pvr-debian: ~ # nohup rclone mount --allow-non-empty --allow-other --uid 1023 --gid 1028 --max-read-ahead 2G --acd-templink-threshold 0 --checkers 16 --quiet --stats 0 Vivant : / mnt / gdrive / &
[1] 29639
Root @ u5pvr-debian: ~ # nohup: ignoring input and appending output to 'nohup.out'
Root @ u5pvr-debian: ~ #
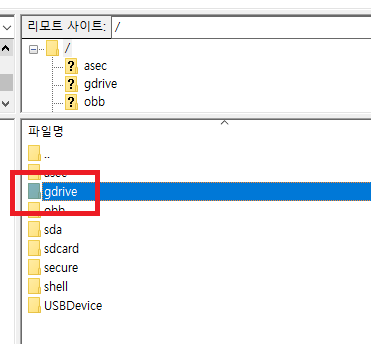
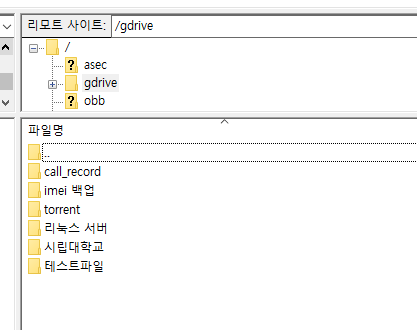
Root @ u5pvr-debian: / mnt / gdrive # ls
Call_record imei ?????? Torrent ????????? ?????? ???????????????????????????????? ?????????????????????????
# You will see files on Google Drive as normal.
(Note) Replace "Vivant" with the name you created.
4. Test Google Drive with U5pvr
By default, Linux firmware has built-in FTP and could be used to test.
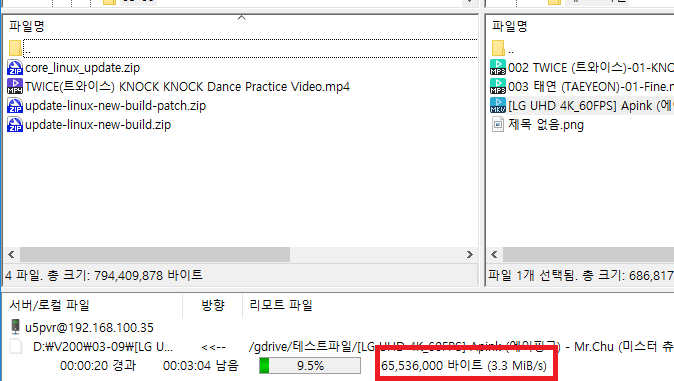
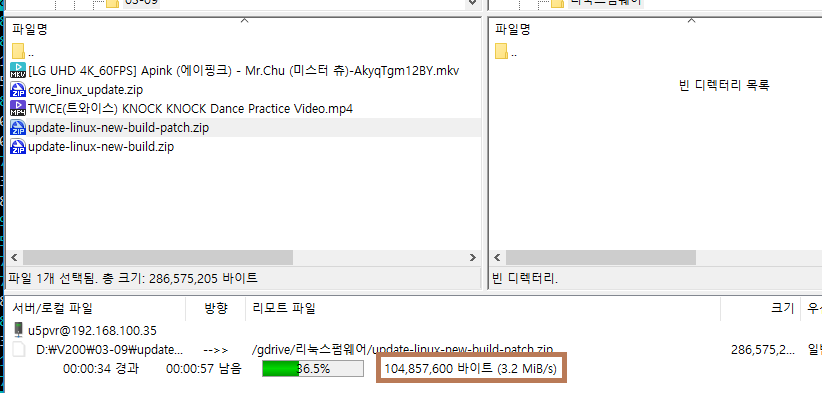
Files should be synced to the internal HDD:
Try to download file from U5pvr to computer with FTP:
Try to upload files from computer to U5pvr by FTP:
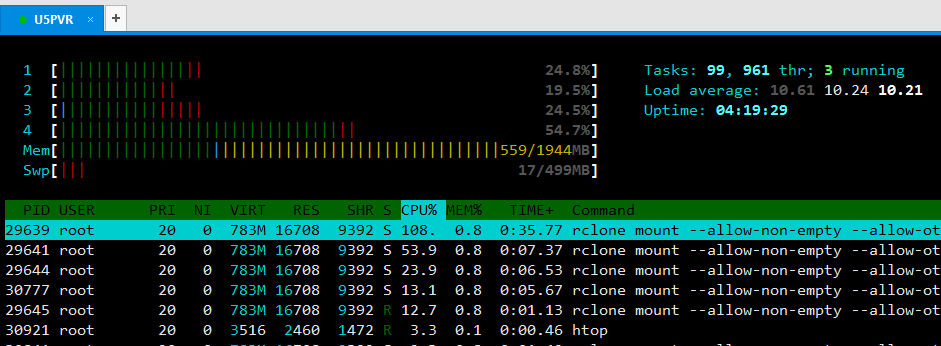
The normal CPU usage is as follows.
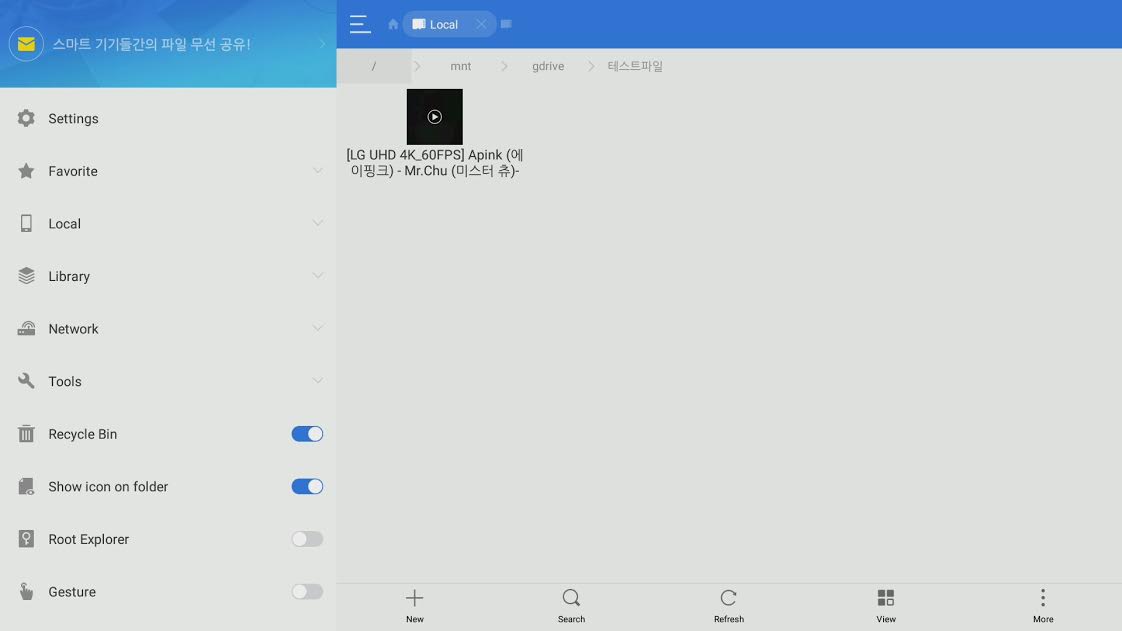
Playback of files synced to Google Drive:
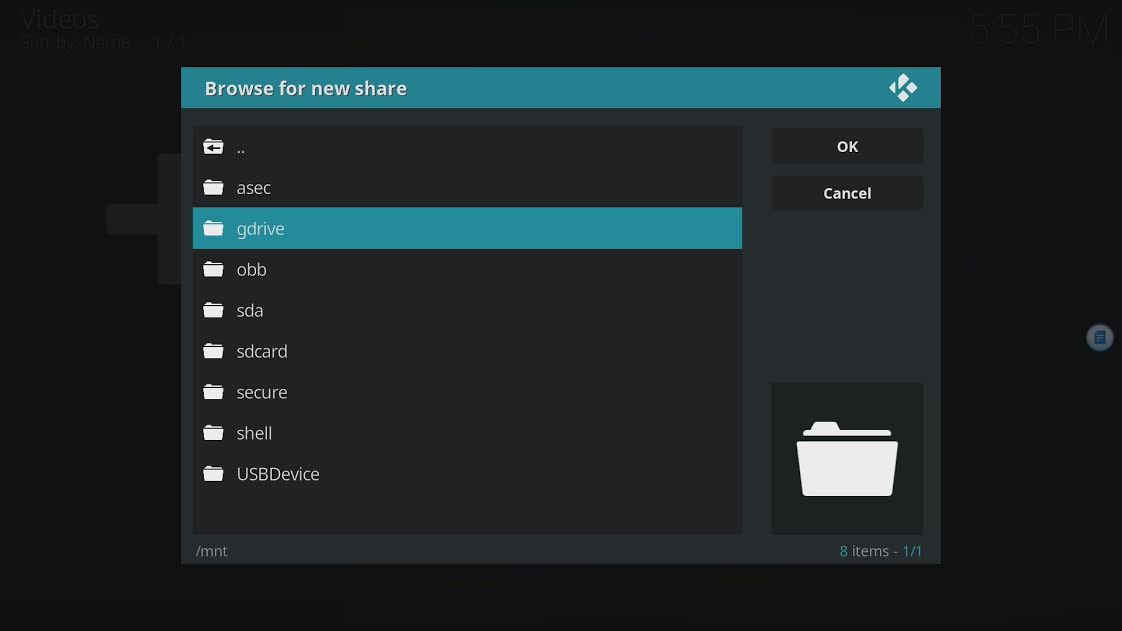
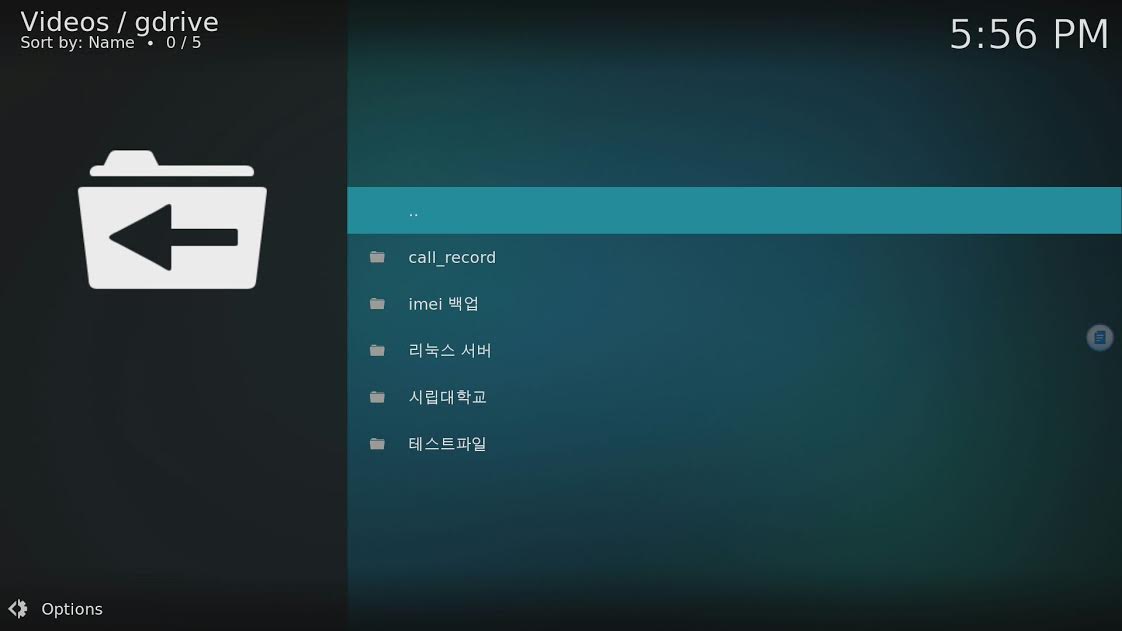
The following is test in Kodi:
The file is normally displayed as shown below.
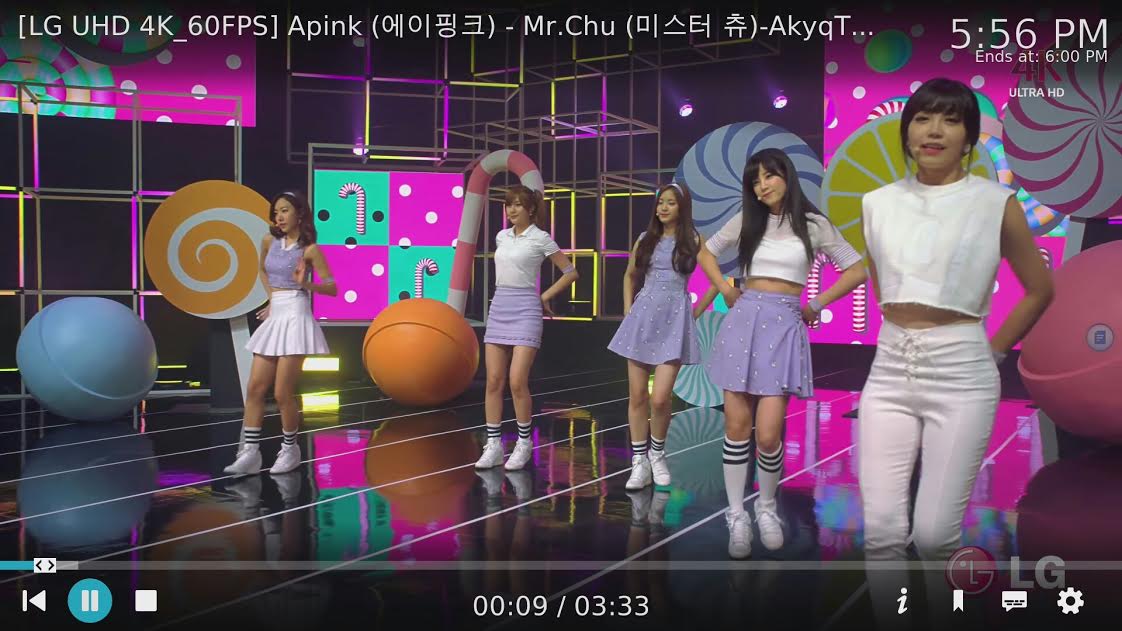
I also tried to run this pink video. (4K VP9 60FPS)
5. Automount of Google Drive in U5pvr
This is an unstable method for those who do not have a wired LAN.
In case of wireless LAN, there is a delay until the connection is made, so if there is no network in the process of booting Linux, an error occurs.
However, in case of wired LAN, there is no problem because the network is attached before Linux booting.
(We'll create a script that checks for network status later in the process.)
By default, the /etc/rc.local file is used to enable autorun at boot time.
Nano /etc/rc.local
#! / Bin / sh -e
#
# Rc.local
#
# This script is executed at the end of each multiuser runlevel.
# Make sure that the script will "exit 0" on success or any other
# Value on error.
#
# In order to enable or disable this script just change the execution
# Bits.
#
# By default this script does nothing.
# Hostname
/etc/init.d/hostname.sh start
# Google drive mount
Mkdir / mnt / gdrive
Su root -c "nohup rclone mount --allow-non-empty --allow-other --uid 1023 --gid 1028 --max-read-ahead 10G --acd-templink-threshold 0 --che $
Exit 0
-
Install Teamviewer Host on U5 and control it on any PC when you are on the go, no need to worry about DDNS.
-
-Find box IP, 192.168.1.100 for example,
-Open any FTP application and login with u5pvr/u5pvr
-
-
U5 supports Transmission with the Linux part. Torrent seeds could be download in the background without interfering regular usage.
-Find box IP, for example 192.168.1.100
-Open browser on your laptop and goto 192.168.1.100:9091
-Login with u5pvr/u5pvr
-Load seeds and start downloading
Alternatively, use only U5pvr to do the job:
-Download seeds or find link of seeds
-Oper Chrome and go to 127.0.0.1:9091
-Load seeds and start downloading