


The below is copied from a kodicommunity forum so some images and formatting may not have transferred across correctly
Link to original article - http://forum.kodicommunity.com/viewtopic.php?f=55&t=718
So I have put together a whole bunch of guides recently on how to assign epg to IPTV streams, update files etc, so thought it might be worthwhile revisiting the topic and summarising it with reference to the latest guides etc
# I do not take responsibility for any lost data or damage to your system or device, This is done at your own risk! #
Points of Note
• This solution assume you will extract the epg data on your own device or will have access to an online epg data source.
• This solution has been tested with epgimport only and is not tested in anyway with crossepg.
• Thanks to the guys over on Rytec support forum on openpli site who answered some queries on epgimport processing and handling. They were the key to this being possible.
Prerequisites:
• IPTV channels: These should be imported into your Enigma2 box and in a single bouquet
• epgimport plugin: this is the main engine that does heavy lifting once you have configuration completed, available to download from plugins feed.
• FTP client: a good commonly used one is filezilla but there are loads out there that will do the job.
• XML editor: I personally use PsPad but others recommend Notepad++
• Enigma2 Box IP Address: To find your IP Address go to Menu-> Setup-> Network-> Device Setup-> Lan Setup (WLan option if that is used)-> Adapter settings
- Note that if you have DHCP set to Yes then your IP Address may change periodically, if you want a static IP address then you need to change the settings here.
• Enigma2 Box userID and password: This varies from box to box and image to image so google is your friend here.
• E-Channelizer: You will need some form of editor to update the Stream reference and E-Channelizer is very simple and intuitive to use, it can be downloaded from http://echannelizer.com/. This can also be used to load your IPTV to the Enigma2 box.
Assigning UK epg to your IPTV streams
This is a very easy process but at the moment very manual and will need to be done via E-Channelizer. If you are going to
• Open E-Channelizer and read the data from the STB,
• Open the IPTV bouquet and all channels should appear in the middle column
• Right-click on the stream, and select Edit. Alternatively, double-click it to edit.
• In the Edit Stream dialog, select Service as EPG and picon source (if using picon).
• Then select the DVB service from the available services (grouped by satellites).
• Click OK to save changes and close.
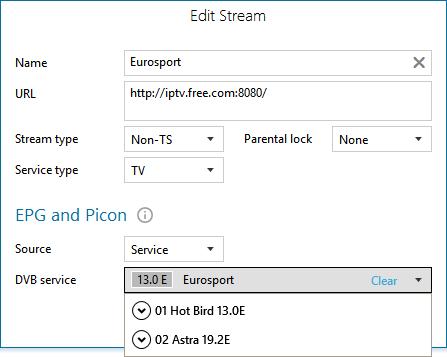
Alternatively, you can drag the DVB service from the Left hand side menu and drop it into the stream while pressing CTRL.
• - The selected service's reference will be assigned to the stream, but starting with 4097 instead of 1.
• - This method is NOT supported by all images, so make sure your image is compatible.
High Level Overview to Assigning non UK epg
Access to the epg data
if you don't have a suitable epg data source available on a server then you will need to extract the data on your box (US epg only possible this way), The following guide shows How to automate extraction of US EPG data on your Enigma2 Device
If you have a server epg available you need to include this in the sources.xml file
Update the stream references to be unique
You need to update all the stream references to be unique, I have created a python file which will do this automatically for you, follow the instructions in How to automatically update your IPTV bouquet with a unique stream reference
If you are assigning UK epg then you need to do that after you have run the above python script otherwise you will lose all your assignments and they will need to be redone.
Create a template custom.channels.xml
This assumes you have already run the streamrefupdate.py file as per above guide, You will need to run another python script which will create a new file called custom.channels.xml in your /etc/epgimport/ folder, the guide on running the script is @ How to automatically create your custom.channels.xml from IPTV bouquet
Map channel ID from epg data source to custom.channels.xml
Download and open the custom.channels.xml file as created earlier and replace the placeholder text with the channel ID from the epg data source on the line matching the channel you want the epg data assigned to.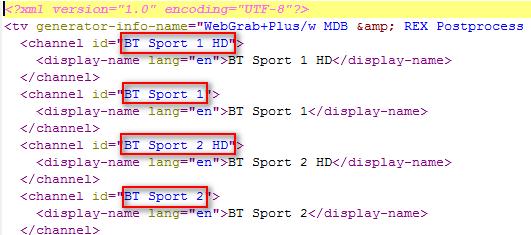
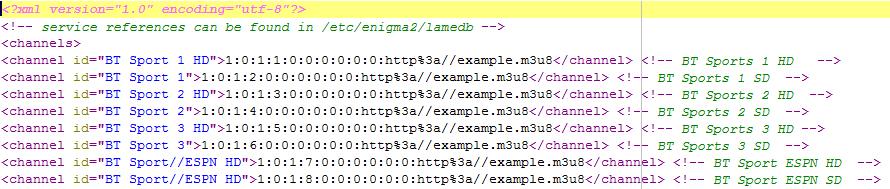
Create custom.sources.xml
This file ties all the others together and is the main reference file for the epgimport plugin, all files mentioned above need to be correctly referenced in this file otherwise the data will not be imported and the epg assigned to the IPTV stream. Note that file names are very case sensitive.
The below is the basic complete custom.sources.xml file copy it ande save into a file called custom.sources.xml
<sources>
<source type="gen_xmltv" channels="/etc/epgimport/custom.channels.xml">
   <description> US TV Guide EPG</description>
   <url>/etc/epgimport/NAME OF EPG DATA FILE</url>
</source>
</sources>
- The source file should point to the file with the channel ID mapping created in previous step
- The description can be anything you want
- The url can be either the local path as per above or a web URL to the epg data source
Transfer the file to your device
Open an FTP connection to your enigma 2 box
Transfer the files you have created above to the box, they must go in /etc/epgimport
Configuring EPGImport Plugin
Open EPGImport on your box and now you should see a new source named as you have in the custom.sources.xml, Select the entry and hit the green button to save.
I recommend that you clear the epg before importing it as this will ensure you get the freshest copy of the data and that if there was any incorrect assignments in the past that they are wiped immediately.
Now you need to run a manual import by hitting the yellow button, this should show a large number of events being imported for each selected option and will take a couple of minutes.
This import should be scheduled for daily update if source files are updated daily.
If the epg doesn’t immediately appear restart your device and rerun the epgimport again as it seems there is some delay in the assigning of epg at times using epgimport.
If you make a mess of your epg while doing this you can easily clear it by setting "Clearing Current EPG before Import" to Yes then running a manual scan with the IPTV source deselected to return to normal service.
Change Log
29/November - Initial version created



