OpenSPA 8

There are 12 replies in this Thread which was already clicked 3,169 times. The last Post () by gggtggg.

  • OpenSpa8.png


    JR OpenSPA Team


    IMPORTANT: UPGRADE TO THIS VERSION ONLY BY CLEAN INSTALLATION, NO BACKUPS. AVAILABLE BY FLASHONLINE AND PENDRIVE.


    - New OE-Alliance Core 5.0
    - Updated python to version 3.8.5
    - Updated Kodi to 19.4 Matrix
    - Added Chromium for HiSilicon receivers.
    - Zerotier update to 1.8.9.
    - Updated rclone to 1.58.1.
    - Added option to not include the items in the EIT (Those numbers that come out in the channel information in M+)
    - Added Wireguard support for Vu+ Solo2 and Mutant HD51.
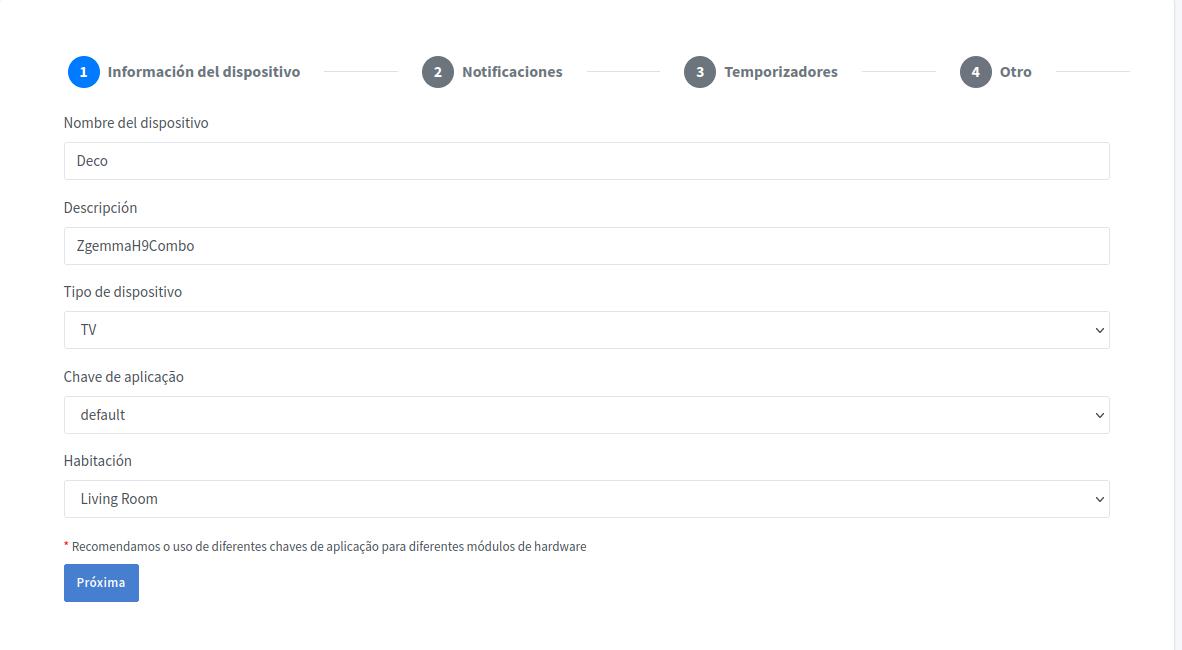
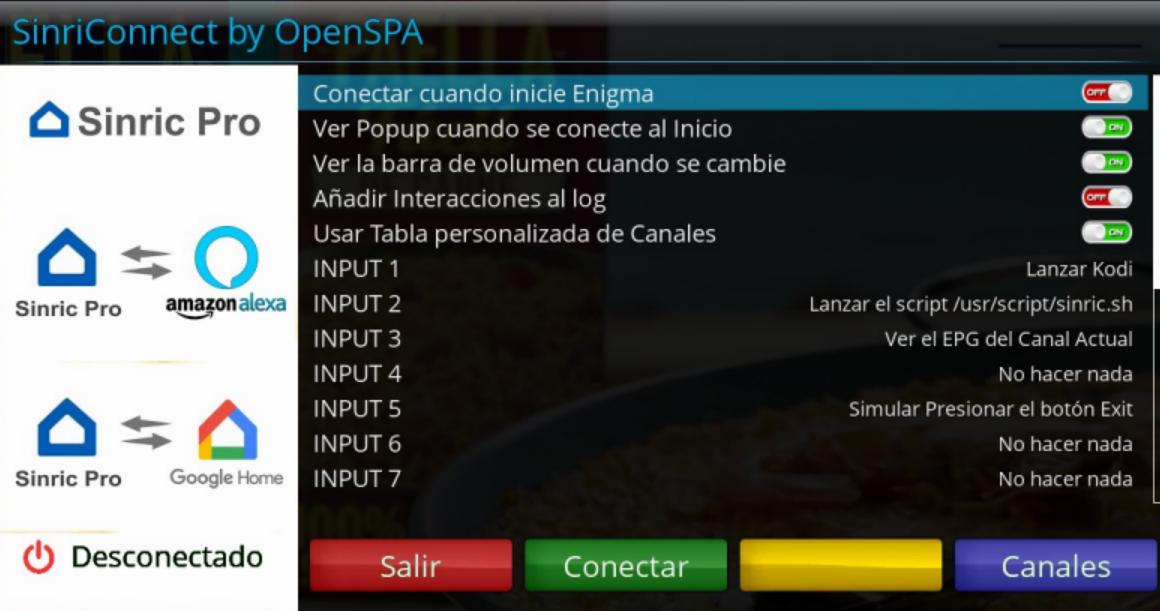
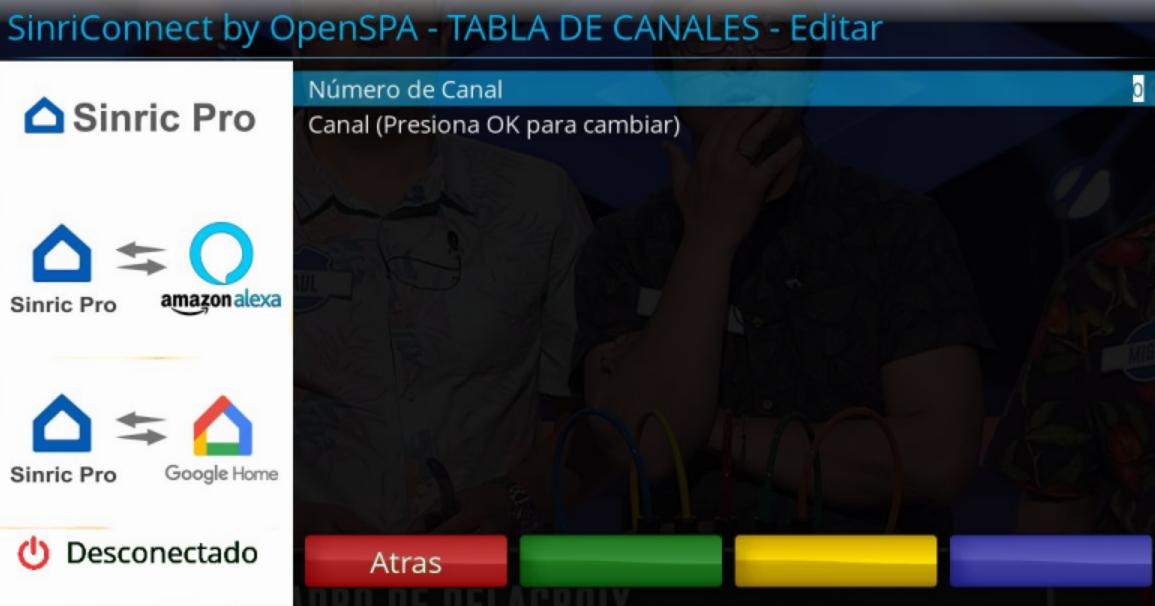
    - New SinriConnect Plugin to control the receiver with Alexa or Google Home
    - New Bootlogo, thanks to pepeman


    - New drivers :

    • AB-Com Pulse 4k and AB-Com Pulse 4k mini :
      • Fixed HDR-SDR auto shift
      • Fixed HDMI-CEC
      • Removed CI support
      • Improved blind search.
    • Qviart Dual:
      • Fixed display at rest profunco.
      • Fixed time on display.
      • Fixed SNR signal (Signal Finder), percentage and db value.
      • Added záping mode interface (mute)
      • Fixed hdmi cec.
      • Fixed sound on Youtube
      • "SPLIT SCREEN" mode in PIP
      • Fixed jump function in playback of recordings. After the jump, it should take 2~3 sec to fix the a/v synchronization.
      • Fixed bug with spzRemoteChannels and remoteChannelConverter.
      • Power button does not work after deep sleep : operation with old and new RCU
      • Update bootoption files
    • Zgemma H7 :
      • Added Microsoft keyboard support.


    - User: root

    - Pass: openspa

  • Hi all, we are glad to introduce SinriConnect plugin by OpenSPA. Through this plugin we can control our receiver with our voice using Amazon Alexa or Google Home assistant. It is based on the Sinric Pro server.


    SINRIC PRO


    This website allows us to create devices that can be controlled by Alexa or Google Home. It has all the integration with Alexa and Google done and has an API to receive the information. In addition, the account is free and allows us to have 3 devices according to the registration page, but I get 5. If we want more devices we must pay $3 a year for each extra device.


    To start, we must go to their page https://sinric.pro and register. In the registry we only have to put our name, email, password, language and time zone.


    Once we login with our email and password, we will find a menu on the left side that allows us to do several things, create scenes with our devices, see our credentials, create rooms, etc. The one we are interested in is Devices.


    Once in Devices, we can find the button “Add Device”.


    imagen1.jpg


    By clicking on the button, the device creation screen will be shown.


    imagen2.jpg


    We must fill :


    - In Device Name, the name by which we will call it in Alexa or Google Home

    - In Description, what we want to know about the device.

    - In type of device, select TV


    The rest of the information can be left as default. By clicking Next, we go to other screens with Notifications, Timings and others that I have left with default values, all disabled. When finished a screen will appear with the codes we need.


    imagen3.jpg


    The codes are not complete, but as you can see, there are two buttons to their right, clicking on the one on the right you can copy the complete code to the clipboard.


    Now we need to go to the receiver and edit the /etc/keys/sinric.keys file, which you can find once the plugin is installed and we will see the following inside:


    APP_KEY=

    APP_SECRET=

    TV_ID=


    We only have to put to the right of each symbol = the code that corresponds to it, the APP_KEY would be the Application Key, the APP_SECRET the application secret and the TV_ID the device ID.


    The ID of each device can also be seen on the Devices page, it appears just below the name of each one and the other two codes on the credentials page.


    SINRICONNECT


    If you have entered the codes correctly, you could now execute the plugin and you will find the configuration page.


    imagen4.jpg


    The first option connects automatically Sinric Pro when enigma2 starts. If you leave this option to OFF, you should enter the plugin to connect manually with the green button. On the lower left side of the screen you can see Disconnected, but it will change to Connected when push the green button and connect to the server.


    When connecting at startup we can get a popup saying that it has been connected if we enable the second option.


    Likewise, we can set whether or not the volume bar comes out when we change the volume through Alexa or Google Home.


    The option to Add Interactions to the log is used for have a log with the information that the Sinric Pro server receives from Alexa or from the receiver.


    The custom channel table is used because there are channels that Sinric Pro does not have and, therefore, does not recognize or interprets them as a number. For example, if we tell it to zap to channel four, it does not interpret it as a channel named four, but as channel number 4, if you have the channel on that number there is no problem, but if it is on another, yes. This list that we will see later is configured with the blue button.


    Finally, there is a list of INPUTS from 1 to 10. Since you can't ask for custom things, only what Sinric Pro has set for TV, we thought of using the INPUTS to do something else that we use and that is configurable. For example, on the screen you will see that I have set INPUT 1 to launch Kodi, so if I tell Alexa to put INPUT 1 on the receiver, Kodi will start for me.


    CHANNELS


    By clicking on the blue button on the main screen we access the configuration of the customized channel table. It is a correspondence between a channel number that we are going to tell Alexa to zap and the channel to zap.


    imagen5.jpg


    As you will see, I have put the M+ #0 channel in number 0 since it is not recognized by Sinric Pro and then I have put the basic DTT channels. It isn’t necessary to be in order. For example, LaLiga channel is recognized, but not LaLiga 1, LaLiga 2, etc. So that, I could add, for example, number 101 for LaLiga 1, number 102 for LaLiga 2 or whatever you want without enter all the previous numbers.


    With the blue button we can edit the selected one, with the yellow one delete it and with the green one add a new one. On the editing or adding screen we have the following:


    In the first option we will set the channel number and in the second one, pressing the ok key, we will access to the favorites list to look for the channel.


    imagen6.jpg


    IMPORTANT: The channels must be in favorites lists, both to ask for it by name and by number.


    Alexa Integration


    To integrate it with Alexa we must open the Alexa app on the smartphone, go to Skill and games and look for the Sinric Pro skill, once selected click Activate. It will ask us to enter the email and password of the Sinric Pro account that we created and then it will start searching for devices. Probably, when finished the app says that it has not found devices, but if we check in devices, we should have it already added.


    Integration with Google Home


    In the case of Google Home, we go to the smartphone app, select Settings at the top and then in the list that appears, at the bottom we select Works with Google. In the list that appears, we look for Sinric Pro and follow the instructions to log in with our Sinric Pro account and it will add the device to the room that we have put in Sinric Pro (later it can be changed in the Google app).


    What can we ask Alexa?


    Assuming that we have named it Deco we can do the following:


    - Alexa, turn on the Deco

    - Alexa, turn off the Deco

    - Alexa, increase the volume on the Deco

    - Alexa, decrease the volume on the Deco

    - Alexa, put the volume at 80 on the Deco (it would be at 80% of the total)

    - Alexa, mute the Deco

    - Alexa, enable the sound on the Deco

    - Alexa, put Movistar Action on the Deco

    - Alexa, put channel 25 on the Deco

    - Alexa, put the next channel on Deco

    - Alexa, put the previous channel on Deco

    - Alexa, put Input 1 on Deco


    In video playback:

    - Alexa, pause the Deco

    - Alexa, play on the Deco

    - Alexa, rewind the video on the Deco

    - Alexa, advance the video on the Deco

    - Alexa, stop the video on

  • wika

    Changed the title of the thread from “OpenSPA 8.0.001 Coming soon!!” to “OpenSPA 8”.
  • I have installed this image for the first time on my octagon sf8008 this morning and I found no way to start the emulator.

    C-lines work OK in Oscam server, but SoftCam.Key is not working.

    Where should I intall it, in /etc/tuxbox/config or in /usr/keys or in /var/keys please?

    octagon sf8008 4K combo

  • I have installed this image for the first time on my octagon sf8008 this morning and I found no way to start the emulator.

    C-lines work OK in Oscam server, but SoftCam.Key is not working.

    Where should I intall it, in /etc/tuxbox/config or in /usr/keys or in /var/keys please?

    In etc/tuxbox/config

  • th's abig problem with this a perfect image the SUPCAM emu didn't open it i install it many version but without result the same problem


    Are you installing from .ipk / tmp or via ftp.
    Have you downloaded the cam from the spa server in advance. Then there may have been a name conflict. In that case, as a suggestion, uninstall all cams and add supcam as the first cam.

  • After many tests & attempts I managed to start emulator & SoftCam Key.

    I was running Oscam_modern r11704 and I switched from value 6 (in "group" option of emulator reader in oscam.server file) to value 1

    and after rebooting the receiver the emulator kicked in and the softcam key started working.

    I tried the same file convertion in 2 more oscam types, oscam r11711 & oscam_patched r11711, but it did not work.

    So now I'm running Oscam_modern r11704 and everything is fine.

    octagon sf8008 4K combo

  • th's abig problem with this a perfect image the SUPCAM emu didn't open it i install it many version but without result the same problem


    Are you installing from .ipk / tmp or via ftp.
    Have you downloaded the cam from the spa server in advance. Then there may have been a name conflict. In that case, as a suggestion, uninstall all cams and add supcam as the first cam.

    I TRIED IT SIR

    OpenSPA has its own cam download. Have you tried that opportunity?
    Regular oscam also works well.

  • master G

    Removed the Label Latest News

OpenSPA Team Images Support Forum ~ based on OE-Alliance

OpenSPA Supported Models ~

Participate now!

Don’t have an account yet? Register yourself now and be a part of our community!