

yes both the s9/s10 boxs can use the channel lists
Posts by phonix
-
-
Great tutorial here its the same for the openbox s9/s10
-
Original file ***box S10
Works correct sound the channels change.
***Box_S10_110731
-
Works correct sound the channels change.
***Box_S9_110731
-
it don't usually take to long for the patched version to come out usually it will have the letter P in the image name to denote a patched image
-
This is the official BM image so there is no hidden 9991 menu we will have to wait till a patched version of this image is made available
-
Imagine_DreamboxToolbox_v.6.0
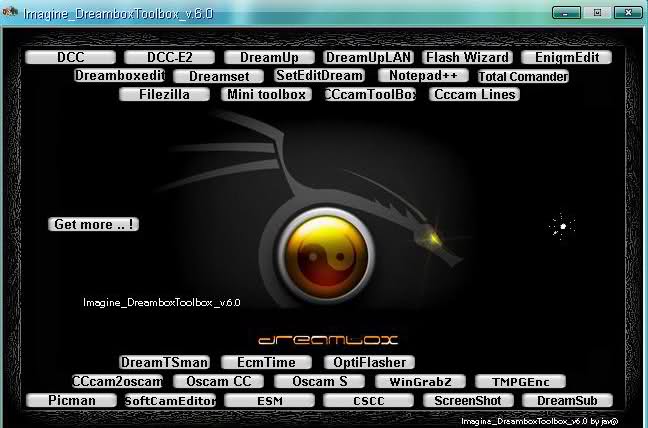
Tools:
==> DCC v2.96
==> DCC-E2 v1.20
==> Dreamup 1.3.3.7
==> DreamUPLAN v1.20
==> FlashWizardPRO 6.3
==> EnigmEdit Ver. 1.3.8
==> DreamBoxEdit IHAD Edition 4.1.0.0
==> Dreamset 2.34
==> SetEditDream 1.09
==> Notepad++ 5.8.7 Multilanguage
==> Total Commander 7.56
==> FileZilla_v3.3.5
==> Mini toolbox
==> CCcamtoolbox Ver 0.12
==> CCcam lines manager v1.2
==> DreamTSman
==> EcmTime
==> Add DreamBox-OptiFlasher-v1.0.2
==> CCcam2Oscam
==> Oscam Config Creator 3.4.0.97
==> Oscam Services
==> WingrabZ
==> TMPGEnc
==> Picman 0.3
==> Softcam Editor
==> ESM
==> CSCC
==> DreamScreenShot V1.0
==> DreamSub################################################## ########## #####
Files:==> Get more .. ! ( download cams , settings , plugins , skins , picons , anything for your box .. ! )
################################################## ########## ###
Utility:
==> Add tooltip descriptions ( How to install .. )
==> Embed Flash Movie with Action script - trailx (drug the object with your mouse and move)
################################################## ########## ##change log:
==> Add new version DreamBox-OptiFlasher-v1.0.2
==> Add new version Oscam Config Creator-3.4.0.97 -
-
BlackHole Vu+ DUO 1.6.4 Full Hdmi-Cec -VolarBlack Backup
includes:
mhw2epgdownloader by sergiotas where we see the HD channel programming, scheduled to be updated every morning.
When installs image for the first time, give the green button twice to load the EPG.Canal Hollywood with picon and HD programming.
Drivers VolarBlack
CCcam 2.1.4
mgcamd 1.35a
Picons by Seti72
Ecm time
Channel List Astra, Hotbird and Hispasat. -
Tested and working on the latest Vix image on the Duo
some screen's
-
Important notice for Vu+ UNO users!
As promised, Vu+ UNO is now on sale from June, 2011.
Vu+ is very thankful for the interest in our new product and we will keep trying to update our products.There was several reports about scanning problem in specific TP and new firmware is released to fix the problem.
We strongly recommend to upgrade your box if you find a problem in scanning channel(s) with your box.There are two ways to upgrade your box.
One is using your USB memory stick and the other is upgrading directly from the internet.Option A) Using USB memory stick.
Download firmware binary from the link below.
p.p1 {margin: 0.0px 0.0px 0.0px 0.0px; font: 11.0px Arial; color: #1800b1} span.s1 {text-decoration: underline ; letter-spacing: 0.0px}http://archive.vuplus.com/download/fpga/vuuno/TS_PRO.dat
Save the download data file into USB memory stick.
Attach USB memory stick to your box and restart. (or restart GUI)
Goto FPGA plugin menu.
Select the data file in USB memory stick and start 'Upgrade'.
Restart your box.Option B) Upgrade directly from the internet
Goto FPG plugin menu.
Download the data file by pressing 'Blue' button.
Select the downloaded data file and start 'Upgrade'.
Restart your box.Please consult the link below for the detailed explanation of upgrade.
How to upgrade Vu+ UNO firmware (FPGA)
Note: this update should only be done with the official image mounted ...
-
-
Glad you got to the root of the problem romman and you are getting the box sorted with the supplier
-
Wind in your attitude a bit romman im only trying to help you
Here are a couple of ways of recovering your box
RECOVERY QBOX MINI HD
If the decoder does not respond and hangs on boot or reboot constantly must be made to restore the system with one of these ways:
Download and install the latest version of the program for Recovery "QBoxHD_Updater" from the websiteFirst way:
1. Connect the receiver to the LAN with a LAN cable normal;
2. Temporarily remove the firewall to protect your PC (Firewall active can cause lack of communication between your PC and QBoxHD MINI);
3. Open the software "QBoxHD Updater";
4. In settings make sure it is set to the ip of the pc (ie 192.168.0.3) and how to set ip QBOX any free ip (eg 192.168.0.40)
(ONLY THE FIRST START, then to change these settings, press the "Program Settings");
5. Save the settings, press the "Show Console";
6. Press the "Recovery";
7. Turn on the receiver while holding down the front of the Q-Box HD MINI;
8. When prompted, select the *. QHU (Al 01/12/10: "qboxhd_boot_update_2010_05_10.QHU" with Q-Box HD, "qboxhd_mini_boot_10_06_2010.QHU" with Q-Box Mini HD);
NB: The files will find them in the folder from where it started the setup or can be downloaded from the site.
9. In about 10 seconds recovery should begin;
10. Once the recovery to proceed with updating the file system via USB.Second way:
1. Connect the decoder to the PC directly to a normal LAN cable;
2. Set the PC a static IP (eg 192.168.0.3);
3. Temporarily remove the firewall to protect your PC (Firewall active can cause lack of communication between your PC and QBoxHD);
4. Open the software "QBoxHD Updater";
5. In settings set the ip of the pc (ie 192.168.0.3) and as a decoder ip any ip (eg 192.168.0.40)
(ONLY THE FIRST START, then to change these settings, press the "Program Settings");
6. Save the settings, press the "Show Console";
7. Press the "Recovery";
8. Turn on the receiver while holding down the front of the Q-Box HD MINI;
9. When prompted, select the *. QHU (Al 01/12/10: "qboxhd_boot_update_2010_05_10.QHU" with Q-Box HD, "qboxhd_mini_boot_10_06_2010.QHU" with Q-Box Mini HD);
NB: The files will find them in the folder from where it started the setup or can be downloaded from the site
10. In about 10 seconds recovery should begin;
11. Once the recovery to proceed with updating the file system via USB.Mil gracias a bambabo
-
Try re-flashing the latest bootloader again
How to Flash a new Bootloader
1. Download both the QBox HD Updater software and the latest bootloader file
2. Use this software to flash the bootloader to the Mini, it's all done over your local network (rather than a USB or serial update for example) so you'll need to enter the IP address, username and password of your QBox Mini, select the IP address of your local PC that you run the updater software on (or just use the automatic one) then click on recovery tool which will pop up a box telling you to turn your receiver on at the mains
3. Do this now but make sure you hold in the standby button at the same time (important on a Mini) and if all the settings were correct after a few seconds the Mini should be seen and then a box will pop up where you can select the bootloader file you downloaded before, select that and then let it do the rest.... After a few mins or so the process should finish and tell you it's complete
-
Egami image is a very good image i would try them all out and and find which image serves you the best
forget the blackhole image as there has been no support since release of there one and only image
-
You cant go wrong trying out the latest Vix image make sure you do a online update via the blue button/software management
-
oscam is the best cam to use as rader gives higher ecm times Mgcamd i still under development for the qbox mini and CCcam is not supported at all by the Qbox
-
Try asking a question on the home of Vix image as a few of the beta team have Uno,s and may be able to help
a Vix Uno image should be out soon
-
