


To configure your Dm800 to boot from a USB stick, all that is required:
A USB stick that is supported by your DB.
A telnet connection to access your DB.
The image.nfi you want to install.
Nfidump to extract your desired image & kernel.
If you don't have a Linux PC available, setting up the USB stick on your DB will probably be easier than attempting to do it on a M$ or Apple PC. Unfortunately, during the process of writing this guide, I noticed that my DM800 OpenPLi image has no ability to create a vfat (Windows) filesystem. As this is required to boot from USB, a PC that is able to create a vfat filesystem may also be required.
This basic procedure will most likely also work on other similar models, such as the 800se, 7020hd, 8000, etc... If anyone verifies it works, or not, please edit this wiki entry or let hemispherical1 know.
Note: This form of manual USB booting sounds quite similar to what the DUMbBOot loader is supposed to do. Personally, I was never able to get DUMBO to work on my box. Unlike DUMBO though, this method allows you to install multiple images on the same USB stick, although requiring one to enter the BIOS to select different images to boot. More info on multiple image setup in the Final Thoughts section.
USB Partitioning
Plug your USB stick into your DB, then telnet/ssh into the box. I think many image will automatically mount the USB when you plug it in, but it needs to be unmounted for preparation. Verify what device the USB stick is. If you have no hard drive installed, it's probably /dev/sda, if there is a hard drive, it's probably /dev/sdb, etc...
Use the "df" command to see if it is mounted, & if so, use the umount command to unmount, something like:
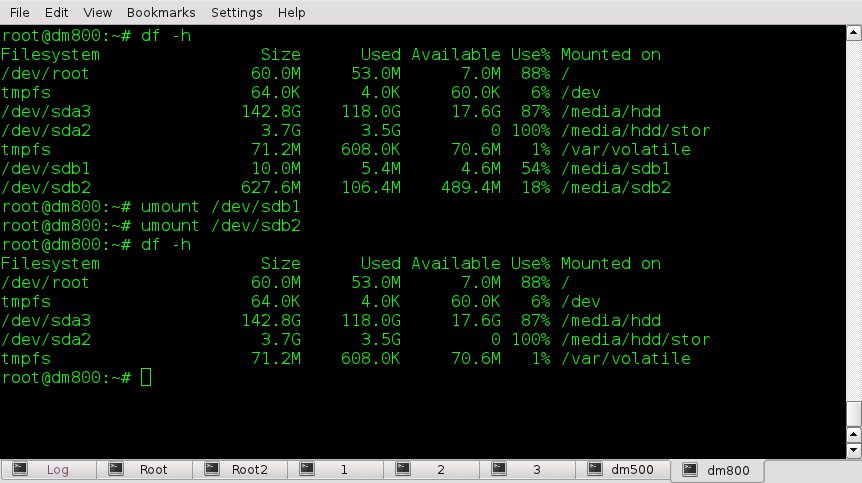
... or something similar, depending on your setup...
Note: I downloaded & installed fdisk through OpenPLi's package management (opkg), by default OpenPLi uses sfdisk which I don't like. Feel free to use whatever method you prefer to partition & configure your USB stick.
Caution, all data on the USB will be lost! In telnet:
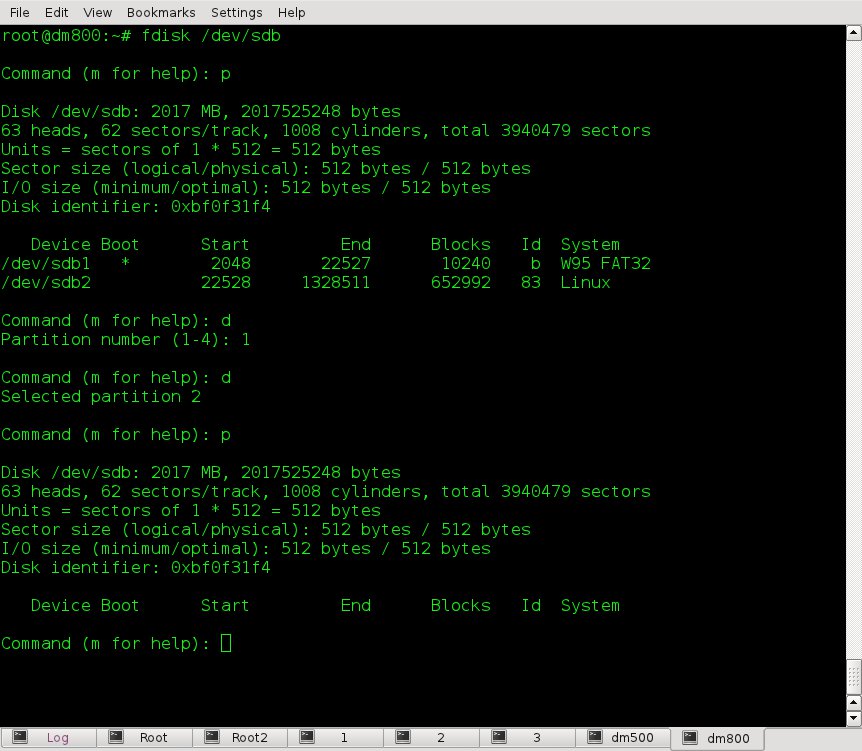
A. fdisk /dev/sdb <enter> (or whatever device your USB actually is)
B. p <enter> (print the current partition table)
C. d <enter> (delete any existing partitions, answer the on screen questions)
D. p <enter> (verify all existing partitions were removed)

Note: The average vmlinux.gz (kernel) file size is less than 2MB. A 10MB partition for the kernels & 200MB or more for the actual image should be fine. If you want your image to have gigabytes of space, make it's partition larger. If you want to install multiple images on the stick, create 3 or 4 primary partitions, but all images can use the same small vfat partition for the 1-3 kernels.
E. n <enter> (add a partition)
F. p <enter> (create 2-4 primary partitions, follow on screen directions)
Use the default starting point and the command +10M to create the small kernel partition & follow the on screen instructions to create the large image partition/s. i.e. +200M for 200MB partition, +1G for a 1 GB partition, etc...
G. p <enter> (verify the partition layout is acceptable)
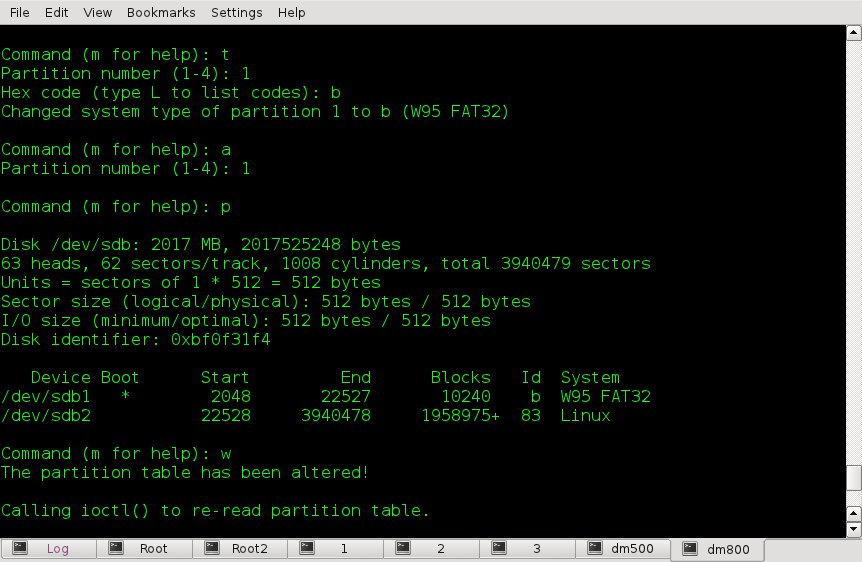
H. t <enter> (change partition type menu)
I. 1 <enter> (select small kernel partition, 1 in this case)
J. b <enter> (selects windows vfat partition type)
K. a <enter> (toggle bootable flag menu)
L. 1 <enter> (set bootable flag on for the kernel/vfat partition)
M. p <enter> (verify the changes made)
N. w <enter> (save all changes made to the USB partition layout)
Note: fdisk may give a warning about having created a DOS partition, it may be ignored for our purposes.
USB Formatting
Now that the USB stick is partitioned and set up for use, it's time to format it (create the filesystems). Again, in telnet:
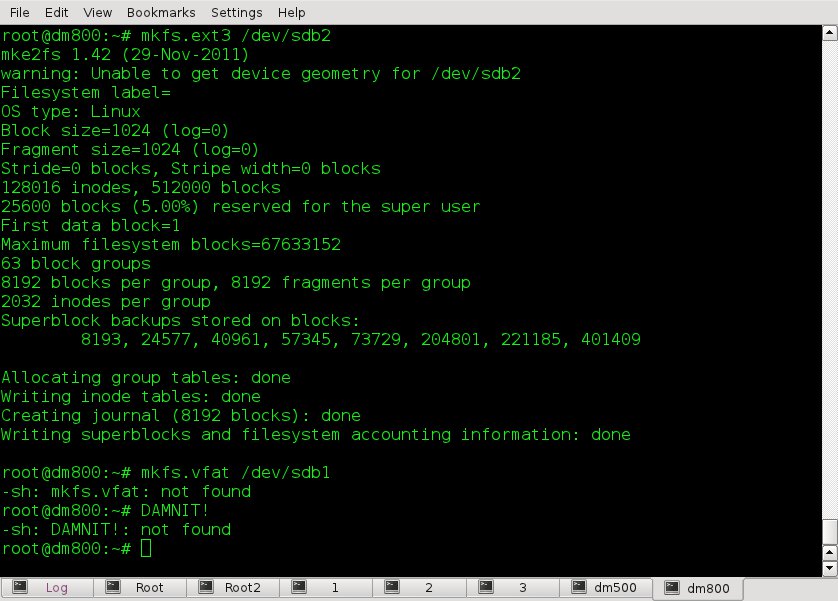
A. mkfs.ext3 /dev/sdb2 <enter> (create the ext3 filesystem for the image partition)
B. mkfs.vfat /dev/sdb1 <enter> (create the vfat filesystem for the kernel partition)
At this point I noticed my OpenPLi image has no function for creating vfat/DOS file systems! I guess that is understandable, after all the DB does use a bare bone OS, it can't contain everything. I can't even find a downloadable package to add support... Looks like the usb stick will need to be transferred to a Linux or Windows PC to format the first (kernel) partition.
On a Linux PC, simply plug the USB stick in & figure out what device it is. MAKE SURE you have the correct device or you'll wipe out something you didn't intend, like your hard drive. On the terminal:
mkfs.vfat /dev/sd?1 <enter> (where ? Is the proper device)
WinXP Detour
Plug your USB stick into your XP PC (I assume Win7/8 procedure would be similar). Open up my computer and double click on the USB stick, the following prompt should appear
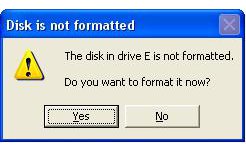
Select "Yes"...
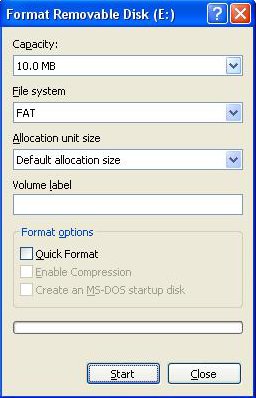
Verify that Windows is only formatting the small ?kernel? partition, not the entire stick, i.e. 10MB above, click "Start".
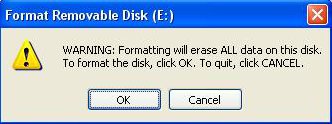
Select "OK" to format the partition.
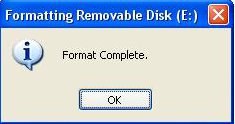
Congratulations, the M$ crap is over (sorry again) and you're USB stick is ready to receive your desired image.
USB Population
Locate & install gutemine's nfidump. OpenPLi includes it in it's download (opkg) feeds.
Copy the image.nfi you've chosen to boot from USB to your DB, I recommend to your DB's hard drive or /tmp. In this example we're using openpli-enigma2-2.1-dm800.nfi & copying it to the DB's /tmp/.
In telnet:
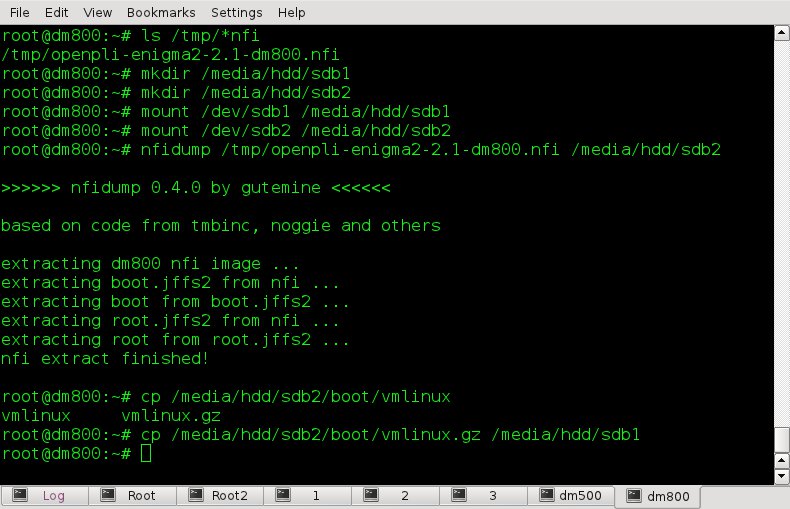
Create the mount points, in this example we'll use /media/hdd/sdb1 & media/hdd/sdb2:
A. mkdir /media/hdd/sdb1 <enter>
B. mkdir /media/hdd/sdb2 <enter>
Mount your USB sticks partitions to these newly created mount points.
C. mount /dev/sdb1 /media/hdd/sdb1 <enter>
D. mount /dev/sdb2 /media/hdd/sdb2 <enter>
Now extract your desired image to /media/hdd/sdb2 using nfidump.
E. nfidump /tmp/openpli-enigma2-2.1-dm800.nfi /media/hdd/sdb2 <enter>
Your image is now installed to the correct partition on your USB stick. Next we copy the kernel from the newly installed image to the smaller kernel partition on your USB stick, /media/hdd/sdb1.
F. cp /media/hdd/sdb2/boot/vmlinux.gz /media/hdd/sdb1 <enter>
The next step will be to create the autoexec.bat file on the kernel partition (sdb1), containing the information necessary for the DB to know how to boot, such as the kernel name, filesystem location, etc.
Personally I use the vi editor, but I'm not about to start trying to explain it's use here. Use whatever editor you're comfortable with, but remember:
If you create the file in a Windows editor, I'd suggest running dos2unix on it after copying it back to the USB stick.
dos2unix /media/hdd/sdb1/autoexec.bat <enter>
The contents of the autoexec.bat file will look something like:
/usb/vmlinux.gz console=null rootdelay=10 root=/dev/sdb2 rootfstype=ext3 rw
... all on one line. A brief overview:
/usb/vmlinux.gz (kernel name & location)
console=null (leaves the serial port open to add card readers, etc.)
rootdelay=10 (gives extra time for the USB stick to respond)
root=/dev/sdb2 (the root filesystem's partition)
rootfstype=ext3 (the root filesystem type)
rw (mount the filesystem with read/write permissions)
The previous descriptions aren't required knowledge, but I figured anyone that made it this far might actually find the information interesting. Feel free to disregard...
We're in the home stretch now. All that is left is to configure the DB to boot from USB by default, rather than it's flash.
Configure The Dm800
Put your DB into "stop mode", as if you were flashing it through the web interface, i.e. power it up while depressing the standby/power button until the OLED reads "stop". Telnet to your DB and you will be dumped into the box's BIOS. Use your keyboard arrow buttons to navigate to the 4th tab, "boot", and again down to the Primary Boot Source.
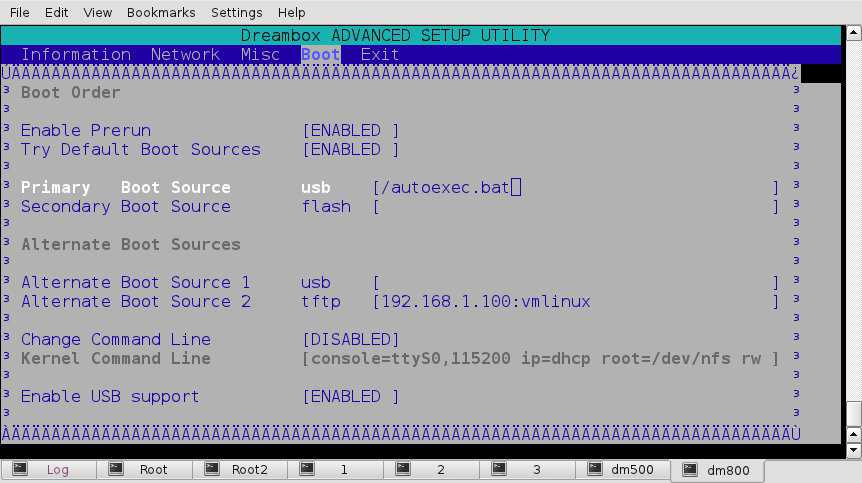
Use your page up & down keys to change it from flash to usb, then enter /autoexec.bat into the field to the right. Change the Secondary Boot Source to flash. Navigate to the "Exit" tab again using your arroe keys.
Note: To change tabs you need to be in a field that the arrow keys work from, try Default Boot Sources, Enable Prerun, Change Command Line, etc...
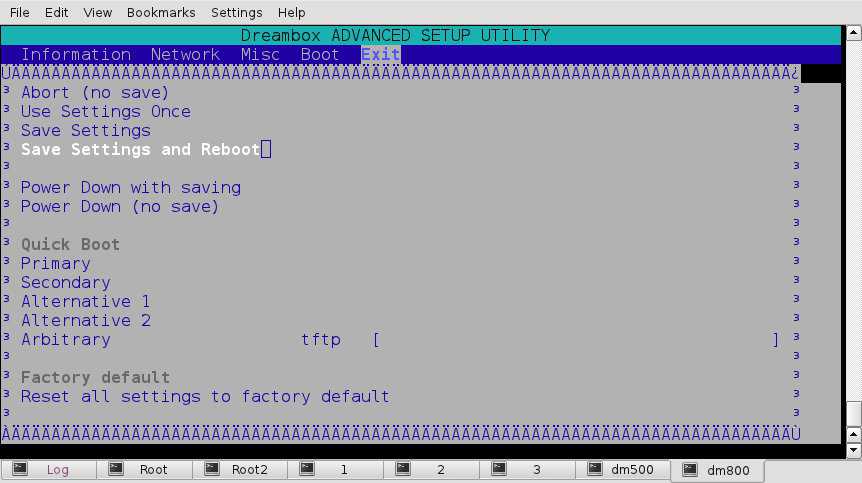
Use the arrow keys to navigate to "Save Settings and Reboot" & press enter. If your USB stick is plugged in it should boot up, if not, your DB should boot the image in flash. Booting from USB is a bit slower than from flash, so don't panic if it takes a couple minutes to boot. You can also watch the OLED on bootup and it will tell you what it is booting from.
Congratulations, you now have your DB running directly off of your USB stick!!!
Even if you don't use it often, it could be handy to keep a USB stick configured & ready to use as a Rescue Disk. This would also come in handy in the rare case that your flash chip dies.
Final Thoughts
Unlike some other "multi-boot" methods, this method does not mix kernels, drivers, & binaries from different images. Each running image is completely independent from any other image that may also be installed. This eliminates strange problems that can occur occasionally.
In the past I've run into trouble trying to use an image extracted from a backup for use with Network Boot, which is similar to USB boot. Although slightly more complicated (setting up DHCP, NFS, & TFTPD servers) than USB booting, the basic DB configuration is similar between the 2 methods. Extracting an actual released image may work better than trying to extract from a backup. Your mileage may vary...
As I mentioned earlier, it is possible to install multiple images on the USB stick. Each image requires it's own partition. I don't know if the DB will boot from an extended partition, I have no need to try it. Feel free to test for yourself if you need more than 3 images on a stick (primary partitions are limited to 4).
For multiple images, each image's kernel must have a unique name, so they can all coexist in the kernel partition. Something like vmlinux_pli.gz, vmlinux_sif.gz, etc. Each image & kernel also needs a uniquely named autoexec.bat file, something like autoexec_pli.bat, autoexec_sif.bat, etc... Each autoexec.bat file must also be edited, pointing at it's correctly named kernel & the partition that holds it's root filesystem, i.e. /usb/vmlinux_pli.gz, etc. & root=/dev/sdb2, root=/dev/sdb3, etc...
To choose which image to boot you'd have to go into the DB's BIOS and edit the Primary Boot Source to point at it's specific autoexec.bat file, save changes & reboot as we did above. You may also experiment with other configurations & Boot Sources in the BIOS.
Source:
