

To get picons working on coolman tv guide press menu while the guide is open. Manually change the picon path to where you store your picons.
Posts by master G
-
-
When you install the multiquick plugin it automatically assigns single red press to cool epg.
-
Default web info port is 16001, is this just a mistype above?
-
Hi pirate,
Which image do you use, i cant say i've heard of reakx-lsd sparkly lol. -
Installing Webmin in Ubuntu is not slightly different to debian win thanks to Webmin’s reliance on a deprecated PERL package (an MD5 wrapper to be exact) that Ubuntu and the like just don’t want to include any more, but never fear, following these steps one by one will have you up and running in absolutely no time!
Before installing webmin we must first Install the dependencies, login to your server as root and issue the following command.
Codesudo aptitude -y install perl libnet-ssleay-perl openssl libauthen-pam-perl libpam-runtime libio-pty-perl libmd5-perl apt-show-versions libapt-pkg-perl
While most of the packages above will all successfully install, you may get an error message that reads something like this:Couldn’t find any package whose name or description matched “libmd5-perl”
The next step is then obviously to manually grab it and install it.
Run the following:
Codewget http://ftp.acc.umu.se/mirror/cdimage/snapshot/Debian/pool/main/libm/libmd5-perl/libmd5-perl_2.03-1_all.deb
followed byAll right, all set. Go to webmin’s home page and download the latest Debian package version which at time of writing is webmin_1.550_all.deb
FTP this file to your server to /home directory
Go to folder /home where you sent the webmin file
now type the following ( if version has changed adjust accordingly )
All done. You should now be able to run the webmin web manager from another PC by hitting
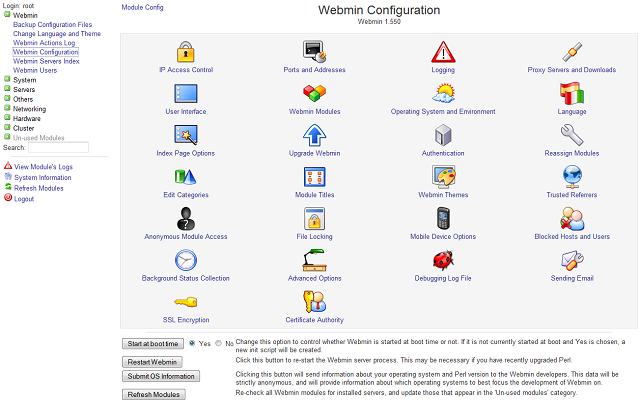
Login as root to start using the benefits of webmin to manage your server.
Have Fun !!!
-
-
-
-
-
Found this on another forum and wondered if anybody here has any experience of them.
Prices seem to start from around £80 looking on fleabay.

-
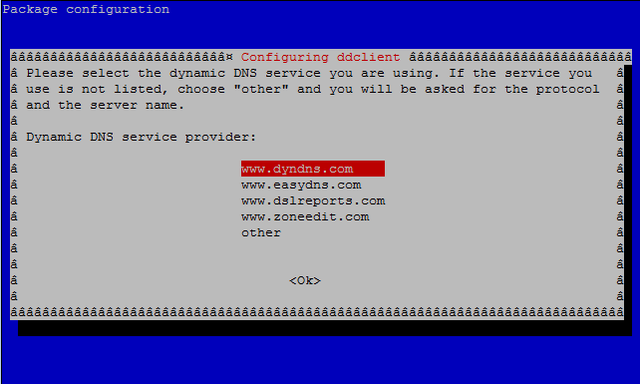
Here is a quick how to install dns updater on ubuntu server.
First login as root and issue the following command.
The package will install and then prompt you to select the service you use.
You will then be prompted to enter the account username you have with the updater service.
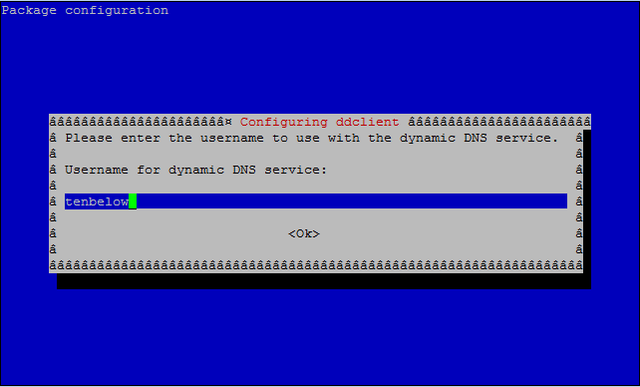
Then enter the password used with the account.

At the next screen choose from list, if you entered user & password correctly you will see your hostname after this.

Select your dns address then ok to continue.

That's it the default installed settings are good to go, but should you need to change anything login to your server as root and issue this command.
You will see simillar to the screens above but with extra options.
Have Fun.
-
lastest software for Openbox S10 America
-
Linux Commands – Top 20 Most Used
Files and Directories Management
ls – Lists files and directories content, I usually use “ls -la” to have a long listing with all the details and hidden files
cd – move from the current directory to a different folder
pwd – lists your current location
mv – this command can either change the name of a file, or move it to a different location.
locate – find any file on the Linux server, to get an updated index of files (if for example you just installed a whole bunch of RPM’s) run the command updatedb
ln – create a shortcut to a file or folder
tar – create or extract files out of a storage file. with the correct arguments it will also compress the filesEditing and Viewing
tail – lists the last 10 lines of a file, but you tell tell it to show any number of last lines
vi – the best command line editing software :) a little hard to learn how to work this one at first, buts its worth the effort
cat – list the content of the file. better know how long is the file you are running this command on, or you will get a very long scrolling of lines that will fill up your screenNetwork
nslookup – very important networking tool – this will show you where a DNS name is pointing – to which IP or to another DNS
wget – get a file from the web from the command line – if you need to download some RPM directly to the command line without a browser, this is the command you need
ping – I think its one of the most used commands, you can check the time it takes you to get via the network to a remote server, whether that server is available, how many packets are getting to the server, etcGeneral
history – lists the last used commands on your Linux server
make – when compiling a software from source, this command will create the binaries
id – who am I right now? besides the philosophical angle, this command will show you as which user you will be running commands, I use this to check what is my status, and then sudo to the user I need
sudo – execute a command as another user – although usually use it to change to root
ps – list the running processes on the server, it give more info like the process id, the parent process id, running time and much more
man – displays a manual page, whenever you are not sure about a specific command or config file, you should run “man command” to get info about it. to search the man database use “whatis command” to find which man file has the info you need
df – report file system disk space usage, use “df -h” to get a human formatted listing -
Cs Studio is the best for info & managing your server.
How To Add Lines To Debian Server
Or if you just want to istall cccam info on the server the guide is here.
Quick & Easy - CCcam.info php up & running in 5 minutes on linux
-
This was written for a tm9100 but is relevant for all linux stb,s & pc's.
Thanks to sonoftechno for the info.There are a few different ways to start a Telnet session, here are two of the more common ones.
Click START > RUN and type Telnet ip.address.of.TM9100 - A command window will appear, enter username root and current password (remember could be blank on some tm9100 images)
Download Puttytel.exe ( Bottom of page)
1. start putty
2. input the ip of the box
3. login: root and current password (remember could be blank on some tm9100 images)Basic Navigation
cd
When typed by itself, cd (”change directory”), will take you back to your $HOME directory
cd /path/to/directory
To change to a specific directory, type cd followed by the path to the directory. If it is a subdirectory of the current directory, you can just type the directory name.
cd ..
Typing cd .. moves you up one directory from your current location.
pwd
To see which directory you are in, type pwd (”print (display) working directory”).
exit
Just as it sounds, use exit to log out. Alternatively, you can type logout.
Creating and Deleting Directoriesmkdir directoryname
To create a new directory, type mkdir (”make directory”) and specify the new directory’s name.
rmdir directoryname
To delete an empty directory, type rmdir (”remove directory”) and the directory’s name.Listing Files
ls
To display a list of files and subdirectories in your current directory, type ls (”list”)
ls -a
To see a more complete list which includes hidden files or files that begin with a “.” (dot), type ls -a.
ls -la
To list all files and directories in long format which will provide details about each file and directory, type ls -la.
ls -lS
To list all directories and files, sorted by size, in long format, type ls -lS.
ls -lta
To list all files and directories in long format by time modified, type ls -lta.Copying Files
cp oldfilename newfilename
Will copy the contents of one file to another file, resulting in two copies of the same file on your account.
cp directory/* destinationdirectory
Will copy the contents of one directory to another directory. Make sure you have created the destination directory before trying to copy files to it - see mkdir above. Results in two copies of the files on your account; one copy in the existing directory and another in the destination directory.Searching FIles and Directories
find -name ‘n*’
The find command can be used to locate files or a group of files. It can also be used to display directories. The example given will find all file and directory names within the current directory and subdirectories of it that begin with the letter n. (You can also explore using the locate command - type info locate and/or man locate for usage information.)
grep -inw text filename
Can be used to locate text in a specific file or directory of files (use * in place of filename to search all of the files in the current directory). The -i argument indicates the search is to disregard cASe, the -n instructs to show the corresponding line number, and -w tells it to match only based on the whole word. (This doesn’t even begin to touch on the power of grep and its many uses. In addition to its searching capability, the grep command can be used in combination with other commands to act as a filter. It also allows the use of “wildcards”. Two other variations of grep are also available, egrep and fgrep. To begin your quest for more information, type man grep and/or info grep.)Displaying / Comparing File Content
wc filename
Counts and displays the number of lines, number of words, and number of characters of the given file.
cat filename
Displays the entire contents of a file.
nl filename
Shows the content of the file, including line numbers (nl=number lines).
more filename
Displays the contents of a file one screen at a time. Press the SPACEBAR to display the next screen of text.
cmp filename1 filename2
Compares the contents of the two named files and reports the first different character found and the line number.
diff filename1 filename2
Compares the contents of the two named files and reports all of the differences found. (Can also be used for comparing the contents of two directories.)
Moving, Renaming, and Deleting Filesmv oldfilename newfilename
Can be used to rename a file (mv fileA fileB), move a file (mv fileA /dirA/), or both (mv fileA /dirB/fileB).
rm -i filename
Removes (deletes) the specified file. (The -i is not necessary, but is recommended as it will prompt you to confirm the action first. When prompted, type y to confirm or type n if you changed your mind.)Changing Permissions
chmod permissions filename
Changes the permissions on a filename or directory as specified. For example, chmod 755 startup.sh.Archives and Compression
tar -cfv filename.tar directoryname
To archive a directory and all of its contents including subdirectories, navigate to where the directory is located and type the above command, replacing filename.tar with the name you wish to give the archive file and directoryname with the name of the directory you wish to archive. Alternatively, you can archive a select group of individual files (or directories) by specifying each file name in place of directoryname separated by spaces, like tar -cvf filename.tar fileA fileB fileC. Note: When creating a tar file (aka “tarball”) be sure to specify the name you wish to give the tar file! (TAR indicates Tape ARchive, as it was originally a tape archiving program. The -c means “create”, v means “verbose” (which basically says tell me what you’re doing), and the f indicates that a filename will follow (filename.tar)).
tar -tvf filename.tar
Typing this command will result in a list of the contents of the tar file. This is generally a good thing to do before unpacking the tar file to be sure there are no matching filenames which will result in files being unintentionally overwritten.
tar -xvf filename.tar
You can see the similarities to the command used to tar the file. This time, though, you use -x to “extract” instead of the -c used to create. You can also extract only certain select files (or directories) by specifying the individual names, separated by spaces, after the tar filename, such as tar -xvf filename.tar fileA fileC
gzip filename.tar
This utility, gzip (gnu zip), is used for compression. Normally, when you wish to compress a set of files, you willtar them first then compress them using this command. In doing so, the filename will automatically change from filename.tar to filename.tar.gz (appending .gz to the file extension).
gunzip filename.tar.gz
This command (g”unzip”) is used to uncompress a .tar.gz file, which will also result in the filename being changed back to filename.tar. Once it has been uncompressed, you can then untar it using the tar command above. (Alternatively, you can use gzip -d (for “decompress”) in place of gunzip.)
tar -czvf filename.tgz directoryname
This command, which uses a z switch (”zip”), allows you to take a bit of a shortcut instead of using the tar and gzip commands separately. The example will result in a compressed archive named filename.tgz.
tar -xzvf filename.tgz
This command is used to uncompress and extract the files from a .tgz archive. -
This guide was written for a tm9100 but is relevant for all stbs used in sharing.
Thanks to sonoftechno for the info.Subnet mask:
Each bit that is on(1) in the subnet mask has to be on(1) in the IP of any device that wishes to join that subnet and each bit that is off(0) can be on(1) or off(0) in the joining device. This means that 255.255.255.0 says that the first three digits of any device that wishes to join the subnet has to match EXACTLY. The last digit can be any number between 1-254. In normal home operation 255.255.255.0 is 'normal'.Default Gateway:
The default gateway is a device that has an IP on the local subnet and also has access to another subnet(network) e.g. the internet. The local IP has to follow the rules for all devices, based on the subnet mask, to be part of the local network. This entry is required to gain access to the internet (typically), but is not important if you only want to have connectivity between your PC and your TM9100, which should both be on the local subnet.DNS:
DNS is a protocol used to resolve hostnames to IP addresses. To reach a computer you need to find its IP address and this is done by DNS. For example when you enter www.EXAMPLE.co.uk the name has to be translated to an IP (69.46.27.83) and this is done by DNS which is made up of very many DNS servers that have the lookup tables for all site names to IP addresses for all sites in the world. If you access a site by using the IP address then DNS is not used and not required.DHCP:
DHCP is a mechanism used to allocate IP addresses to devices in a subnet. When a device is started it asks the DHCP server for an IP address. The DHCP server issues the IP address with a 'lease time' (time that device owns that IP). This means that devices n a network that use DHCP can be issued with a different IP each time they are started or the lease expires. This is not a good situation for the connection between the PC and the TM9100 as changing IP addresses make it difficult to connect DCC.TCC/STBManager. That is why it is recommended that the network be set up with STATIC IPs (not using DHCP). Before the previous gets attacked - this is not an absolute requirement, but it will make life for newbies much easier.Static IP
A static IP is an IP that is assigned to a device and remains the same regardless of whether the device is restarted or not. This is the prefered way to set up your TM9100 as it ensures that it always has the same IP and therefore it is much easier to connect to it. If you leave the DHCP box ticked in SETUP/EXPERT/COMMUNICATIONS SETUP, then the IP could (and most likely will) keep changing. When you untick the DHCP box you will be allowed to enter a static IP in the "IP" box.
SO, to get your PC connected to your TM9100 you only need to set the subnet mask and IP adresses correctly and turn off DHCP(at least on the TM9100). If you also wish to access the internet, you have to set the default gateway correcly and if you wish to use domain names(site names) to access the internet you have to set up your DNS correctly.NOTE
I did not discuss home networks that do not have a router to connect to the internet as I don't believe that to be a good solution and do not recommend it at all. Furthermore you have to have internet access to get full value out of your Linux STB, so connection with crossover cables are also not discussed.The following would be a typical setup:
ROUTER: DHCP Server = no
IP = 192.168.1.254
subnet=255.255.255.0PC:
DHCP = no
IP = 192.168.1.1
subnet=255.255.255.0
DNS= (as provided by your ISP)
default gateway=192.168.1.254TM9100: DHCP=no
IP=192.168.1.100 (use a larger number in case there are DHCP devices on the subnet)
subnet=255.255.255.0
DNS= (same as for PC)
default gateway=192.168.1.254 -
Here is what i needed to get it when using pli enigma1 image.
SHOW TIMING : yes
MINI OSD : yes
ZAP OSD TIME : 3 ( your choice )
DEBUG : yes -
Glad its working pal, thread closed..
-
I recommend you use enigma2 channel lists from here, saves loads of time scanning other sats.
-
Hold the blue button for a few seconds to bring up the extensions menu and coolman tv guide will be there.


