Posts by master G

    ~ ~ ciefpsettings E1 ~ ~
    - - - 11.03.2011 - - -


    === Turksat 2A / Turksat 3A (42?E) ===
    - Balkan RTV


    === Hellas Sat 2 (39?E) ===
    << Bulsatcom >>
    - Utilisima


    === Astra 3B, 23.5?E ===
    << Satellite BG >>
    - Utilisima


    === Astra 1H / Astra 1KR / Astra 1L / Astra 1M (19.2?E) ===
    << Digital+ >>
    - Real Madrid TV
    - Animax
    - Decasa TV
    - Cinemagic
    - C Estrelas
    - Nick JR


    === Eurobird 16A / Eutelsat Sesat / Eutelsat W2M (16?E) ===
    - Utilisima


    === Hotbird 6 / Hotbird 8 / Hotbird 9 (13?E) ===
    << Sky Italia >>
    - Cinema Comedy
    - Cinema Passion
    - Primafila 20


    ~ ~ ciefpsettings ~ ~


    ciefp E1 FAV 53E-30W 11.03.2011.rar

    Swapfile gives your receiver more external ram.
    When your internal ram is over worked the swapfile kicks in, so it optimises and gives stability.
    Its not really needed unless you are intending to use alot of plugins or have 100`s of peers.

    L53 Openbox S9 Multi-Satellite Channel List v3.80 [10 March 2011]


    This channel list is best used with either the latest official Firmware, or with the latest L53_MOD_Dump file.


    General Info:
    This is a multi-satellite channel list covering satellites from 30west to 45east.
    It can also be used as a single satellite channel list, just click on the Zoom or SatList button and select the satellite you wish access from the satellite list.


    Default Settings:
    Channel list format: .dbs
    Default Motor Setting: DisEqC 1.2.
    Default LNB Setting: Universal [9750 - 10600]
    Radio Channels: 0
    Favorite Channels: 0


    If used in an external channel editor, change extension from .dbs to .abs
    once you have edited the channel list, change the extension back to .dbs
    ---------------------------------------------------------------------------


    What's New:
    ALL satellites 30w to 45e updated.


    I have also decided to included the replace.list and constant.list in all future releases, only for those that may require them.
    Of course if you already have them installed, then simply ignore them.
    ---------------------------------------------------------------------------


    Please Note:
    To avoid any possable conflicts, it is always wise to delete all channels from your receiver, before installing a new list. if you do not then you could possably encounter problems.

    To remove all channels click Menu -> Edit Channel -> Delete All


    To install this channel list, simply transfer the unzipped channel list to a USB Stick, and then insert the USB Stick into the USB port, which is located on the rear of the receiver, then follow the instructions below.


    Click Menu -> Tools -> Upgrade By USB, then in 'Upgrade Mode' select 'Misc Files'
    then click on 'Select & Upgrade' and select OPTION 1 [TP_PROG] now click the OK button,
    when you see a check mark or tick next to the TP_PROG, click the yellow button to install.


    Once the file have been installed, reboot the receiver, once rebooted you can then click the Zoom or SatList button, and directly select any satellite from within the satellite data base list.


    L53_S9_multi_channel_list_v3.80.zip


    For those of you who for one reason or another, are experiancing difficulties adding clines, I have put together this basic tutorial showing how to add clines.


    First download the attached test cccam.cfg file at the bottom of this page.
    Once unzipped open the file and overwrite the test clines with your own active clines, then save the changes.


    Now add the cccam.cfg file to a USB Stick, do not zip the file, add it as is.
    Then place the USB Stick that contains the cccam.cfg file, into the USB connector at the rear of the receiver.


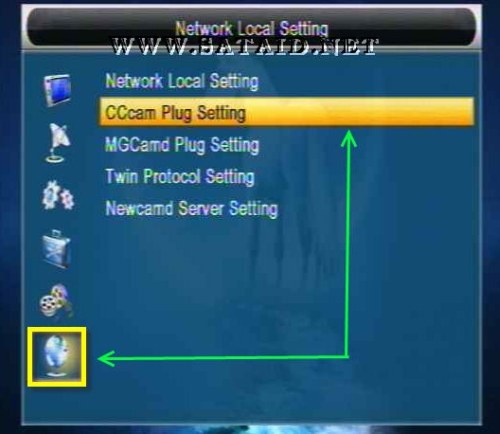
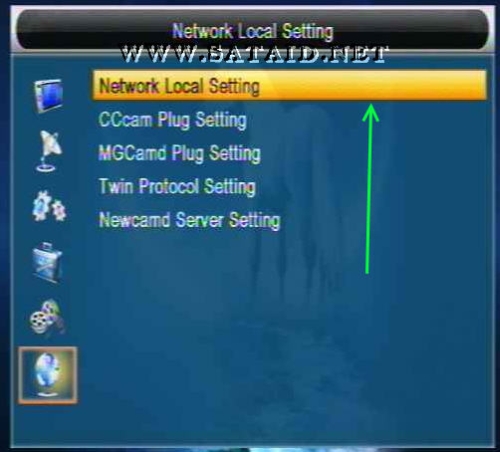
    Now goto Menu -> Network Local Settings and select CCcam Plug Setting and click the OK button.


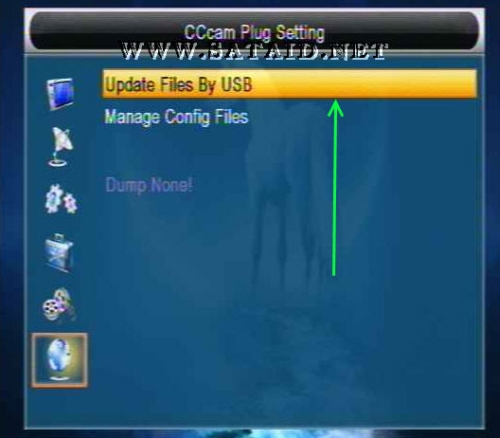
    Now select Update Files by USB and click the OK button.


    Now select CCcam,cfg [CCcam Plug] and click the OK button, you should then see a check mark or tick appear, indicating you have selected the file, if there is no tick shown, then you have not selected anything, and nothing will be installed.


    If there is no tick displayed, select CCcam,cfg [CCcam Plug] and click the OK button.


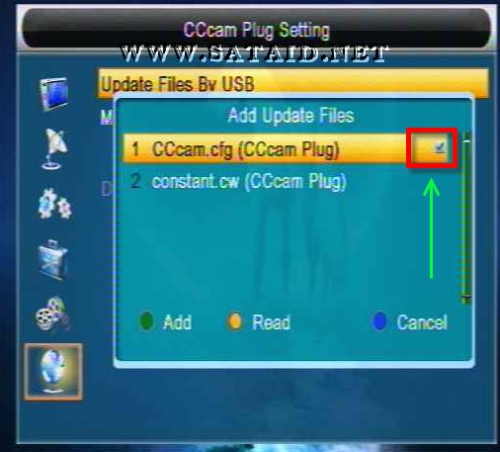
    Once the tick is displayed, click the Yellow button.
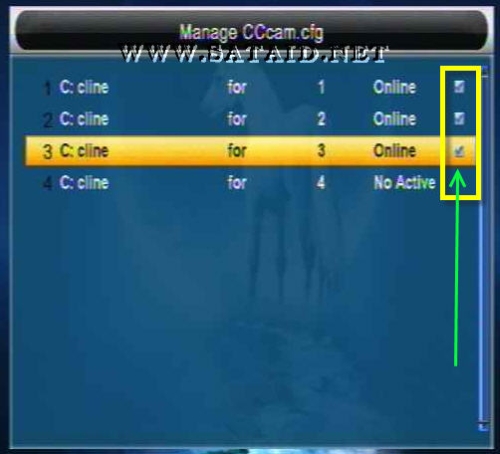
    Now select CCcam Plug Setting and click the OK button.


    Now select option 1 .. CCcam.cfg and click the OK button.


    Now highlight each cline you wish to activate, by clicking the OK button, a tick will appear next to each cline you have activated.


    Finally check your Network Settings are configured correctly.


    If your router supports DHCP turn it ON and click Apply.
    If your router do not support DHCP you will be required to set it up manually, click Apply once you have set it up correctly.


    Now reboot your receiver, and if all is okay, you may start viewing channels.


    -------------------------------------------------------------------------------


    Additional cline data info window:


    Once you have access to a channel via your cline.
    Click Menu -> Network Setup -> CCcam Client Setup -> Manage Config Files -> CCcam.cfg
    then highlight any single cline and click the 'Info' key
    you will then get access to the following data pop up window.


    Thanks to Laurels for this great tutorial..


    Install the program, click the tool in the top left corner, enter the ip address, username and password of the dreambox.
    Exit the program and restart it, you should see your server details.

    Additional Basic Smart Card Infomation


    Click Menu -> Tools -> Information and then press '7' [5 times], you will then see additional basic smart card information, you will of course need to have a smart card inserted.

    Click Menu -> Tools -> Information and then press '1' [5 times], you will then gain access to the Factory Test Menu.


    To change a value, simply press the 'OK' key
    To quit the menu press Menu or Exit