

CS Studio by Damirsat HERE.
Posts by master G
-
-
Check in cs studio or cccaminfo to make sure you definatley have reshare.
It is possible that he doesnt have 2 reshares, so it wouldnt matter if he gave you reshare or not.
The way you have setup the c line for the spiderbox looks good, so dont see any problem there. -
-
Use notepad++ from HERE, its a much better program.
-
News : v1.8 @ 10-03-2011 (Release Version)
- Updating languages
- Adding possiblity to read CCWs keys as 'F' entries like Mgcamd ! (compatibility issue)
the only exception is while the ECM pids equals (1FFF or 1FFA) which remains as BISS.
* In order to use them as CCWs you must check this option from Softcam dialog :
" Use The 'F' keys as CCWs unless the ECM PID equals 1FFF or 1FFA (BISS) " (Default Enabled)
( if you disable this option, the keys will be read as BISS, CW, DCW and not as CCWs !)
* mdplug still use his own CCWs softcam definition as the format : C SID INDX KEY
- Now you can use the keys priority on mdplug "BISS, CW, DCW" if you wanna speed up
the access to the locked channels with CCWs, but if no associated key of the current channel
was found (either BISS, CW, DCW, CCW) then mdplug will try the Available ECMs.
( Note that, this option is not recommended because it always forces DCWs or CCWs keys
while other ECMs can have fresh keys (and the main CCWs are down) and the channel remains locked!
so it's up to you to choose the keys priority in main plugin dialog )
-
If you want to block a certain package from peers you would add the caid to their f line.
F: user pass 2 0 0 { 0:0:2,0963:0 } (this blocks sky uk)
F: user pass 2 0 0 { 0:0:2,0963:0,93b:0 } (this blocks sky uk and sky italia) -
For all those of you who are still having difficulties changing a file extension, from .dbs to .abs for example,
just follow the instructions below:-To change the extension of a file, make sure you have view file extensions enabled, by simply doing the following:
1 .. Open a folder [any folder will do]
2 .. Click the Organize tab button.
3 .. Click the Folder & Search Options.
4 .. Click the View tab button.
5 .. Now make sure the [Hide Extensions for known file types] box is blank, ie, no tick displayed.
6 .. Click apply and then close the folder.
7 .. That's it, you should now be able to change a files extension by right clicking on the file and selecting the Rename option.
-
If you add the caid of a provider to the f line it will block your peers from using it.
Your f line blocks those three caids. -
Instructions on transfering a Dump file from PC -> STB
This will also resolve the issue of the receivers display only showing 'ON'
Date of released 10 - 10 -10A null-modem serial cable will be required to connect the receiver to the PC.
Open & run the Openbox S9 Upgrade Tool v2.0.0
now set the com setting to suite your set up
Now make sure your receiver is Turned Off
Click 'Connect' only when your receiver has been Turned Off
Once the Connected button has been clicked, Turn your Receiver On
and you should see the following message displayed.
You will now see a new set of options appear on a new page.
In this example we are going to install a Dump file
so select and double click on the option All Chunks [No Bootloader]
Now simply locate the folder where you placed the Dump file,
by clicking on the drop down menu button you can easily locate the
folder in which your Dump file is located in,
once you locate the correct folder double click on it.
Once you have opened the folder where your Dump file is located,
double click on it, and it will then appear in the
File Name Window.
Now Click Open.
The Dump file will now be displayed in the transfer window.
If it's the correct Dump file click Next to start the transfer.
If it's the wrong file, click Back to select a different Dump file.
Now the transfer has started you will see a Transfer Progress Indicator
which displays the current transfer rate.
You will also see a description of what's going on in the Message window.
If all went according to plan, you will see a pop up window displayed
stating that the Upgrade was a complete Success.
Click OK to close the window.
Finally if you have no more files to transfer click Finish.
Otherwise click Restart to transfer any other files.Now all you have to do is wait for the receiver to re-boot itself.
That's it, you have now installed a Dump file successfully, and fixed all problems, well done.
-
-
Additional cline data info window:
Once you have access to a channel via your cline.
Click Menu -> Network Setup -> CCcam Client Setup -> Manage Config Files -> CCcam.cfg
then highlight any single cline and click the 'Info' key
you will then get access to the following data pop up window.
-
-
iDreamX manages your Dreambox (with enigma1 or enigma2 OS, including Bouquet-Editor).
* Bouquet Editor
* FTP Client
* Telnet Client
* Screenshots
* Streaming TV, Radio and Movies to Mac
* Streaming TV, Radio, Movies, iSight, Screen and A/V Files to Network (Internet)
* EPG & Timer Events
* and much moreWhat's New
Version 2.6.0.0b:* New feature: stream tv, radio, movies, iSight, screen and audio/video files to your iPhone, iPad, iPod Touch, Android or Symbian device.
Requirements
PPC / Intel, Mac OS X 10.5.8 or later, VLC v1.1.5 or newer, Satellite or Cable Box with Enigma1 or Enigma2, Like: Dreambox, VU+, Kathrein, Topfield e.t.c. -
-
Here I shall demonstrate the procedure of adding channels to a favorite group, I shall only select and save one channel, as the procedure is the same no matter how many you decide to add as favorites.
Here we shall simply add a single channel [Calle 13] to the favorite group [General Entertainment]
First click Menu -> TV Channel List and click the OK button
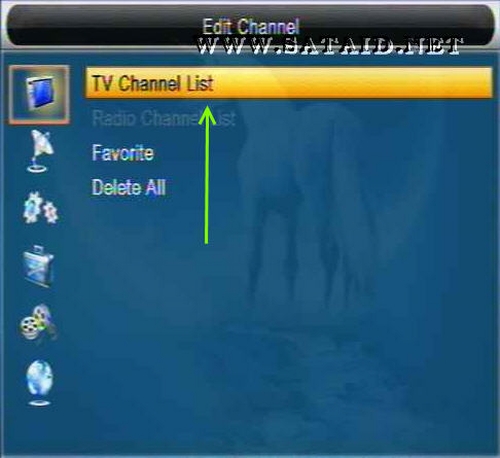
Using the remote control click the FAV button.

Now click the OK button and select which favorite group
your going to save the channel to.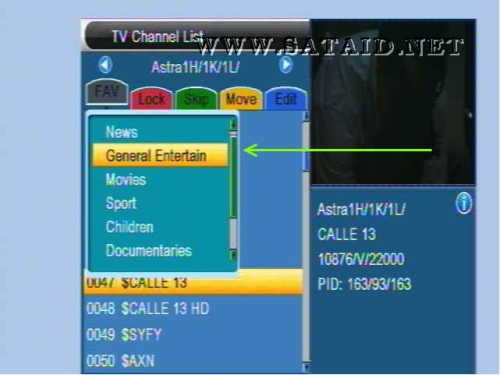
Once the favorite group has been selected click the OK button,
and a tick or check mark will appear next to the selected favorite group.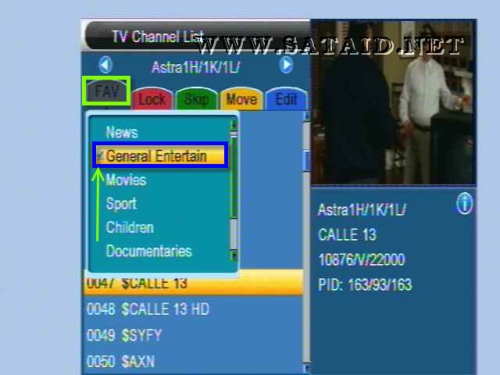
Now click the Exit button and an heart icon will appear
next to the selected channel, now click the Exit button twice and
click Yes to save.Obviously if you wish to add more channels,
you should continue selecting channels you wish to include in the favorite groups,
and only click the Exit button on completion.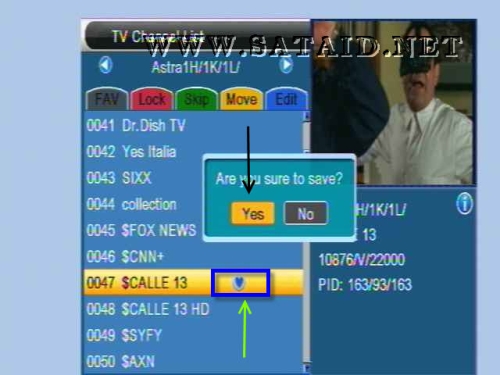
Once you have added the channels and saved the changes, exit the Menu
and on the remote control click the FAV button,
this will then bring up all groups that have channels stored within them.As we only selected a single channel stored in the General Entertainment group,
that will be the only group displayed.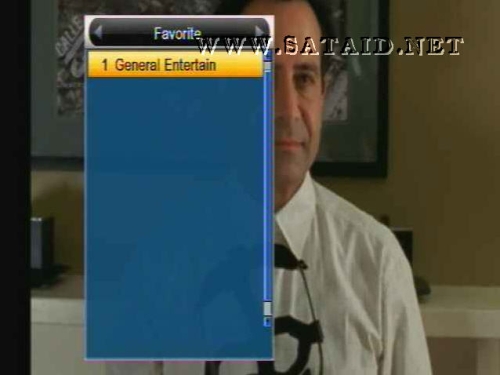
Once the group has been selected click the OK button, to view the channels added to that particular group.
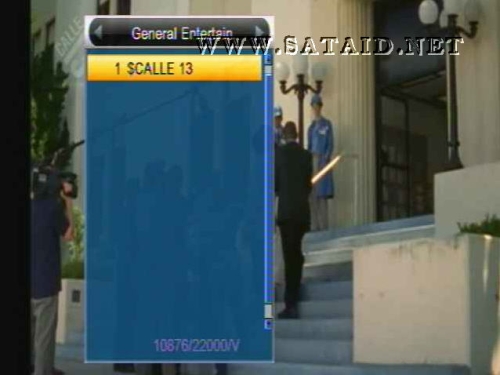
Finally select the channel you wish to view and click the OK button.

You have now added a channel to a favorite group.
-
CS share protocol settings.
Edit CCcam+Newcamd accounts:
1. Prepare an available Cccam code and select it, as following code format:
C: test.dm700.com 63001 ah4Cf5hCh e85e1104D yes
N: test.dm800.com 12000 user1008 password102 01 02 03 04 05 06 07 08 09 10 11 12 13 14
2. Use Wordpad to open ?Cccam.CFG? file , and copy the available code into the wordpad and save it.
3. Then copy the Cccam.CFG file with available code into your U disk root list.
4. Connect the USB driver with the HD model?s usb port.
5. Press "menu" into Cccam setting ,select Cccam Plug Setting and OK.

6. Select read CCcam.cfg From USB and press OK.

7. After read the available code ,please select Account Management and press OK.

8. You can select maximum 4 CCcam accounts at one time, but for newcamd accounts not be limited.
After activate the sharing accounts.9. For MGcamd Plug setting.
Our enable Mgcamd protocol for patch CCcam.
Some channels for Europe , the channels decoded don`t use actual CAID, but used other CAID, so our need a replace.list to patch the actual CAID to other.
10.Edit and Copy the replace.lst and Ignore list to U disk root list, then press " update replace.list by USB device or Update ignore.list by USB device" to load the files and save the files to STB.


11. Twin protocol:
Twin protocol is satellite share protocol, user need a satellite dongle connect with serial cable RS232 to the STB`s Serial prot. Then select "ON" the function.


12. Network Local settings:
Select Network Local Setting and press OK.

13. At DHCP select ?ON? and then select ?Apply ? press OK.

14. When everything is ready ,please press ?Standby? ,then reboot the model again.
So the sharing setting is now finished. -
How to USB flash the VU+ SOLO (second post is easiest method)
I think the VIX Team or Blackhole are the better images.
I would setup a usb drive for picons, epg and swap file, Vu+ solo – usb hdd installation.
I would recommend Manually Creating a Swapfile on VU+DUO/SOLO, it will improve the performance of the solo. -
Make sure the image is compatable with the bootloader for your clone.
All the images in this thread are compatable with your dm800 clone, DM800 Clone Patched Images for Sim2.01 Bootloader 76. -
Have a look at this tutorial HERE..
-
Setting up an Infinity USB Phoenix programmer to use On a Debian Linux PC server running CCcam
First things first, all credit goes to all those out there who have provided the advice and assistance on various forums that has made this possible. I DO NOT claim this to be my work; I have simply brought all the information flying around together in one place.
Also, I take no responsibility if you mess anything up – you use this tutorial at your own risk.
CCcam.cfg
Once you have got your PC/Laptop (server) setup with the Debian Linux operating system, you will need to upload your edited cccam.cfg file to the server (as per the tutorial you have probably used tells you to do).
I have set out below details of what my cccam.cfg file shows so that you can edit yours accordingly:
CodeSERIAL READER : /dev/ttyS0 SMARTCARD CLOCK FREQUENCY : /dev/ttyS0 3570000 TRY ALL CHIDS : /dev/ttyS0 BOXKEY : /dev/ttyS0 XX XX XX XX SERVER LISTEN PORT : XXXXXThe above assumes that your reader will be communicating with the server through Com1. If, for any reason, it will be communication through Com2 then you need to change the “S0” part in the detailsabove to “S1”.
The clock frequency will vary depending on which card it is you are using. For me, the frequency above works perfectly for the UK service provider.
For the box key, replace the X’s with your box key details.
The server will be set to port 12000 by default. If you are going to use this port then leave out the SERVER LISTEN PORT line. However, it is advisable to set up a different port number. It can be anything from 1 to 65555 but it must not be one that is already (or is likely to be) in use (eg 21, 22 etc).
Once you have edited your cccam.cfg file and uploaded it to your server following the tutorial for setting up the server, we can move on to the reader itself.
Setting up the Infinity USB Phoenix reader
We need to set up the reader so that it is operating in phoenix mode. To do this you will need to get the reader up and running on Windows XP PC/laptop (computer).
On your computer install the reader either by using the disc that came with it or by downloading the software from the following website:
WB ElectronicsOnce you have installed the reader on your computer, we need to configure the reader to run in phoenix mode.
Configure your card reader to automatically load up in Phoenix mode (I'm using Phoenix mode with a clock frequency of 3.58 Mhz).
To do this, connect your card reader to your computer via USB and serial lead (RS232).
? Launch Infinity USB, this should detect your card reader.
? Select: OPTIONS, GENERAL, PHOENIX
? Place a tick in 'Enable Phoenix Mode at Power On'
? Select your Frequency (eg in my case this is 3.58 Mhz for other providers it might be
different)
? Select the reset polarity as PhoenixTo test that your reader has been configured, close down Infinity USB, unplug the reader and plug it back in again.
If configured correctly, the right hand side LED will power on RED instead of BLUE.
Installing USB drivers
Whether or not the USB drivers were installed at the time you installed Debian onto your PC/laptop, it would be worth running through the process to get them installed. Can’t do any harm even if they have been installed.On your computer open up PuTTY and log into your server as root with the password you set up when you installed Debian on your PC/laptop.
Copy these commands from here and right-click in Putty to execute the following commands (if you don't like to write much):
(if this does not work for you try -)write y and hit Enter when prompted to download and install
write y and hit Enter when prompted to download and install
Once done we move on to the next part.
nftytool (v1.1)
This is the driver that needs to be installed on your Debian computer in able for the reader to work.
nftytool is a program that should be used for Infinity USB and Infinity USB Phoenix ONLY!!
Download nftytool (v1.1) HERE to your computer.
FTP into your server as root and copy the downloaded file (as is) into the home directory.Then write in PuTTy you need to execute the following commands to unpack and move the file you copied to the right place.
(this will make a directory for nftytool on /var)
(This will copy the content of the nftytool-1.1 folder to the nftytool folder created in
the last step above)Once the above is done connect your reader to the server. IT MUST be connected using both the USB and Serial (RS232) cables. The USB lead will power the reader and the reader will communicate with the server through the serial cable.
Next you need to get the reader started so back to your computer and log into the server using PuTTy as root and then execute ONE of the following commands (ie this will depend on the setting you used when configuring the reader earlier):
./nftytool -p phoenix -- -p phoenix -f 3.58 -e
(For 3.58MHz)./nftytool -p phoenix -- -p phoenix -f 3.68 -e
(For 3.68MHz)./nftytool -p phoenix -- -p phoenix -f 6.00 -e
(For 6.00MHz)You need to execute the command of the desired speed for your card in the nftytool folder once when you start it and again if you shutdown your system (not the Virtual Machine) and start it later, notwhen rebooting.
As long as the Infinity USB Phoenix gets power through the USB cable, then it will still function as its configured, only when it looses the power, then the command needs to be executed to configure it again. That said, once I had set mine up, even though the reader lost power (blooming USB cable popped out when I tried to move the reader to a better place) it still worked without me having to runthe commands again.
If you do shutdown your system and start it again at some point later you will probably need to execute these lines in PuTTy:
(x.xx are the desired speed of your card)Well that’s it and if all things went well you should be able to use your server with your Infinity USB Phoenix reader.
Enjoy!
