

How much ram have you got remaining on the dreambox ?
How many peers do you have ?
What is the limit on hops you receive from your peers ?
Posts by master G
-
-
Viaccess_v2.74a TNT
Fixed small bug inside 030B00 code.
Now channels without AES are working properly. -
Check in your router that the port you have openned matches the ip address you are currently using.
You need to have a static ip address for sharing to work properly.
Goto canyouseeme.org and check if your port is open. -
Automated Install Script for Ubuntu Server
The benefits of using an Ubuntu server are that the desktop environment is really user friendly; it can be used as a day to day PC. Support for Ubuntu is not as good as Debian but the commands are either the same or just slightly different.
This Tutorial is taken from CCcam Forum; the script was created by Youknowwho. The script itself is perfect works a treat and takes just minutes to run through, there are a few small errors on his instructions so I re-wrote them.
Please read the instructions, Install Ubuntu and do the whole process from the UBUNTU desktop. If you don’t it may not work.Download the latest stable release of Ubuntu 10.04 (as of July 2010)
Download link. Download | Ubuntu
Burn the ISO to a disk pop it in the server and reboot, select your language and install directly, don’t bother with the live disk. If for any reason it does boot in to the live version then when it gets to the desktop double click on the “install” icon. When asked for your account name think carefully and write this down as you will need this at a later stage, I will use cccamThe attached setup file contains all the scripts required. Use winrar (http://www.rarlabs.com) or similar to unzip. The file contains Cccam 2.1.4 and CFG file, if you want to use a different version then just replace the Cccam.x86 with the one of your choice.
Ok so Ubuntu is now running and you are sat looking at the desktop. There are two ways to proceed, you can either use the Ubuntu PC to continue or you can use FTP and Telnet, Personally I prefer to use the Ubuntu Server. People have reported errors that use windows to edit the .sh files, please use your new Ubuntu server to continue.
Open the attached file that has been unzipped it is called cccam_install_package and there will also be a file called UbuntuInstall.sh. Edit UbuntuInstall.sh just double click these tonight on your Ubuntu desktop and choose display to edit them.
On Line 12 you will see this
OWNER=share4u
You need to edit this to reflect the account name you used to install Ubuntu. I used cccam so mine will now look like this
OWNER=cccam
Repeat this step on the following files:
cccam_install_package/UbuntuInstall.sh
cccam_install_package/LogCleanUp.shYou should have done this three (3) times now. DO NOT EDIT ANY OTHER FILE OR IT WILL NOT WORK.
Once edited place the folder cccam_install_package and the file UbuntuInstall.sh in the TMP folder, click on places computer then your drive, you will see /tmp/Click applications, and then open Terminal.
Type in:
sudo –i
It will ask you for your root password insert it now
It will now display this:
root@ubuntu:~#
Type the following:
chmod 755 /tmp/UbuntuInstall.sh
/tmp/UbuntuInstall.shThe installation will now begin. The script will ask you one question you need to select “Standalone” when it is complete the script will reboot Ubuntu for all other questions just press yes.
You can place a config file in the var/config folder; the server will update it every night at 3:57 am. If you want to force the script to update you must use the following command
Sudo –i
(Insert password)
/var/script/configupdate.shThis will then back up your old cfg file and insert the new one. Do not try and put a config file straight in to the Var/etc folder, it won’t work.
Using your Ubuntu server and Firefox type in the following http://127.0.0.1:16001
You will see Cccam is working.
Total Install Package Link:
CCcam total package.zipCredit to original author Steve.
-
-
I presume you are using either oscam or newcs to read this, check the emu you are using is running.
-
Streaming dreambox channels to internet in 6 steps:
- Install the program from the link below.
- Create and update dynamic dns address.
- Open and forward port 1234 to your computer IP.
- Fill created dynamic dns address and choose your. internet speed from settings.
- Hit start streaming from the program.
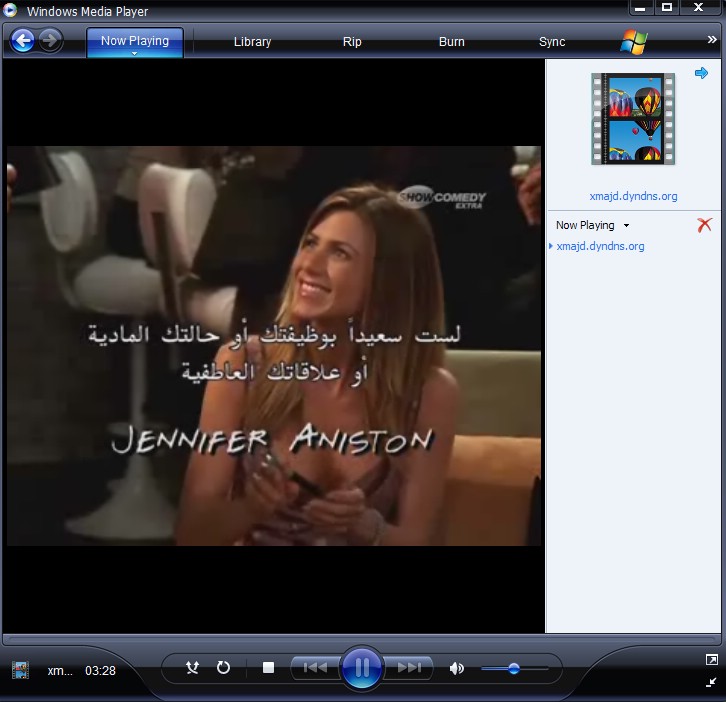
- Take the appearing internet address and use it with. windows media player and enjoy your dreambox anywhere.
Note: For better internet streaming form enigma 1 dreambox i advice pli-jade image,the image is not important for enigma2 all equal
- Additional features...
- Playing enigma 1 and 2 dreamboxes on local computer
- View hd channels on pc from hd capable dreambox
- Record E1 and E2 dreambox channels on pc
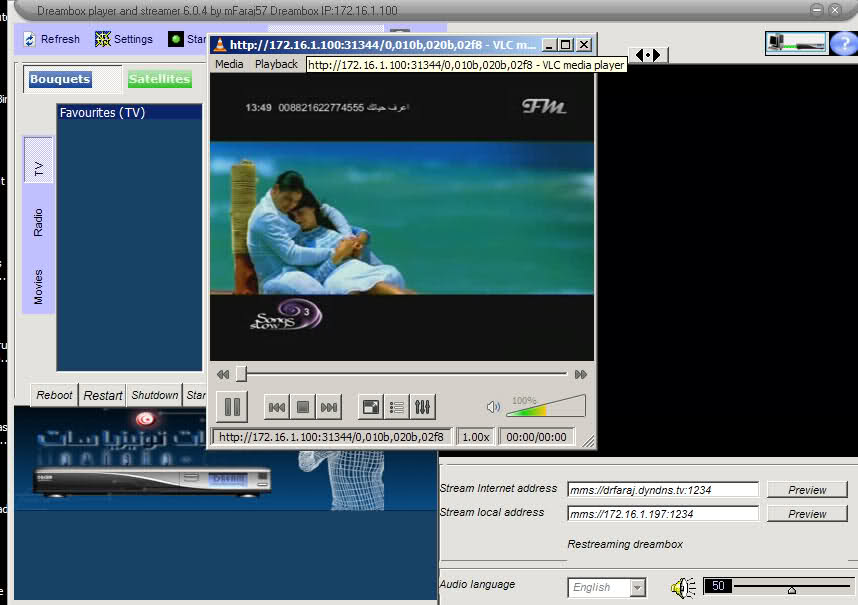
picture taken from live video for remote dreambox by internet
The program works only with vlc version 1.0.5 and down ,best is .99
Tunisiasat web receiver program 5.0.2
This software installed in remote pc to control the streamer program and indirectly dreambox, receive stream from streamer in mms format only -
Which format is the card mate? eg viaccess
-
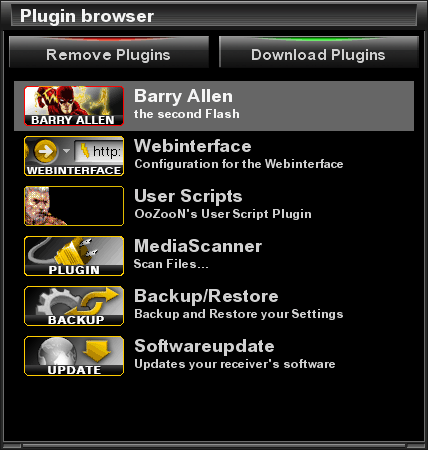
Ipk is file extension for most the enigma2 plugins files and composed of compressed data of the plugin distributed in different folders for automatic installation,Barry allen and drivers are other examples of ipk files
There are three common methods for installation of ipk files1- Telnet command by using Telnet from windows and better from DCC program
Transfer your ipk file to dreambox /tmp folder by dcc-ftp commands and put the following command in telnet window
you can use copy-paste to put ipk filename
some images like newnigma and openpli do not accept ipkg command we can use opkg instead
The following is demonstration of Barry allen ipk file installation by this method
2- DCC-upload packages method
This is the easiest installation method specially for beginner
3-Manual installation
after copy the ipk file to dreambox .tmp folder from dreambox we follow the demonstration(this is for old gemini but same principal apply to all images)
Thanks to Tunisiasat
-
sometimes we like the image but we do not like the image bootlogo
we can easily change the bootlogo by one personal or any other logodm800 and generally enigma2 boxes have 6 logos
1-Initial bootlogo : this one appears immediately at initial reboot and lasting about 40 seconds and before appearance of meoboot or barry allen menu
the file responsible for this is boot/bootlogo.jpg
2-The logo appears after the initial bootlogo and lasting depend upon the image from 1-3 minutes and the file responsible for this logo /usr/share/bootlogo.mvi
3-this logo follows the second one and called bootlogo_wait and located in usr/share/bootlogo_wait.mvi
4-Logo appear as background for the image and appear when restart enigma and called /usr/share/backdrop.mvi
5-usr/share/radio.mvi appears when playing radio channels
6-usr/share/switchoff.mvi appears when shutdown the dreamall these logos can be changed with what we like easily
first logo bootlogo.jpg can be replaced by any pc picture with extension jpg and importantly dimensions should be 1280*720 pixels
and copy this pc picture by dcc or any ftp program to folder /boot in dreambox
adjustment in dimension can be done by the defualt windows program paint brush or if you want dimension adjustment with adding effects,texts or other to the picture you can use fantastic software snagitother bootlogos are special video files with extension mvi
we can convert any pc image to mvi by the software called Dream Logo Generator_Dreambox 800/8000 and again importantly the image should be 1280*720 pixels before conversion to mvi
after conversion of your images to mvi transfer these mvi files by dcc or any ftp program to folder usr/share/ and replace the existing file by yoursTo view mvi files in pc use windows media classic in win xp enviroment or windows media player in win 7
-
merlin excalibur image has different approach for activating the cams and emus
download and install cam from Tunisiasat addons manager from the merlin cams section and follow the pictures below.


-
-
howto: install and running emus in oozoon images
install the the cam you want from Tunisiasat addons manager -oozoon cams
follow the pictures to activate the cam
from blue panel(blue button on the remote)


-
Exclusive and as promised by the band and finally a picture Albulejad Openpli egauge support means supports Alskinat containing Analogique clock, you change the source code and image building, including all properties and a knife, which is beautiful Validation8.
Note: The photo is not mixed with Imo Cesc or O.camd only and can image degradation Server, as well as maintaining their rights to the image, which include my name in the image Marwan HTML Source when you build and lovers of the amendment can change the picture, no problem , But each blade supports work on the Clock Analogique. Only when it is put these three lines in ezapmain with the knife that bears my name, referred to below in red. I hope you like the picture and a greeting from his brother Marwan
Extras:
Fixed-Egauge
- Copy the new boot
- Add the French language outside of Arabic and English
- the knife is the original Validation8 Marwen
- Merge CCcaminfo away from the Var
- Merge Ecminfo away from the Var
- Merge movieplayer away from the Var
- Merge Minicatkey updater away from the VarNote:
- This is raw (img) to be transferred to the Dream through dreamup or flashwizard
I leave you with images and files to download


OpenPli-beta-dm500 Skin Validation8 and Clock Analogique Fixed by Mawen
-
Log into the server type the reboot.
Watch the onscreen log as it restarts, if it is not reading your CCcam.cfg file it will display the message no config present. -
The flash expander "enlarged" the flash with the help of an additional device.
Gemini or ICVS is not a requirement, should work on all images.
The idea is to check the flash expander into CVS.Function:
The complete folder / usr is swapped with "mount bind" to a device. Meant that brings the flash expander the greatest benefit when the same after flashing a new image using the flash expander and then installed only other plugins or skins. If you want to test the new flash without flash expander can of course also the only way is no free space is created in Flash but, the current free space is "frozen".
Once you've used the flash expander should be removed in any case, the stick or CF SSD or more, the box will boot up but only in this moment again used the original / usr, so all changes are lost. The device which is used for the flash expander, can be found under the mount point "/ media / flash expander" again. Any negative side effects should not arise from the flash expander (eg TPM-Check), as it has changed for the programs / Enigma nothing, for example, FTP can see no difference in the folder / usr.The unit can still be used for other tasks, such Picon outsource, only required it is no more. Wink
If a swap on the device to be applied should first be disabled. The unit must be hung briefly make it new on / media / flash expander integrate.Requirements:
A device that is formatted with ext 2/3/4 and has a partition. RAW devices are not supported. If you stick his e.g. as a RAW device used, without partition, it can be as Gemini in the device manager and re-initializing provided with a partition.Installation:
The IPK into / tmp and install the Console "opkg install / tmp / flash expander *". Anyone who has installed a Gemini is easily in the console an "opkg update | opkg install flash expander" Perform. You can find the plugin then menu-> Add-ons to restart Enigma.Anyone who wants can help you develop into the flash expander, sources can be found on the box. Geminis are newer, with a recommendation to use flash expander published.
Important:
Flash Expander has been tested not in conjunction with any other image managers or Flash extensions.v0.13-r1
New is the integrated devices through its UUID (except 7025).
Has the advantage that the device still has the same name in the system
by mechatron -
Actually reading crashdumps is not difficult - first comes a lot of blah-blah, then come in 90% of the cases of the 3 lines:
"Plugin Extensions / block content failed to load:"
"EXCEPTION IN PYTHON STARTUP CODE:
"Traceback (most recent call last):
"FATAL"
...........And then comes a handful of interesting lines of why this happened and then comes back a lot of yada yada. That's really all a little scroll in the file and it knows what going on.
Unfortunately, few people know the shocking (and this may pardon my simplicity), and thus can actually quite a few people whose English would be enough to recognize what has happened with a crash dump enigma2 not do anything (to see which plugin for example, has caused Him)
In addition, many people do not know how many crashdumps they already have, which is the latest and the ridiculous number in the file name, the timestamp is.
Currently you can also CrashLogs in enigma2 View the Widget Console does not properly because they are too long and then enigma2 stuck if you look at it.
So I have allowed myself time to crush a small plug-knit makes this whole things a little easier:
1) clean up all CrashLogs from / tmp and / hdd
2) List all CrashLogs from / tmp and / hdd
3) The possibility in 2) CrashLogs complete view, or just the handful of interesting lines which usually sufficient to know is why it happened and to convert a possibility the timestamp as a real-time when it happened and delete the respective CrashLogs individually .
Is, of course, as usual, not perfect, but that You must try it now. If the handful of lines of your opinion, is not sufficient to understand the cause of CrashLogs be found on / tmp / crush.log this short version of the dump - please this file to post along with the long version so I find out what you would need to adapt even more.
Is also clear that the 3 lines from above, only the usual 90% of starters for CrashLogs, there are certainly a few more - let me know that you can also include in future they will be well spent in the short version.
Have fun with Crush!
PS: Anyone who is not looking Crush should see with his children the movie Finding Nemo
PPS: In an HD Skinn's better readability, but it was me at the moment not so important. If anyone feels like he can optimize the like, including my class for displaying large files (scrolling up / down and line by line with right to left) is not the yellow of the egg, but whatever.
LG
gutemine -
Barry allen was designed first to work with dm7025 thereafter redevloped to work with dm800,8000 and 500hd
Barry allen has one main function and summarized by its capability to create multiboot in external device and installation of images by using simple remote control buttons.Later many functions added to barry allen and some describe it as image in image so many image teams do not like it
when we say external flash we mean all external storage devices can be attached to dreambox like usb flash memory,harddisk(HDD) and combact flah(Cf)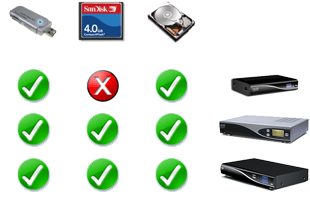
In the following steps i will describe how to install Barry allen on USB flash memory and although Barry allen can be installed in other devices i do not advice to install in HDD
1-First of all we have to do fat or ext fat format of good read/write USB flash and can accept linux partions
2- After usb flash attached we download latest barry allen release Barry allen latest versionsMethods of barry allen installation
Barry allen file is ipk file and there are three methods to install barry allen as any other ipk file
Howto:Enigma2 dreambox ipk files installationafter complete installation we restrt enigma2 and if the installation succeeded the Bary allen will appear in plugins menu
Installation of images to multiboot
We open barry allen from plugin browser and we see many menu items,i will explain how to install images to multiboot and leave the rest of items to you to discover various functions done by this fantastic plugin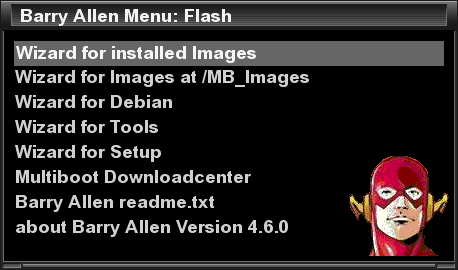
first copy your image with extension nfi to /mb_images by software dcc or any ftp program thereafter follow the demonstration

barry allen opens special folder in dreambox media/ba/ba/ contains all installed images
Booting from external flash image
There are two ways to boot from exteranl flash image either from Barry allen menu
select installed image for booting -then we select the image for booting
or reboot your dreambox and from the barry allen menu which appear early in reboot we select the image
Control of multiboot images
you can install,delete installed image,backup installed image and show information about images from the barry allen menu
Note: when rename multiboot image better to keep the name short and less than 40 characters and no spaces
Barry allen webinterface
we can control installed image by pc through Barry Allen Web Interface
just enter your dreambox in internet explorer and followed by barryallen
http://xxx.xxx.x.xxx/barryallen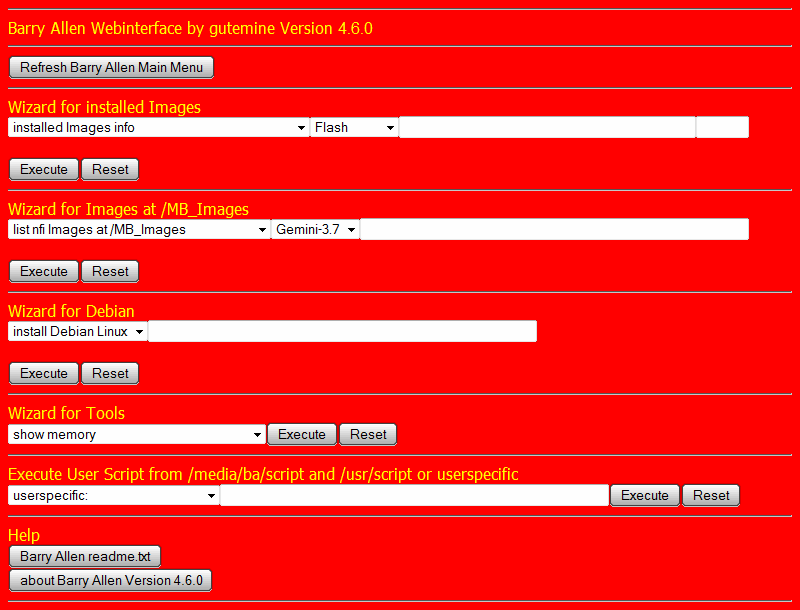
How to remove barry allen
by telnet command
cd /
ipkg remove enigma2-plugin-extensions-barryallen
Barry allen and remote control
sometimes we have to choose the correct settings to make barry allen respond to remote control
event0/1 with dm800 and 7025
event2 with dm8000
how we can change barry allen background image

if the color of background are not clear we can fix it

Credits to mfaraj57 & Tunisiasat for this guide.
-
No virus found with avg.
-
You can run thousands of shares on a ubuntu server but the card you are trying to share will have a limit.
You can overclock the card frequency that will allow more shares, but be careful with this as you can fry the card.
Wont know if cccam will work alone unless you tell us what card you are using.


