

Posts by master G
-
-
Update 08.12.2010
Included in the Dump file is a multi-satellite channel list.
The channel list default setting is DisEqC 1.2.
Coverage of the channel list is: 45east to 30west.
Included in the zip file is a replace.list.
The channel list can also be used on a fixed dish setup, simply click the Zoom or SatList button, and select any satellite from the data base that you wish to access.================================================== =================================
What's New:
Updated channel list.
Updated channel sETTINGS on 16E 13E 28E
I believe all the channels that cause rebooting problems, have now been removed.
To optimize this list & receiver to it's full potential, you will require a full multi-sat coverage cline.
================================================== =================================Instructions:
If this is the first time you have uploaded a Dump.file, then you will need to read the following instructions:-
1 Click Menu -> System Setup -> TV System -> Video Resolution this will return to the default setting of [1080i 60] after each upload, if your TV has a refresh rate of 50Mhz then set the video resolution to [1080i 50] and the picture will become clear now press exit
Now select Local Time Settings and set it as follows if your in the UK:
1 GMT Usage ... ON
2 GMT Offset .. UTC+00:00
3 Summer Time . OFF
now click exit and exit again
Now select Network Local Setting and if your router supports DHCP then set it to On
otherwise you will need to configure the settings manually, once you have set it up click Apply then exit
Finally click CCcam Plug Setting, if you already have an active cccam.cfg file transfer it to a USB Stick insert the stick into the USB connection on the rear of the receiver and click Update Files By USB then select Option 1 in the popup box and click the OK button then click the Yellow button and your cccam.cfg files will be transfered
Now you need to activate the files, click CCcam Plug Setting then Manage Config Files click Option 1 and select each file in turn and click the OK button when you have a tick next to the files you wish to activate then exit.
To finish the activation and configuration process you must now reboot your receiver, then once it has restarted all should be okay.
The channel list included in the HDS2_DUMP file includes the latest L53 multi-satellite channel list, this is by no means a finished list, and is still an ongoing project.
================================================== =================================How to add the replace.list file.
Click Menu -> Network Local Settings -> MGCamd Plug Settings -> Update Files by USB
-> replace.list [MGCamd Plug] now click either the OK or Green button to select replace.list and place a check mark next to it, once the check mark or tick is visable click the Yellow button to upload.
You can then if you wish, check to see if the replace list has been correctly added, by clicking Manage Config Files and clicking on relace.list if all went well, you will see the following line X: {{ 1833 } { 1702 }}
================================================== ================================= -
Update 03.12.2010
Included in the Dump file is a multi-satellite channel list.
The channel list default setting is DisEqC 1.2.
Coverage of the channel list is: 45east to 30west.
Included in the zip file is a replace.list [German HD Channels okay on Astra]
The channel list can also be used on a fixed dish setup, simply click the Zoom or SatList button, and select any satellite from the data base that you wish to access.================================================== =================================
What's New:
Updated christmas boot logo.
Updated channel list.
Sirius 5e renamed Astra 4A.
A number of channels added.
I believe all the channels that cause rebooting problems, have now been removed.
To optimize this list & receiver to it's full potential, you will require a full multi-sat coverage cline.Instructions:
If this is the first time you have uploaded a Dump.file, then you will need to read the following instructions:-
1 Click Menu -> System Setup -> TV System -> Video Resolution this will return to the default setting of [1080i 60] after each upload, if your TV has a refresh rate of 50Mhz then set the video resolution to [1080i 50] and the picture will become clear now press exit
Now select Local Time Settings and set it as follows if your in the UK:
1 GMT Usage ... ON
2 GMT Offset .. UTC+00:00
3 Summer Time . OFF
now click exit and exit again
Now select Network Local Setting and if your router supports DHCP then set it to On
otherwise you will need to configure the settings manually, once you have set it up click Apply then exit
Finally click CCcam Plug Setting, if you already have an active cccam.cfg file transfer it to a USB Stick insert the stick into the USB connection on the rear of the receiver and click Update Files By USB then select Option 1 in the popup box and click the OK button then click the Yellow button and your cccam.cfg files will be transfered
Now you need to activate the files, click CCcam Plug Setting then Manage Config Files click Option 1 and select each file in turn and click the OK button when you have a tick next to the files you wish to activate then exit.
To finish the activation and configuration process you must now reboot your receiver, then once it has restarted all should be okay.
The channel list included in the HDS2_DUMP file includes the latest L53 multi-satellite channel list, this is by no means a finished list, and is still an ongoing project.
================================================== =================================How to add the replace.list file.
Click Menu -> Network Local Settings -> MGCamd Plug Settings -> Update Files by USB
-> replace.list [MGCamd Plug] now click either the OK or Green button to select replace.list and place a check mark next to it, once the check mark or tick is visable click the Yellow button to upload.
You can then if you wish, check to see if the replace list has been correctly added, by clicking Manage Config Files and clicking on relace.list if all went well, you will see the following line X: {{ 1833 } { 1702 }}
================================================== ================================= -
-
-
-
To find out what bootloader your DM800 is simply do the following
* Telnet to your box
* Log in
* Type ' ipkg list '
* Look for the line - dreambox-secondstage - 7#-r0 -And hey presto, you now know for sure what bootloader your DM800HD is.
-
There were spacing errors in both your flines and having no restictions enabled you to see each other, i still think this is the reason.
-
Basically, it gives your system more memory to cache things to, which can be useful for low memory box like the Solo..
If you have lots of processes or plugins installed it may sometimes struggle, this is where the swapfile will help. -
How To Create Swapfile On ViX image
Menu >> Setup >> ViX >> Swap Manager
Blue/Create >>Green/Activate >> Yellow/Autostart.
Restart the receiver so the Swapfile will become active..
-
First off, telnet in to the box using your favourite telnet programme.
Then, type the following command (after count, enter the size of file you want. In example below, it is a 128mb swap - 1024 x 128 = 131072):
Then, set up a linux swap area
Now, to activate the swap space immediately, type:
Now, activate the swap file to load when the vu duo loads, we need to edit the fstab file. To do this, type the following command to edit the fstab file:
Add the following line to the file:
Now, when the box restarts, the swap file should automatically be enabled...
To verify that it has worked correctly, type the following command in a telnet session:
This should give you some information similar to below:
-
package enigma 1 by CST
CST_MOTOR (80?E > 58?W) NEW
CST_TRIAL1 (13?E - 19?E - 30?W) NEW
CST_TRIAL2 (13?E- 19?E- 16?E) NEW
CST_TRIAL3 (13?E- 19?E- 9?E) NEW
CST_TRIAL4 (1?W - 13?E - 19?E) NEW
CST_FOUR (9?E- 13?E- 16?E- 19?E) NEW
CST_FIVE1 (9?E - 13?E - 16?E - 19?E - 28?E) NEW
CST_five2 (7?E- 13?E- 19?E- 23.5?E-28.5?E) NEW
CST_DUAL1 (13?E- 19?E) NEW
CST_DUAL2 (13?E- 9?E) NEW
CST_DUAL3 (1?W - 13?E)NEW
CST_DUAL4 (13?E - 16?E)NEW
CST_MONO (13? E) NEW -
i have a problem with my remote....i have to be staight in front of the receiver to work and it is a bit of slow.... does anyone had the same problem? maybe is my image???
Hi Manic,
The problem you are describing is exactly the same as i had on my 800, hold a torch infront of thr ir sensor window to see if you can see the senor clearly, in my case there was a black plastic film covering 90% of the window since removing it the remote works perfectly. -
ok bear with me if some of these updates are say a week old but KOS news feeds have been on a break for the last week and a bit so there updating things now
thanks2010-12-15
* Astra 2D, 28.2?E
* (22h36) Sky Digital: A new channel has started in DVB-S Clear: ITV 1 Central West +1 (United Kingdom) on 10891.00MHz, pol.H SR:22000 FEC:5/6 SID:10145 PID:2334/2363 English.
* (22h38) Sky Digital: A new channel has started in DVB-S Clear: ITV 1 London +1 (United Kingdom) on 10891.00MHz, pol.H SR:22000 FEC:5/6 SID:10155 PID:2366/2367 English,2379 English.
* (22h27) Sky Digital: A new channel has started in DVB-S Clear: STV West +1 (United Kingdom) on 10906.00MHz, pol.V SR:22000 FEC:5/6 SID:10225 PID:2399/2398 English.
* (22h27) Sky Digital: A new channel has started in DVB-S Clear: ITV 1 Granada +1 (United Kingdom) on 10906.00MHz, pol.V SR:22000 FEC:5/6 SID:10255 PID:2403/2402 English.
* (22h28) Sky Digital: A new channel has started in DVB-S Clear: ITV 1 Meridian South +1 (United Kingdom) on 10906.00MHz, pol.V SR:22000 FEC:5/6 SID:10265 PID:2407/2406 English.
* (22h30) Freesat & Sky Digital: New PID for ITV 1 Border England: PID:3368/3369 English SID:10120 (10891.00MHz, pol.H SR:22000 FEC:5/6 - Clear).Eurobird 1, 28.2?E
* (21h29) Sky Digital: Bangla TV has left 12560.00MHz, pol.H (DVB-S SID:54065 PID:2345/2346 Bengali), it is no longer transmitted by satellite in Europe -
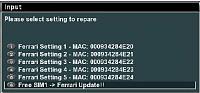
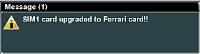
01/01/2011
Image version 1.3
Final version - tested with all SIM 1.0 cards done by Ferrari Team.
Supported library versions: 00.03, 00.04, 00.05 and 00.06Flash your box with this NFI image
Select MENU, PLUGINS and FERRARI GENUINE.
Select last option - UPGRADE -
-
pm'd you. thanks
@ caz thanks i've correct the spaces
Have replied mate, sorry its so late but let us know how you get on. -
This could work it it was an event we were likely to be watching on tv.
When the bells go the last thing on my mind will be tv or screenshots, Only my opinion though. -
Display More
ten
i've amended my f line to this with two empty brackets exactly as you have here. i then added scooby.blahdns addy to the end (without port number??)
my c line is back to normal with {0:0:3} at the endi guess thats right? the lines dont return errors in ccline manager!
soooo... im back to my original line's with dns in my fline
server shown from scobby with 0 still tho!
Dave & Scooby can you show me what the fline looks like in your cfg, obviosly hiding port and dns. -
After the fline put daveangel's dns addy.
Not a pain at all scooby were here to help. -
Ok so the probem lies with your configs try setting each others like this
F: user pass 3 0 0 { 0:0:3 } { } { } eachothers dns addy here
C: user pass no { 0:0:3 }
