Tutorial : How to Install Ubuntu Server 10.04 + Oscam + Smargo Reader

There are 61 replies in this Thread which was already clicked 63,979 times. The last Post () by mckee25.

  • Install Ubuntu Server 10.04


    Install Ubuntu Server 10.04 (follow steps, pretty straight forward, when it asks you what services you want to install, pick SSH Server, leave others off).


    2. Once installed, ssh in (putty is a good free ssh client) and here are the comamnds to download and build oscam from the sourcecode. It includes usb support for smargo readers (doesn't matter if you dont have one) and also enables the web interface.
    sudo apt-get install openssl
    sudo apt-get install libssl-dev
    sudo apt-get install cmake build-essential
    sudo apt-get install gcc g++ cmake libpcsclite1 libpcsclite-dev subversion


    cd /usr/src


    sudo wget http://cdnetworks-us-2.dl.sour….0.8/libusb-1.0.8.tar.bz2


    sudo tar xjvf libusb-1.0.8.tar.bz2


    cd libusb-1.0.8


    sudo ./configure --enable-shared=no


    sudo make


    sudo make install


    cd /usr/src


    sudo svn co oscam - Revision 5075: /trunk oscam


    cd oscam


    sudo mkdir build


    cd build


    sudo cmake -DWEBIF=1 ..


    sudo make


    3. Now copy oscam to /bin and lets setup the config files.
    sudo cp oscam /bin/oscam


    sudo pico /usr/local/etc/oscam.conf


    [global]


    nice = -1


    WaitForCards = 1


    pidfile = /var/run/oscam.pid


    logfile = /var/log/oscam.log


    usrfile = /var/log/oscamuser.log


    cwlogdir = /var/log/cw


    maxlogsize = 10000


    [newcamd]


    port = 10000@096C:000000


    key = 0102030405060708091011121314


    [webif]


    httpport = 8888


    httpuser = user


    httppwd = pass


    httprefresh = 0


    httpallowed = 127.0.0.1,192.168.0.1-192.168.0.254


    httphideidleclients = 0


    httpreadonly = 0


    sudo pico /usr/local/etc/oscam.server


    For a smargo reader plugged in via USB (you can identify the device by running lsusb and changing 003:002 to what suits your system)
    [reader]


    label=Foxtel


    protocol=SmartReader


    detect=CD


    group=1


    emmcache=1,1,2


    ecmcache=1


    device=003:002


    caid=096C


    boxid=XXXXXX (to generate this, take your box serial number, drop the last digit and convert to HEX)


    For a pheonix/serial reader try this (ttyS0 is com1, ttyS1 is com2)
    [reader]


    label=Foxtel


    protocol=mouse


    detect=CD


    group=1


    emmcache=1,1,2


    ecmcache=1


    device=/dev/ttyS0


    caid=096C


    boxid=XXXXXX (to generate this, take your box serial number, drop the last digit and convert to HEX)


    sudo pico /usr/local/etc/oscam.user


    [account]


    user=user1


    pwd=pass1


    group=1


    uniq=0


    au=Foxtel


    caid=096C


    ident=096C:000000


    4. Now run oscam to test if its working and picks up your card
    sudo oscam -b


    tail -f /var/log/oscam.log


    Monitor the log file to see what is being displayed... it should detect your card and read the entitlments and accept connections on port 10000. If all this is working then well done.


    5. One last step to get oscam to autostart at boot time.
    sudo pico /etc/rc.local


    (before the last exit line add this)
    ? oscam -b


    Assigning Static IP Address in Ubuntu


    ? Go to System -> Preferences -> Network Connections.
    ? Select Auto eth0 and click Edit
    ? Copy the MAC address to the clipboard
    ? Click Cancel
    ? Click Add
    ? Paste the MAC address you copied earlier into the MAC address box
    ? Go to the IPv4 Settings tab
    ? Select Manual from the Method drop down menu
    ? Click Add and type in your IP address, subnet mask and gateway to the left
    ? Type in your DNS server in the box below
    ? Tick Available to all users
    ? Click Apply (enter your password if it asks)
    ? Click close and reboot (reboot optional, just to check if the setting stuck)


    Your linux machine should now have a static IP address.


    For those using VMware Player and want your Oscam VM to automatically start on Windows boot, here is a guide which will help you:


    Part 1- Disable VMware Player Automatic Sleep State


    By default, VMware Player is setup to create a sleep state if the VM is closed without it being properly shut down. When this happens to your Foxtel VM and it is resumed from a sleep state, Oscam loses connection to your card reader and does not automatically reconnect, therefore needing Oscam or the VM needing to be restarted. But, you can make VMware Player avoid creating a sleep state of your VM when it is closed, whether manually or when shutting down Windows.


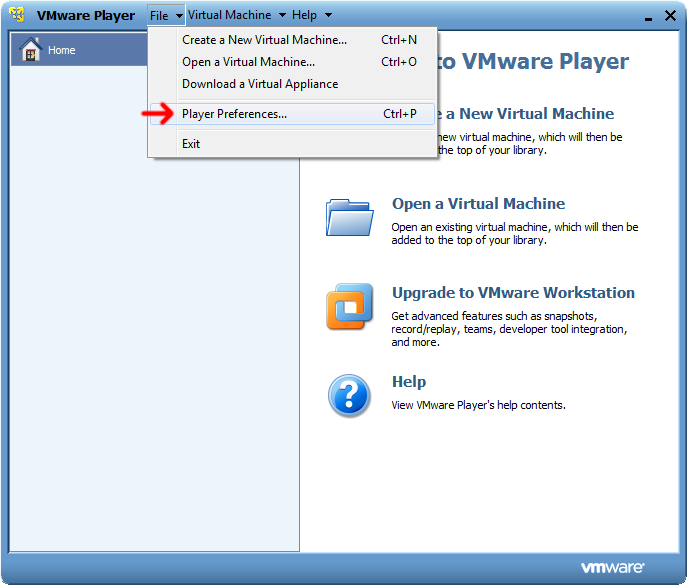
    Start VMware Player and select File>Player Preferences...


    Under 'When closing the virtual machine', select 'Power off the virtual machine'.


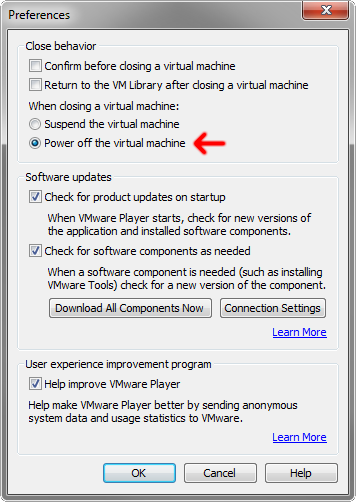
    Part 2- Start Oscam VM on Windows Boot


    Using Windows Explorer, navigate to the folder containing your VM (Default is C:\Users\<Username>\Documents\Virtual Machines\<VM Name>). Locate the .vmx file within the folder and create a shortcut to desktop (right-click>Send to>Desktop (create shortcut)).


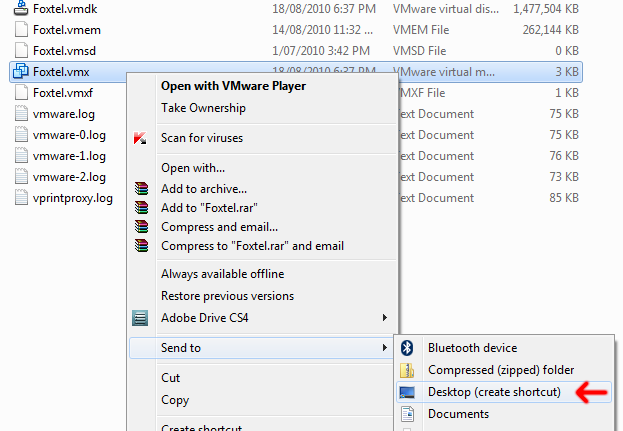
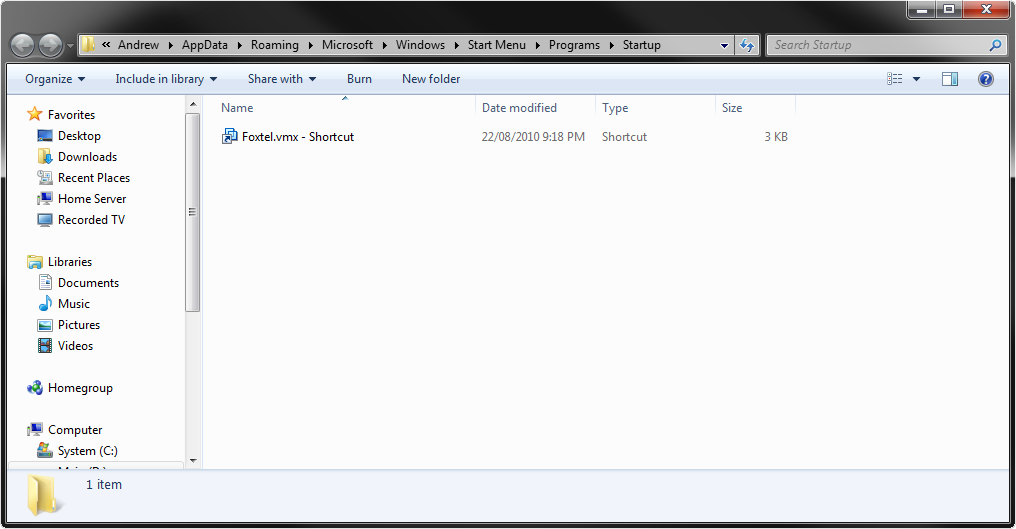
    Locate your Startup folder (Start>All Programs>Startup) and right-click>Open.


    Finally, copy or cut the shortcut from your VM on your desktop to your Startup folder. You can rename your pasted shortcut if you would like to.

  • Great work buddy . Should help some peeps out


    regards


    new2

    Dont forget to hit the thanks button!!!!!!!!!!!!!


    :41_002:


    Some articles may discuss topics that are illegal, so this information is provided for educational purposes only, your use of the content, downloads and files, or any part thereof, is made solely at your own risk and responsibility. Viewing Pay TV without a valid subscription is illegal. !! Linuxsat-Support.com cannot be held responsible for the content of any information stored or posted on this forum.

    • Official Post

    When i put into Putty the links to download
    sudo wget http://cdnetworks-us-2.dl.sourceforg...-1.0.8.tar.bz2


    getting errors....


    New to this.. If you have any advice it would be great


    Seems to be working ok now. here is another link to the file incase you still have problems.
    libusb-1.0.8.tar.bz2 - 4shared.com - online file sharing and storage - download

  • Thanks a million for that... Another piece of the puzzle solved... Putting in the Cccam.cfg file now will be another challange and getting it to work ...

  • just read read read . and if your stuck just post back


    regards


    new2

    Dont forget to hit the thanks button!!!!!!!!!!!!!


    :41_002:


    Some articles may discuss topics that are illegal, so this information is provided for educational purposes only, your use of the content, downloads and files, or any part thereof, is made solely at your own risk and responsibility. Viewing Pay TV without a valid subscription is illegal. !! Linuxsat-Support.com cannot be held responsible for the content of any information stored or posted on this forum.

  • i am following this tutorial , but when i get to : sudo svn co oscam - Revision 5075: /trunk oscam i get an error message as follows.....debian:/usr/src# sudo svn co oscam - Revision 5075: /trunk oscam
    svn: invalid option:


    any ideas how to get past this? regards.......

  • Dont forget to hit the thanks button!!!!!!!!!!!!!


    :41_002:


    Some articles may discuss topics that are illegal, so this information is provided for educational purposes only, your use of the content, downloads and files, or any part thereof, is made solely at your own risk and responsibility. Viewing Pay TV without a valid subscription is illegal. !! Linuxsat-Support.com cannot be held responsible for the content of any information stored or posted on this forum.

  • thanks for quick reply.im still getting an error when i follow your guide fella.........
    debian:/usr/src# svn co oscam - Revision 5352: /trunk oscam
    svn: invalid option:
    Type 'svn help' for usage.


    any ideas?:confuse:

  • i am following this tutorial , but when i get to : sudo svn co oscam - Revision 5075: /trunk oscam i get an error message as follows.....debian:/usr/src# sudo svn co oscam - Revision 5075: /trunk oscam
    svn: invalid option:


    any ideas how to get past this? regards.......


    I was having the same problem found out if you copy the orange section as a link then paste it will work after.
    it dont show fully on the forum thats why!

  • Hi Guys-got this to work but DVB API is not supported :-(
    Could someone please explain how to compile to include DVB API support??
    Many thanks in advance ;-)

    • Official Post

    Try a differant version of oscam, you can find it HERE or the oscam site.


    Download the oscam-svn****-x86_64-pc-linux-webif-ssl-libusb-pcsc-Distribution.tar.gz, extract and rename the binary to oscam.


    Find the existing oscam binary in directory /usr/local/bin/ and delete it.


    FTP the renamed oscam to /usr/local/bin/ and chmod 755.


    Restart oscam and you should be back in business.

  • can some one help me with this please
    wan i put this [sudo tar xjvf libusb-1.0.8.tar.bz2]
    i get this
    tar (child): libusb-1.0.8.tar.bz2: Cannot open: No such file or directory
    tar (child): Error is not recoverable: exiting now
    tar: Child returned status 2
    tar: Error is not recoverable: exiting now
    that what i get can you tel me what i am doing rung please
    thanks

Participate now!

Don’t have an account yet? Register yourself now and be a part of our community!