Settings ENIGMA 2 by CYRUS®
CST_E2_MONO
CST_E2_DUAL
CST_E2_Trial
CST_E2_Motor


CST_E2_MONO
CST_E2_DUAL
CST_E2_Trial
CST_E2_Motor
I'm starting this topic as I'd like to get feedback from members as to what sections they would like added to the forums.
Remember its us, the members that make this community. So please post what sections YOU would like to see added. Wither its a PC section or iPhone section or even a daily quiz! Please post and ask here. Now I'm not promising all the suggestions will be added but ALL suggestions WILL be considered.
Thanks.
master G
MTV Unlimited comes in under ?60 mate.
Tool to flash/backup images.
:download:
I`ve just reloaded my dream-elite image and found that the old server is back. Everything is there for download,except cams.
Ok here's a quick Newbie setup procedure for the VU+ Duo, hopefully should get you through the basic setup.
1. Unpack receiver
2. Install SATA HDD if you've bought one to install.
3. Choose your image and prepare on USB stick.
4. If your using a motorised dish prepare yourself with your longitude and latitude from here http://www.dishpointer.com/
5. Connect to TV etc..
6. Follow USB flash guideHERE
7. Follow this install wizard on screen through choosing your resolution etc..For tuner setting see attached screenshots, set your own longitude and latitude. One screenshot if for fixed dish, other for motorised dish. Don't bother with scanning, select "no, manual scan later".
Fixed dish settings: -

Motorised dish settings, change longitude and latitude to suit your area: -

Once setup is complete transfer your bouquets to the VU+ Duo using dreamboxedit. I've attached a screenshot of the correct dreamboxedit settings, just change the IP to suit your receiver. This can be found in by Pressing Menu > Setup > System > Network.

8A. Once settings/bouquets have been transferred re-check your tuner setup, it sometimes changes.
9. Once all the above is completed and your watching FTA channels, you will need to initialise the HDD is you installed one, press Menu > Setup > System > Harddisk.
The above should get you watching FTA channels.
Once the above has been done look around the menu's and ask your questions on the forum
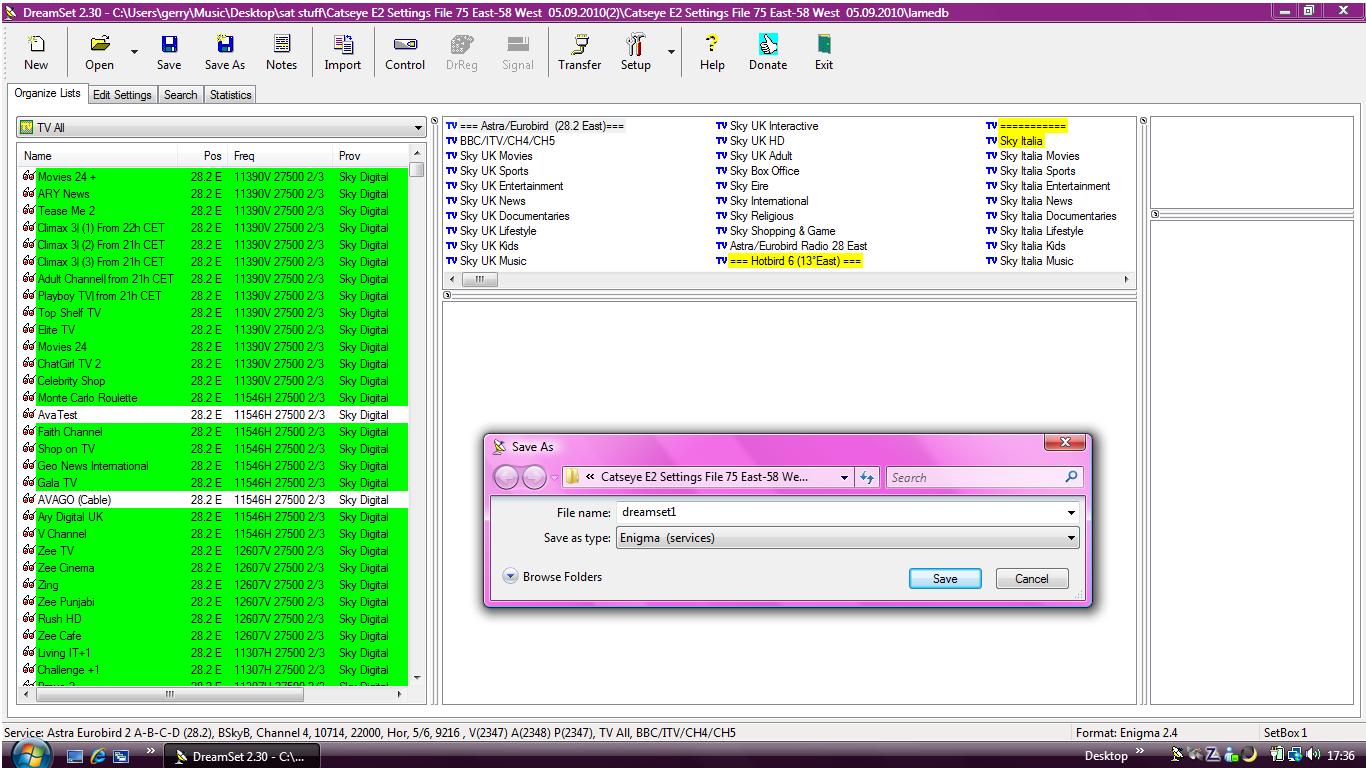
Start dreamset and click "open" to load the prefered channel setting.
Click "save as" then enter a file name and change the save as type to Enigma (services)
vuplusvuplus, create a subfolder named: duoduo folder📌 Note: Ensure extracted files include boot.bin, kernel_cfe_auto.bin, and root_cfe_auto.jffs2
| Indicator | Status |
|---|---|
| Front display shows update progress | Flashing in progress |
| USB activity light flashes | Files being read |
| Process completes | Receiver may reboot automatically |
/vuplus/duo/ with files inside
It can be very helpful when asking a question to include screenshots.
To take a screenshot you will need your Dreambox and a PC connected to the same router.
On your Dreambox
Navigate to the screen that you wish to take screenshot. In this example I navigated to:
Menu > 6 > service searching > satellite configuration
On your PC
1. In a web browser type in the IP address of your dreambox e.g.
Code:
http://192.168.0.11
and you should see the Enigma Web Interface for your Dreambox
2. Click on Control and then Screenshot
Save the image.
To attach the screenshot to your post, click Go Advanced and click Manage Attachments to browse to the image on your PC and attach the image.
Addition
By the way, you can use the "Remote Control" feature on your web browser to navigate to the menus of the Dreambox
On enigma2 boxes, you can get a screen grab by entering the following into your web browser.
http://dreamboxip/grab
where dreamboxip is the internal lan ip address of your dreambox. For example :-
http://192.168.1.10/grab
To be able to view this channels on the DM800 you need to edit the pids, make sure you add all the parameters manually.This was tested on nabilosat and works well.
Check these parameters for the channel using dreamboxedit
Satellite Position: 28,2
Transponder: 2052
Frequency: 10876000
Vertical
FEC 5/6
Other Parameters :2:0
Video Pid: 518
Audio: 646
Teletext: 582
PCR: 8190
Extra Parameters: C:0960,C:0961,C:0963
Enter these with dreambox edit then do a hard reset (pull the plug out the back then put it back in) to get the changes to register in the lamedb.If you are changing it with out the reboot it won't work, or register the changes that you are making.
This will back up all your bouquets, settings, channel mappings, cccam.cfg ect ect.
Saving you the hassle of setting it all up again should you ever need to reflash the the image for any reason.
First thing to do is create a folder in your network mount named Backup.
The rest is done with the remote as follows.
Menu/6 (systen settings) / backup or restore

select browse and look for your network mount


Select the backup folder you created and press green to save.

Now press green to run the backup, the backup will take less than 2 minutes and a message will appear showing all backed up files when complete.
All payservers care about is getting as many people on their servers as possible to make money from genuine sharers cards they exchange with,it is not uncommon for them to have no local card and pass others off as their own.
They fast become over subscribed and you will not get a stable picture. Once they absolutely need to make space for new subscribers they will boot someone off even if they have paid.They will close a server and start another without warning,they are only there to make money and dont care about those who have paid.
They are the most likely to get busted, and your IP can be recovered from the server wether you pay or exchange with them. Guess who's door gets knocked on next ? Be very careful who you are sharing with.
Please do not support payservers they are killing our hobby.The real clue is in the name "cardSharing" - enough said
I have a this for my own setup using smartbee minibee phoenix reader also works with infinity,when i was setting it up i found very little info on how to do it so am posting this as it may be useful to others.
Connect USB cable ONLY to PC.
Install drivers from CD.
Install software on PC Then start software.
Click on Options then General
In options window click Phoenix then tick Enable Phoenix mode at power-on and frequency 3.58, reset polarity Phoenix.
Click OK.
On main window click Phoenix again set Frequency and reset polarity.
Add this to CCcam.cfg
PHOENIX READER PATH : /dev/tts/0
SMARTCARD CLOCK FREQUENCY: /dev/tts/0
CAMKEY: /dev/tts/0 00 00 00 00 00 00 00 00
CAMDATA: /dev/tts/0 00 00 00 00 00 00 00 00 00 00 00 00 00 00 00 00 00 00 00 00 00 00 00 00 00 00 00 00 00 00 00 00 00 00 00 00 00 00 00 00 00 00 00 00 00 00 00 00 00 00 00 00 00 00 00 00 00 00 00 00 00 00 00 00
TRY ALL CHIDS : /dev/tts/0
Connect serial cable to back of your dreambox .Now you can disconnect the USB cable from PC & use a Mains powered USB hub the unit will boot in Phoenix mode.Now you have external cardreader.
Please note. with certain images depending on the firmware you cannot reboot your box with the serial reader connected, i am using plijade and there are no problems at all.
Flashing a new firmware by Browser
What you need to flash
You need the image file you want to flash. Image files have the extension *.nfi. You can't flash other
images like *.img files. Don't try it - it won't work.
You need either a DHCP server, a configured bootloader or a serial cable and a terminal program
like HyperTerm.
You need a browser, and a network cable. If you connect the Dreambox directly to the PC,
you need a cross cable, if you connect trough a switch/hub/router you need a normal
(non-cross) cable.
To flash a new image, you can use the second stage loader. It must be present and not broken.
The following steps assume you have a DHCP server.
If you don't have one, you have to setup an IP address in the bootloader's serial setup: (same like DM8000)
- Power down the Dreambox, either using "shutdown" and by removing the power connector.
Standby is not enough!
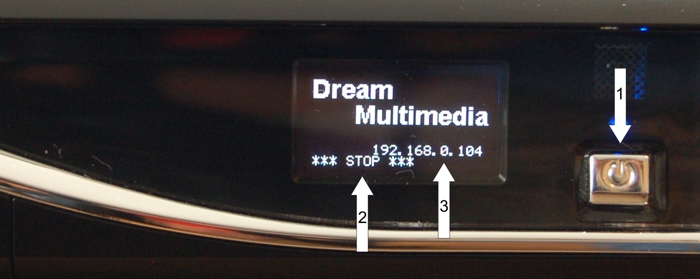
- (1.) Press and hold the power button. Replug the power connector into the Dreambox.
- (3.) A text "*** STOP ***" should appear. Now you can release the button.
The bootloader entered the "waiting" mode.
- (4.) Above the "*** STOP ***" text, there should appear an IP-address
(four decimal values with a dot in between). If there appears the string "dhcp" instead,
the box still searches for a DHCP server. Wait a bit. If it doesn't change, something doesn't
work with the DHCP server. Check wether network cable is plugged in etc. If it just doesn't
work, set an IP using the serial terminal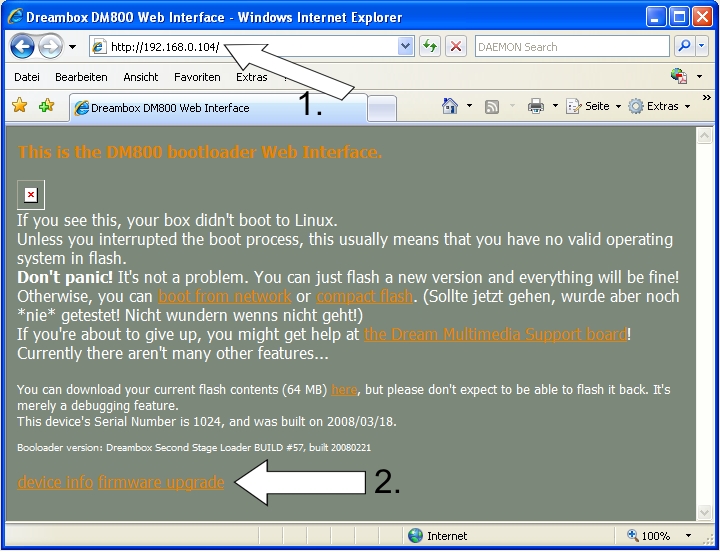
- Now, open a browser on your PC.
(1.) enter in the address line "http://ip/" (where ip must be replaced with the value in the LCD).
- (2.) on the bottom of the page, there's a link called "firmware upgrade". Click it.
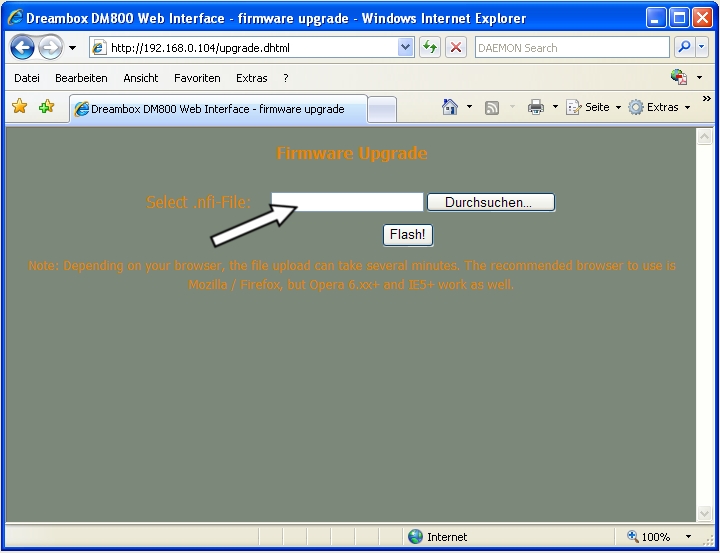
- On the next page, you can select the flash image you want to flash. be sure that it has the ".nfi" extension.
You can't flash other images (like .img)!
- Click on "FLASH!" and wait. It might take some time to upload and flash the image.
- Switch the box off again, and on again. The new image should be flashed and working.
This is the satellite you should use when setting up your motorised dish.
London & South East England=Thor 5 & 6 @ 0.8 west or Intelsat 10-02 @ 1 west
West Country & Wales=Atlanticbird-3 @ 5 west,
Liverpool & North West=Atlanticbird-3 @ 5 west ,Intelsat 10-02 @ 1 west or Thor,
Midlands & North West England=Intelsat 10-02 @ 1 west or Thor,
Scotland =Atlanticbird-3 @ 5 west, Intelsat 10-02 @ 1 west or Thor,
Outer Hebrides = Atlanticbird-3 @ 5west or Atlanticdird-2 @ 8 west,
South West Ireland = Atlanticbird-1 @ 12.5 west,
Central Ireland=Atlanticbird-2 @ 8 west,
Dublin & Belfast Atlanticbird-3 @ 5 west,
Le Harve North West France=1 west either Thor or Intelsat,
Belgium & Netherlands=Sirius-4 @ 4.8 east or Eutelsat W3A @ 7east
West France =Atlanticbird-3 @ 5 west
Paris & Central France=Sirius-4 @ 4.8 east or Thor @ 0.8 west
Lyon Marseilles & East France= Eutelsat W3A @ 7 east
If yours is not on the list and you know it feel free to add it, may prove useful to others one day.
Fixed Dish
To get the best signal from your Lnb on a fixed dish system you will need to Skew your Lnb for 1 west if this is your reference satellite you will need very little Skew maybe 1 O'Clock at the most,
Skew is the rotating of the Lnb in the Lnb holder whilst viewing a signal meter to achieve maximum signal,1st loosen the clamps that hold the Lnb in place then adjust your Skew afterward tighten up the clamp,
The further the satellite is from the reference satellite the more skew will be required so Arabsat/Badr-4 will require the Lnb to be turned as you stand in front of the dish to between 3 & 4 O'Clock again use a signal meter while doing any adjustments to your Lnb,
Motorized Systems
Always move your dish to your reference satellite before you carry out any adjustment to your Lnb on a motorized system,
For a Motorized system your Lnb should be at 12.0'Clock for maximum signal but you may find that 12.15 gives you a better signal that's why you need the signal meter,
You can also check that the Lnb is in the correct position in the Lnb Holder,
Try Furthest forward then furthest back again whilst viewing a signal meter once you have achieved maximum signal tighten up the Lnb clamp,
If you do not have a signal meter you can use the Quality Signal bars on your satellite receiver just make sure that you or some one else can see the signal bars after each adjustment to make sure that you are improving your signal,
The life of an Lnb is varied some last for 5 to 10 years others not so long the Lnb's available today are much better than a decade ago so for ?15 it is worth changing if your signal is not as strong as it was a few years back.
It is possible to have 3 days UK epg on a DM500 without network mount by storing the data in tmp. Many people including myself believed there simply wasnt enough free space but i have tested this and it is working 100% and performance is not affected in any way, infact it works better than a mounted epg file.Below i will explain with screenshots how to do it.
First you need to select tmp as the storage area, using the remote menu go to system settings.
Select EPG
Select SQLite as epg data store, you will see a warning ( THIS DIRECTORY HAS NOT GOT ENOUGH SPACE ) just ignore it.
And browse to tmp for location then press green to select.
Now exit the settings menu and press yellow to bring up the plugins menu, select Dreambox EPG Config.
Select the following as in the picture,
Package - Radio Times UK
Time Offset - 0 Hours
Number Of Days - 3
Now press blue and you will see the channel mapping screen, here you just need to match the channels from your bouquet in the left and right boxes, this is a pain but only has to be done once.When done press green to save.
You will now be back at the EPG config screen, press yellow and you will see the epg data being retrieved.This takes 10-15 mins but once done you will now have full working 3 day epg without the need for a mounted drive.
The only downside to storing the data in /tmp is when the box is rebooted all data is deleted, how ever this can be overcome if you ftp into your box and find the tmp folder.
Look for the EPG.DB file and copy it so should you have to reboot then you only need to ftp the file back into /tmp.
Before trying to update the guide via Radiotimes check this link HERE if you see a single line like this "In accessing this XML feed, you agree that you will only access its contents for your own personal and non-commercial use and" then it is off line and dont bother. If it is online you will see a full epg database page and then you can retrieve it via your DM500.
There are the BBC/Itv/Sky interactive channels which are normally only available via the red button.
These are flagged as data streams when you scan them in and wont show up on the dreambox but can easily be viewed by doing the following.
Use DreamboxEdit for this get it HERE
Import your channel list into it, find the data streams listed below, right click on each of them and convert them to tv channels.
Reload the channels back onto the dreambox & away you go.
Services: ITVi Quad,stream2,stream44 - ITV Interactive channels
Services: 1381-1399 - Sky Sports Interactive Channels
Services: stream 0 - 6 - BBC Interactive Channels
There are others showing but appear to be only feeds of channels that can be viewed normally.
Best Regards
Ten Below
First download the netinstall cd of debian linux
You can download it from the following URL:
32 Bit version
http://cdimage.debian.org/debi…ian-6.0.2.1-i386-CD-1.iso
64 Bit version
http://cdimage.debian.org/debi…an-6.0.2.1-amd64-CD-1.iso
This will install the basic debian linux system on you're harddisk.
Boot the computer from the CD you just created.

Just press enter here to start the installation

Select the language you prefer

Select the country you're in. Based on the language it selects a default country

Here you can choose the keyboard layout. Make sure you select the proper layout otherwise installation might prove to be quite tricky.

Set up the hostname of you're server here. I prefer to set up the first part of my DYNDNS account info here.

Here you must enter the domain name. In the example above, you can see i put dyndns.org here

Next up is the partition guide. Here you must choose guided - Use entire disk

Select the right harddisk. Usually in a stand-alone server, there will just be one entry

Debian will let you choose to have everything in 1 partition, or have seperate partitions for the important directory's. One advantage of having seperate partitions, You cannot fill the root system by accident if you upload a lot to the home directory. Linux will NOT boot correct , if the root filesystem is full

In the overview, You can check to see if all is set up correct before writing the changes to harddisk. Once you press finish, it will show you the next screen if you are really sure.

Once you select yes, It will write the changes to harddisk and format all partitions.

Next you will have to enter the root password. Do not choose an easy to guess password if you want the server to be reachable from the internet. (if you want to use SSH for example to manage the server from work)


Next is setting up an account to use for FTP transfer.Use username cccam for this.
It's very important you use the correct username as some scripts depend on this name!!

Again, do not use a simple to guess password. This account can also be used for SSH

When selecting a mirror, make sure you select a good, fast one


In the software selection screen, select Web Server

One of the last things it needs to know, is where to place the grub bootloader. Usually it is safe to place it on the MBR

Congratulations, You just installed a fresh new DEBIAN server.
Installing and running the script
Log into the server using username root
type in:
The script will automatically install and you will get the choice to install oscam with cccam or just cccam alone.


All it needs as userinput at the end of the installation if the following:
New STATIC ip adress
subnet mask
gateway
DNS server
Once this is finished, You can use a FTP client to upload you're CCcam config to the server and reboot it.
After the first reboot, the server will put the config in the right place and start CCcam.
Just remember the server is allready reachable with it's NEW static IP
Good luck:ok:
If you included oscam emu, the config files should be placed in /emu/oscam. This way you allways know where they are.
The logfiles from oscam can be found in /emu/log
There are allready a sample config, userfile and serverfile present in /emu/oscam
[fade]Getting Started - Flines And Clines For Beginners[/fade]
This is probably the most confusing thing for beginners so i will try and keep this as simple as possible.
The first thing you need to to is create yourself a dns address and download the updater software to go with it.I recommend using one of the following,both are equally good.
Dyndns- Register Here - DynDNS.com
Updater Software here - DynDNS.com Windows Update Client
OR
No-ip - Register Here - No-IP
Updater Software here - Update client for your dynamic IP
The dns address you choose will form the first part of all clines you send to your peers like this.
C: anyone.dyndns.org
The next part of the cline is the server listen port, by default this is 12000.
If you want to change it look in your cccam.cfg for the following line.
SERVER LISTEN PORT : 12000
you can change it to whatever you want as long as you open the corresponding port in your router.
So the cline so far reads.
C: anyone.dyndns.org 12000
This is how every cline you send will start,now you need to create a user name and password in your cccam.cfg that will allow a peer to connect to your server.This is where the fline comes in.
Remember this
F: = Friend, for others to connect to you.
C: = Connect, for you to connect to others.
To make the fline using your ftp programme connect to your box and go to Var/etc for enigma1 image or /etc for enigma2 image you will then see a file named cccam.cfg, right click on this and choose edit.
Everything you see with # in front of it is not read by cccam and can safely be deleted or if you wish to leave it there it will make no difference.These are the only lines that need to be there for it to work.If you find it easier delete it all then copy and paste this in its place.
SERVER LISTEN PORT : 12000ALLOW TELNETINFO: yesALLOW WEBINFO: yesWEBINFO USERNAME : yourchoiceWEBINFO PASSWORD : yourchoiceTELNETINFO USERNAME : yourchoiceTELNETINFO PASSWORD : yourchoiceTELNETINFO LISTEN PORT : 16000WEBINFO LISTEN PORT : 16001ZAP OSD TIME : 3#OSD USERNAME : yourchoice#OSD PASSWORD : yourchoiceOSD PORT : 80SHOW TIMING : yesDEBUG : noNEWCAMD CONF : noDISABLE EMM : noEXTRA EMM LEVEL : noMINI OSD : yesPROVIDERINFO FILE : /var/etc/CCcam.providersCHANNELINFO FILE : /var/etc/CCcam.channelinfo#MINIMUM DOWNHOPS: 1#LOG WARNINGS : /tmp/warnings.txtA simple Fline looks like this. F: linuxsat 10Bel0w This is all you need fo your peer to connect to you and means we can complete the cline using the user name and password from the fline. Completed cline ready to send to your peer looks like this. C: anyone.dyndns.org 12000 linuxsat 10Bel0w Other Settings To optimize your servers performance and security there are some other settings to add to both the c & f lines,I recommend you start with the following on your flines F: linuxsat 10Bel0w 2 0 0 { 0:0:2 } { } { } yorpeersdnsaddress This will give you the best performance i will now try and explain what these numbers mean The 2 0 0 The 2 means that the peer will get all cards at a maximum of 2 hops away from you. The first 0 means that the peer gets no emus from you. Change to 1 to get peer?s emu. The other 0 means that the peer is not allowed to send us emm. Change to 1 to take peer?s emu. Please note that there has to be a corresponding entry in the in the server you are sharing with.Cccam is capable of its own emu these are the optimal settings. The { 0:0:2 } The 2 means that the peer can reshare your card once.Change to 1 for no reahsare,3 for 2 reshare ect,ect. The IP or DNS address at the end of the F line The IP Address at the end of the F:line makes sure that only the specified peer connects to your server. This is known as locking the fline and is very important against hackers. Cccam is capable of its own emu work so there is no point using your peers or vice versa. Extra cline settings You should resrtict the amount of hops you receive from your peers as anything above hop 3 is virtually unwatchable,ideally you want to using hop1 and 2 only this is done by adding the following after the cline you recieve from your peer. No { 0:0:2 } Later on C: anyone.dyndns.org 12000 anyuser anypass no { 0:0:1, 0963:0:2, 093b:0:2 } This takes the peers local plus sly uk & sly italia from hop 2 There is loads more on this but follow this guide and you should be off to a good start. Best Regards
You can disable/enable any of these by adding/removing #
The safest way to share is receive emm from only the person you trust most - YOURSELF
This means you recieve your peers local and hop 1
if you are sharing without a local make this No { 0:0:3 }
Once you have most of the cards you want in hop1 and there are still some hop2 cards you use it is possible to take only the cards you want from hop2 to further improve the speed of your server.To do this add the caid of the provider like this