The root account is the ultimate account on a Linux and other Unix-like operating systems. This account has access to all commands and files on a system with full read, write and execute permissions. It is used to perform any kind of task on a system; to create/update/access/delete other users’ accounts, install/remove/upgrade software packages, and so much more.
Because the root user has absolute powers, any actions he/she performs are critical on a system. In this regard, any errors by the root user may have huge implications on the normal operation of a system. In addition, this account may also be abused by using it improperly or inappropriately either accidentally, maliciously, or through contrived ignorance of policies.
Therefore, it is advisable to disable the root access in your Linux server, instead, create an administrative account which should be configured to gain root user privileges using the sudo command, to perform critical tasks on the server.
In this article, we will explain four ways to disable root user account login in Linux.
Attention: Before you block access to the root account, make sure you have created an administrative account, capable of using sudo command to gain root user privileges, with the useradd command and give this user account a strong password. The flag -m means create user’s home directory and -c allows to specify a comment:
Next, add this user to the appropriate group of system administrators using the usermod command, where the switch -a means append user account and -G specifies a group to add the user in (wheel or sudo depending on your Linux distribution):
Once you have created a user with administrative privileges, switch to that account in order to block root access.
1. Change root User’s Shell
The simplest method to disable root user login is to change its shell from /bin/bash or /bin/bash (or any other shell that permits user login) to /sbin/nologin, in the /etc/passwd file, which you can open for editing using any of your favorite command line editors as shown.
Change the line:

Change root User Shell
Save the file and close it.
From now on, when root user logs in, he/she will get the message “This account is currently not available.” This is the default message, but, you can change it and set a custom message in the the file /etc/nologin.txt.
This method is only effective with programs that require a shell for user login, otherwise, sudo, ftp and email clients can access the root account.
2. Disable root Login via Console Device (TTY)
The second method uses a PAM module called pam_securetty, which permits root access only if the user is logging in on a “secure” TTY, as defined by the listing in /etc/securetty.
The above file allows you to specify which TTY devices the root user is allowed to login on, emptying this file prevents root login on any devices attached to the computer system.
To create an empty file, run.
$ sudo mv /etc/securetty /etc/securetty.orig
$ sudo touch /etc/securetty
$ sudo chmod 600 /etc/securetty
This method has some limitations, it only affects programs such as login, display managers (i.e gdm, kdm and xdm) and other network services that launch a TTY. Programs such as su, sudo, ssh, and other related openssh tools will have access to the root account.
3. Disabl SSH Root Login
The commonest way of accessing remote servers or VPSs is via SSH and to block root user login under it, you need to edit the /etc/ssh/sshd_config file.
Then uncomment (if it is commented) the directive PermitRootLogin and set its value to no as shown in the screenshot.
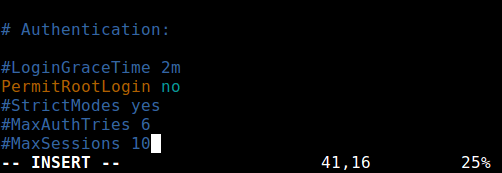
Disable Root Login in SSh
Once you are done, save and close the file. Then restart the sshd service to apply the recent change in configurations.
As you may already know, this method only affects openssh tools set, programs such as ssh, scp, sftp will be blocked from accessing the root account.
4. Restrict root Acess to Services Via PAM
Pluggable Authentication Modules (PAM in short) is a centralized, pluggable, modular, and flexible method of authentication on Linux systems. PAM, through the /lib/security/pam_listfile.so module, allows great flexibility in limiting the privileges of specific accounts.
The above module can be used to reference a list of users who are not allowed to log in via some target services such as login, ssh and any PAM aware programs.
In this case, we want to disable root user access to a system, by restricting access to login and sshd services. First open and edit the file for the target service in the /etc/pam.d/ directory as shown.
Next, add the configuration below in both files.
When you are done, save and close each file. Then create the plain file /etc/ssh/deniedusers which should contain one item per line and not world readable.
Add the name root in it, then save and close it.
Also set the required permissions on this.
This method only affect programs and services that are PAM aware. You can block root access to the system via ftp and email clients and more.
For more information, consult the relevant man pages.
That’s all! In this article, we have explained four ways of disabling the root user login (or account) in Linux. Do you have any comments, suggestions or questions, feel free to reach us via the feedback form below.