AJ's Skybox/Libertview List 2-5-15
- Updates -
Sky Box Office HD


AJ's Skybox/Libertview List 2-5-15
- Updates -
Sky Box Office HD
I have updated the CWAITE (Previously sattv5) Sky numbered channel list, with the following changes, there is also a list which excludes the Adult Channels
24/04/2015
Sky Arts Moved Transponder
Sky Showcase Moved Transponder
Update : 24/4/15
Sky 1
Sky 2
Sky Living
Sky Living +1
Sky Atlantic
Lifetime
London Live
Turner Classic Movies
Sky Sports 5
Eurosport
Chelsea TV
Angling TV
I have updated the CWAITE (Previously sattv5) Sky numbered channel list, with the following changes, there is also a list which excludes the Adult Channels
21/04/2015
TBN Europe Now TBN UK
BT Sport Extra 1 Moved to 497
BT Sport Mosaic i1 & i2 moved to 498 & 499
SkySpts1 HD (Alt) & SkySpts2 HD (Alt) Moved to 1203 & 1204
SkySports i Channels now start from 459
Angling TV moved from Test to 457
Gospel Channel Moved Transponder
Information TV Moved Transponder
XXX Brits Moved Transponder
Thanks to stavros67 for details of some of the changes above
The method above is almost 100% but you must also realise that the Alien is fussy wth USB stick and some USB sticks will just not work but I found from experience that using the HP USB format tool gets 99% of USB sticks working, just google for the tool its free to download and use and lastly make sure the image you are using is for the Alien 1.
I have updated the CWAITE (Previously sattv5) Sky numbered channel list, with the following changes, there is also a list which excludes the Adult Channels
15/04/2015
5707 added to test section
Horror Channel +1 Test Moved from 1238 to 320 renamed horror ch+1
Old Horror Channel moved to 1210
CBS Action Test Moved from 1240 to 148
Old CBS Action moved to 1211
Extreme Sports Test Moved From 1244 to 419
Old Extreme Spots Moved to 1215
Switch on 942 removed from Sky EPG moved to test area channel 1224
TV3+1 Test moved from 1248 to 1126
SkySpBoxOff on 490 Moved Transponders
BnanzaBnanza Test Moved from 1244 to 266
Jewellery Maker Test moved from 1239 to 665
Old Jewellery Moved from 665 to 1233
Old Psychics Live Test Removed as No Longer Transmitting
54226 British Muslim Test Added to 1234
Studio 66 TV2 on 941 Renamed Studio 66
55202 Channels TV Test Renamed Channels 24 and Moved to 575
Heat Test Moved to 364
Old Heat Moved to 1235
Magic Test Moved to 363
Old Magic Moved to 1238 Now Showing Irish TV
53530 Angling TV? Test added to 1237
Sky Living +1 Ireland Changed Transponders
50435 Samaa TV Test Added
5709 Sky 2 Ireland Test added to 1240
52002 Gospel Channel Test added to 1241
52006 InformationTV Test added to 1242
52007 S66 Test added to 1243
52075 BON TV Test added to 1244
5711 Sky Atlantic UK Test added to 1245
5712 Sky Living UK Test added to 1248
5713 Eurosport Test added to 1249
5714 TCM Test added to 1250
Old Magic Channel Now Showing Showcase with Magic EPG on 1238
MTV+1 Moved from 160 to 270
Spike Test Moved From 1203 to 160 (no longer encrypted)
Switch Renamed Sin and Moved from 1224 to 942
Samaa Test Moved from 1239 to 832 as its Changed Transponders
Old Alex Casino Removed from 1207
Old Cruzr TV Removed from 1209
5566 Sky Living +1 Ireland on 1204 Moved to 1115
1210 52002 horror ch+1 Moved to 1241 Renamed Gospel Channel
1211 52007 CBS Action Renamed S66 and moved to 1243
BT Sport Mosaic Test Removed from 1214
Extreme Sports Test Removed from 1215
52006 Old Jewelry Maker Moved to 1242 and renamed 52006 Information TV
1251 Old BEACHBODY removed
Update : 15/4/15
ESPN HD
Sky Sports News
Extreme Sports
Sky Living +1
CBS Action
Horror Channel +1
Channels 24
Sikh Channel
Jewellery Channel
Jewellery Maker
Magic
Heat
Various radio stations
My Amiko 8900 just stopped while changing channel, I turned it off at the back to reset it, it has been stock on boot for hours. Any help will be appreciated, the spark is not booting as well.
Babatunde
Should really start your own thread to get more help but you will need to reflash both your spark and E2 image first I would get spark working I've uploaded a rescue image flash that first then upgrade your spark image once this is done than flash the E2 image of your choice.
At the top of your list add this:
#EXTM3U
I've corrected and uploaded it here just unzip and point your pvr client to it. Tested on my kodi install and works.
The dev is reporting it as broken but still plenty of ways to watch HD footy the phoenix add on had a few matches on in the phoenix tv section tsn channels are in hd , you just got to look around.
The Aliens are funny in the way they work if you just are pointing to one satellite (28.2E) then the dvbapi causes problems and you have to delete it before oscam works also try to download and install the oscam files via the softcam feed to ensure compatibiliy with the Alien. I have uploaded the softcam feed just install then look in plugins then green button to get plugins then look in softcams for the oscam of your choice.
ps master G I am not contradicting you about dvbapi it is what I have found with experience on the Aliens that deleting it is the best option.
With nbcsn live extra plugin on kodi you don't need login details just a vpn service with a server thats in USA.
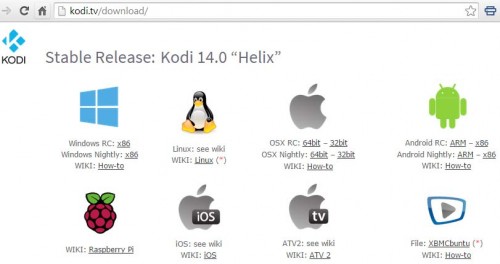
Download Kodi for Amazon Fire TV
Head over to the Kodi download page, and download the latest stable Kodi apk available for Android ARM architecture.
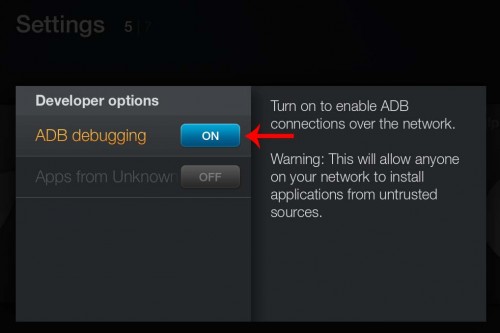
Enable ADB Debugging on Amazon Fire TV
The first thing that needs to be done is to enable AD Debugging on Amazon Fire TV. This will allow you to connect and make modifications or sideload XBMC on Amazon Fire TV. To this go to Settings -> Developer Options and turn ADB Debugging to ON.
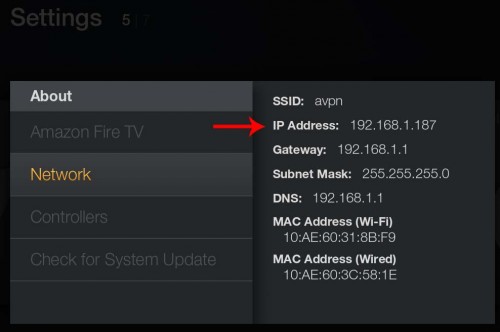
Then go to Settings -> About – Network and note down the IP address of your Fire TV. In my case
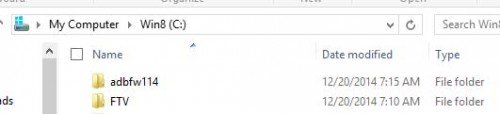
Download AFTV Toolkit
There are currently two major tools that allow rooting and sideloading apps on Amazon Fire TV: Amazon Fire TV Utility App and the adbFire app. The adbFire app is available for Windows, Mac, and Linux while the Amazon Fire TV Utility apps works only on Windows. You may use either one depending on your situation. I use both as the both have certain unique features. On Windows, download one of the apps and extract it to a separate folder on C Drive as shown in the picture below.
I have shown how to install using both utilities but just follow the one you are comfortable with.
Method 1: Sideload Kodi with Fire TV Utility App
With the Amazon Fire TV Utility app on Windows, first connect to your Fire TV by going to File -> Connect.
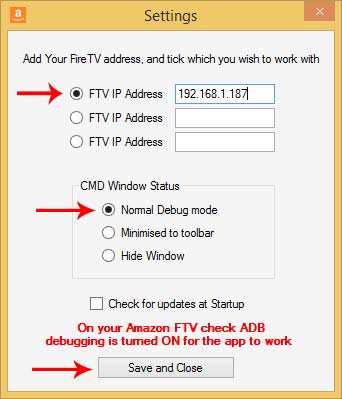
Enter the IP address and choose Normal Debug mode and click Save and Close. A command prompt should popup (shown below) indicating a successful connection.

Then, 1) ensure that the Fire TV Utility app says Connected to 192.168.1.187 (of course, with your IP address) at the bottom, 2) browse and select the downloaded Kodi ARM apk, and 3) click on “Side Load 3rd Party Application” button to install Kodi on Amazon Fire TV.
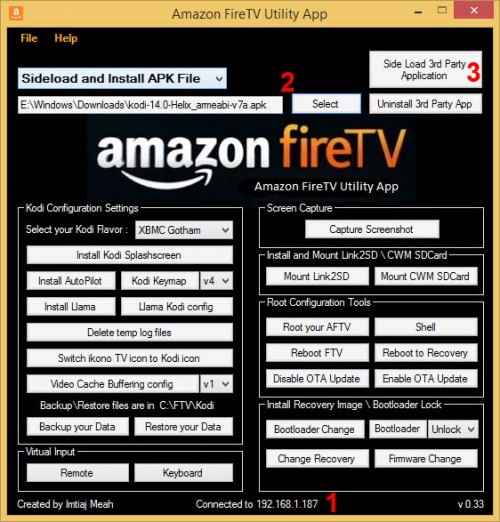
You should a message as shown below, indicating successful Kodi installation. That’s is all there is to side-loading Kodi on Amazon Fire TV using the Fire TV utility app.

Method 2: Kodi Installation on Fire TV with adbFire App
Sideloading Kodi using adbFire app is quite simple as well. Just run the application file in the extracted adbFire folder. Then, 1) enter the IP address, 2) press connect, and 3) press Install APK and browse and select the downloaded Kodi apk file.
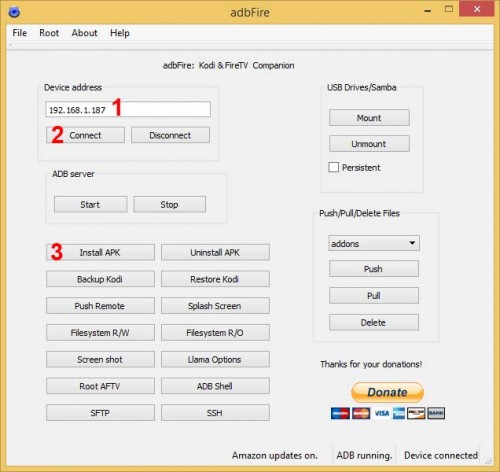
The the progress bar at the bottom proceed to completion. You see a confirmation message after successful Kodi installation on AFTV.
Launch and Run Kodi on Amazon Fire TV
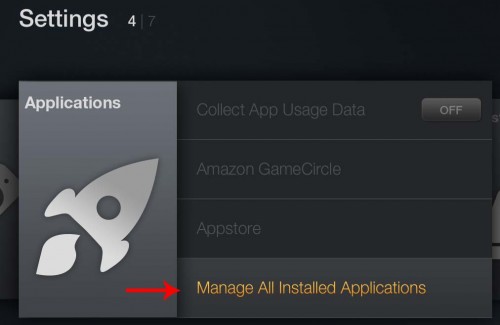
After installing Kodi on Amazon Fire TV press both “Select” and “Play” button for more than 5 seconds to reboot it. Unfortunately, AFTV does not add homescreen shortcut icons for sideloaded applications. Therefore, to launch Kodi go to Settings -> Applications -> Manage All Install Applications -> Scroll down and select Kodi -> Select Launch Application.
That’s a lot of steps to launch an application. You can overcome this limitation by creating a Kodi shortcut on Amazon Fire TV homescreen or making your Amazon Fire TV automatically boot to Kodi. Go ahead, install Kodi on Amazon Fire TV and enjoy what this great little box has to offer.
Loading kodi on the fire stick should be the same.
thanks to Anand Subramanian for tutorial
hey most of the channels are saying no signal i have tried everything i can think of to fix this, can you please be of any help and tell me what could be wrong please. also the box i am using is a openbox s11
It would be useful to know what steps you have already taken, you say most of the channels say no signal but can you list what channels are working? I f you are getting some channels it might point towards sat cable becoming loose or the sat dish having moved.
Update : 26/3/15
Mostly just small fixes
Investigation Discovery
Investigation Discovery +1
Discovery Science +1
TLC +1
TLC +2
Hi mate if I remember rightly in PKT images you have install the config files separately, it should be in the same section where you installed the oscam file from, should be called oscam configurationv or similar.
im havinga nightmare with his as im new to the andriod oeraaating system.
ive installed the file and t inmy downnnloads then what? this operating system is so limited to what i can do with it!
whr is it stored and how do i access it through the xbmc?
(Sorry I didn't see this post before so I made another post in the support section feel free to delete.)
Mate you need the second file 'plugin.video.nbcsnliveextra.zip ' download to your pc then onto a usb stick don't unzip.
Put the usb stick in your android box then in xbmc system>addons>install from zip file> navigate to your usb stick (sda1) then click o the zipped file it will say something like nbc plugin enabled.
I am suggesting doing it by this method because the direct downloading it the box then installing threw up a wrong structure error for me.
[h=3]AJ's Skybox/Libertview List 12-3-15[/h]
Only getting audio on some channels? If you have an F3S/F5S box, you might need to update your firmware.
Firmware upgrades can erase everything so make sure to BACKUP!
- Updates -
Investigation Discovery
Investigation Discovery +1
Discovery Science +1
Discovery History +1
Discovery Shed
Animal Planet +1
Home & Health
QUEST +1
DMAX
DMAX +1
TLC +1
TLC +2
Showcase
GEO TV
I am using KODI both for my mx box and windows but I am sure the guide will work for XBMC install as well.
As this is a enthusiasts forum I want to create a guide here so you can mess around with settings so that your install is to your exact specifications, KODI is extremely customizable here I will guide you through all the different ways you can customize it from using libraries, smart playlists and the super favorites addon and even changing skins can give you options.
BASICS
I don't know about you but I find the RSS feed really annoying and it does consume a little of your bandwidth (for those with slow broadband) so I would recommend disabling it, unless you really need it. I am using Aeon Nox skin at the moment and that doesn't allow disabling but you can change to confluence which allows it then change back to the skin of your choice.
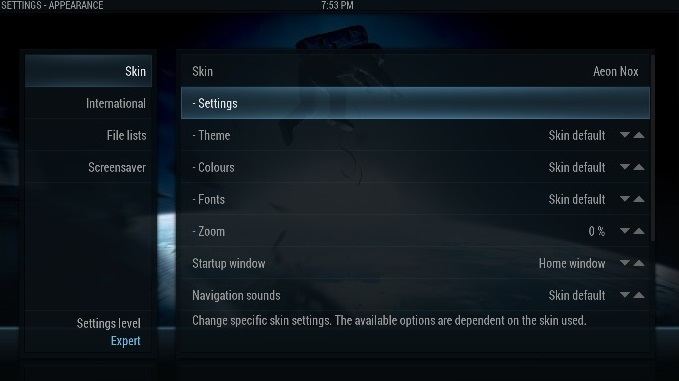
1 In the Kodi main menu, go to System > Settings.
2 Select the Appearance tab to configure appereance settings.
3 In the skin tab, scroll down and disable show RSS news feed.
4 Now, go back to the main menu by pressing the back key on the remote control or ESC-key on the keyboard.
My box came from Hong Kong so I had to change my time settings so this is how you do that.
1 Go to System > Settings > Appearance.
2 Select the second tab called International. Select Language to change it and then select Region.
3 Select the suitable region from the list.
4 Now, your system clock will show the correct time.
You can have the weather for your location, I tried the met office but found yahoo easier to use.
1 Go to System > Settings > Weather.
2 Select “Service for Weather Information”.
3 Select “Get More…”
4 Select “Yahoo! Weather” add-on.
5 Type in your location, all done.
- - - Updated - - -
Kodi/XBMC TV and Movie Library
Thanks to MJD
This easy to follow guide will show you every step you need to integrate Genesis with your Kodi/XBMC TV and Movie Library.
This guide shows how to integrate the TV Shows section. To integrate movies just repeat the process but choose Movies instead of TV Shows at the final step. This can also be done with add-ons like iStream.
This guide is done on a Mac and so the path I take to get to the stored Genesis TV & Movies links is different to that of a Windows/Linux/Android/FireTV user. The paths for Windows/Linux/Android/FireTV users is located at the bottom.
For some devices we need to show hidden files otherwise you will not be able to find the path to your TV Shows-Movies. This is very simple:
Select SYSTEM
Click here to view the original image of 640x400px.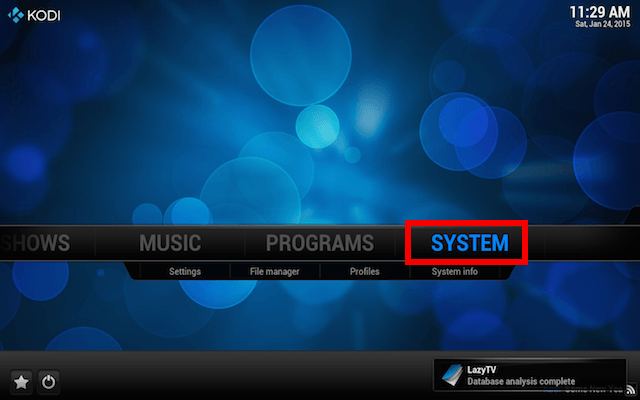
Select Appearance
Click here to view the original image of 640x400px.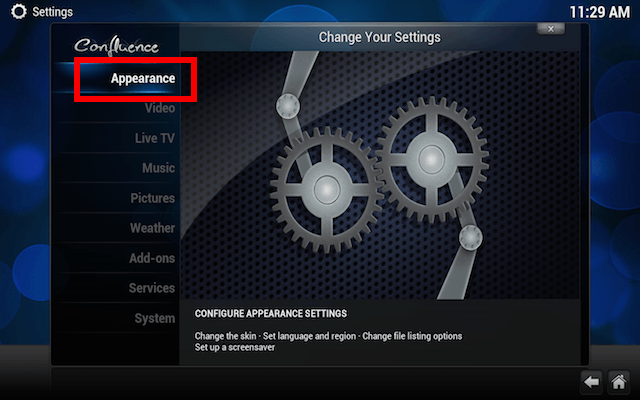
Select File Lists and turn on Show Hidden Files and Directories
Click here to view the original image of 640x400px.
Now you can move on to integrating Genesis with you Kodi/XBMC Library
On your XBMC homescreen select VIDEOS > Files
Click here to view the original image of 640x400px.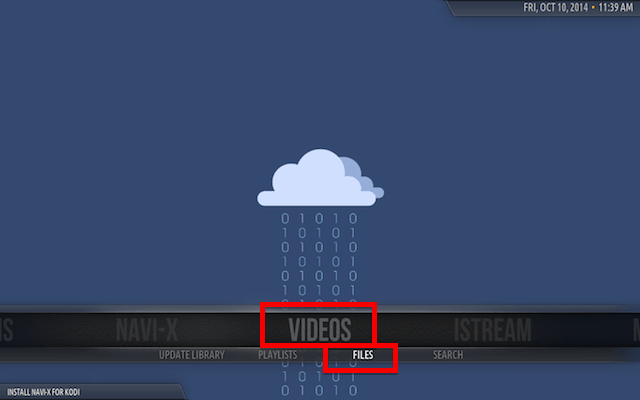
Select ADD VIDEOS...
Click here to view the original image of 640x400px.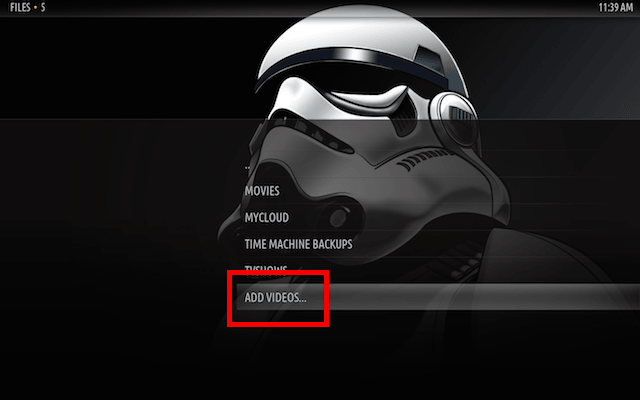
Select Browse
Click here to view the original image of 640x400px.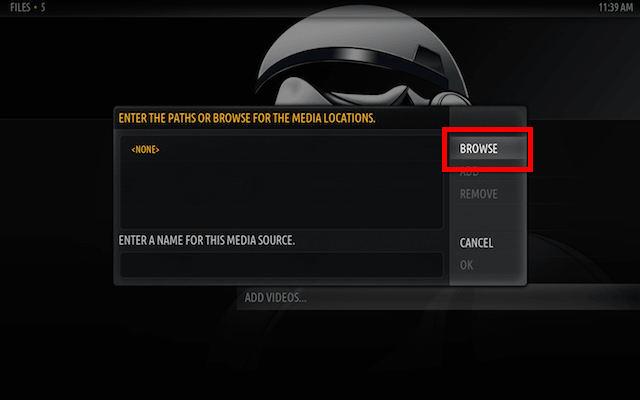
Select HOME FOLDER
Click here to view the original image of 640x400px.
Select LIBRARY
Click here to view the original image of 640x400px.
Select APPLICATION SUPPORT
Select XBMC or Kodi if you have upgraded to 14.0 Helix
Select USERDATA
Select ADDON_DATA
Select PLUGIN.VIDEO.GENESIS
Select TVSHOWS
You will now see a list of all the TV Shows you added to Genesis. Select OK
You can change the name of the media source in this screen to anything you want if you wish. Select OK
You will now see a screen like the following. Click on none until you see TV Shows
When you have selected TV Shows select OK
Click here to view the original image of 640x360px.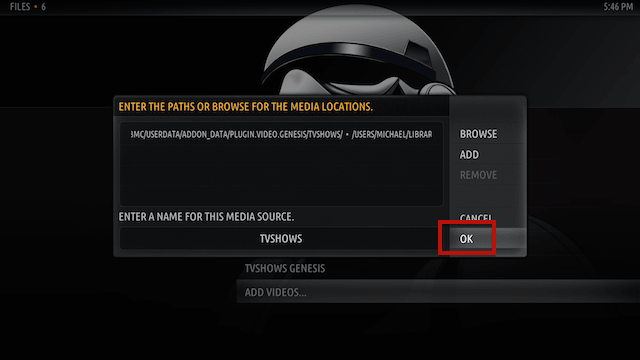
Select YES and allow Kodi/XBMC to refresh the new content
This is now completed. If you go to your home screen you will now see a TV SHOWS link. Clicking on that link will take you to the shows you have subscribed to in Genesis. Now if you do exactly the same but choose Movies instead of TV Shows there will be a link to your Movies library on your home screen as well.
Click here to view the original image of 640x360px.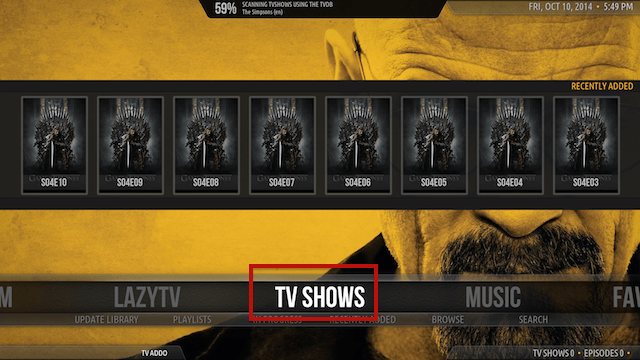
Use the following path for Windows. If you are on Kodi select Kodi and not XBMC:
C:\Users\AppData\Roaming\XBMC\userdata\addon_data\ plugin.video.genesis\TVShows
Thanks to 'Another Michael' for providing that.
The path for Linux users is. If you are on Kodi select Kodi and not XBMC:
/home/USERNAME/.xbmc/userdata/addon_data/plugin.video.genesis/TVShows
Thanks to 'lassegs' for providing that
The path for FireTV users is. If you are on Kodi select Kodi and not XBMC:
/storage/emulated/0/Android/data/org.xbmc.xbmc/files/.xbmc/userdata/addon_data/plugin.video.genesis/TVShows/
Thanks to Dhorlo for providing that.
Use the following path for Android replacing XBMC with Kodi if you have updated.
/storage/emulated/0/Android/data/org.xbmc.xbmc/files/.xbmc/userdata/addon_data/plugin.video.genesis/TVShows/
or
Root filesystem/sdcard/Android/data/org.xbmc.xbmc/files/.xbmc/userdata/addon_data/plugin.video.genesis/TVShows/
This tutorial has been done for genesis but it works with any video or music addon that uses the library function and I have also found that tv shows or movies added to the libraries auto play when clicked and you don't have to choose stream source like you would when you use the genesis addon directly. Also once you have created a tv show or a movie category I will show you to how add them to your home screen for easy access later on in this thread (which makes it wife and kids friendly.)
- - - Updated - - -
SMART PLAYLIST
At the moment I am going through how to organise your tv shows and movies it takes a bit of time but at the end it will enhance and make your viewing experience that much better. The smart playlist creates a filter for your collection, say you have 100's of movies and you want to separate them so that you can easily find what you are looking for. (can be used for tv shows and music)
In my example I am want all my animation movies in one group so using a smart playlist I create this group and all my animation movies will automatically go in this group.
Video>playlists
Click here to view the original image of 969x544px.
new smart playlist
Click here to view the original image of 969x544px.
select movies then new rule
Click here to view the original image of 969x544px.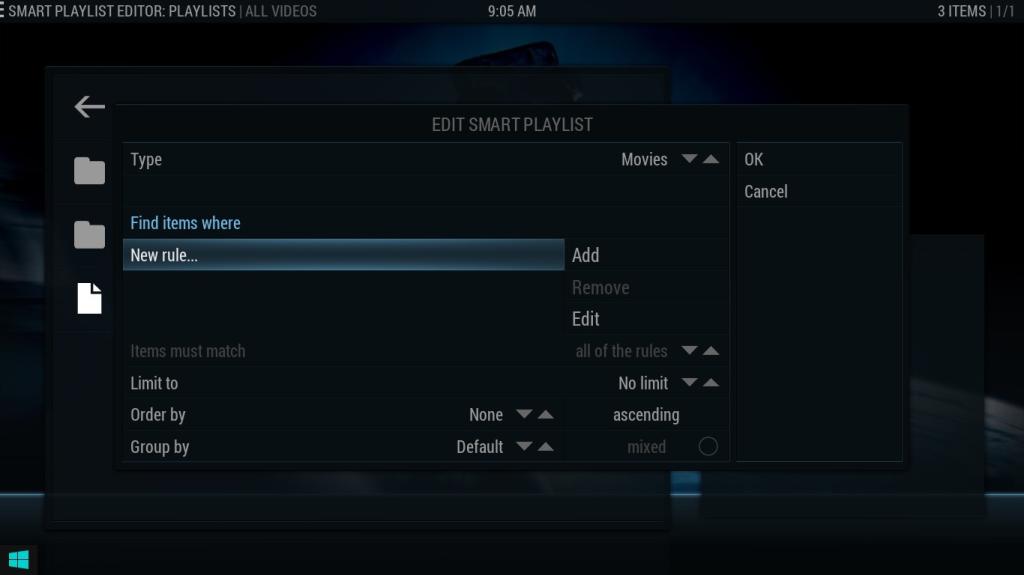
select genre is then click browse
Click here to view the original image of 969x544px.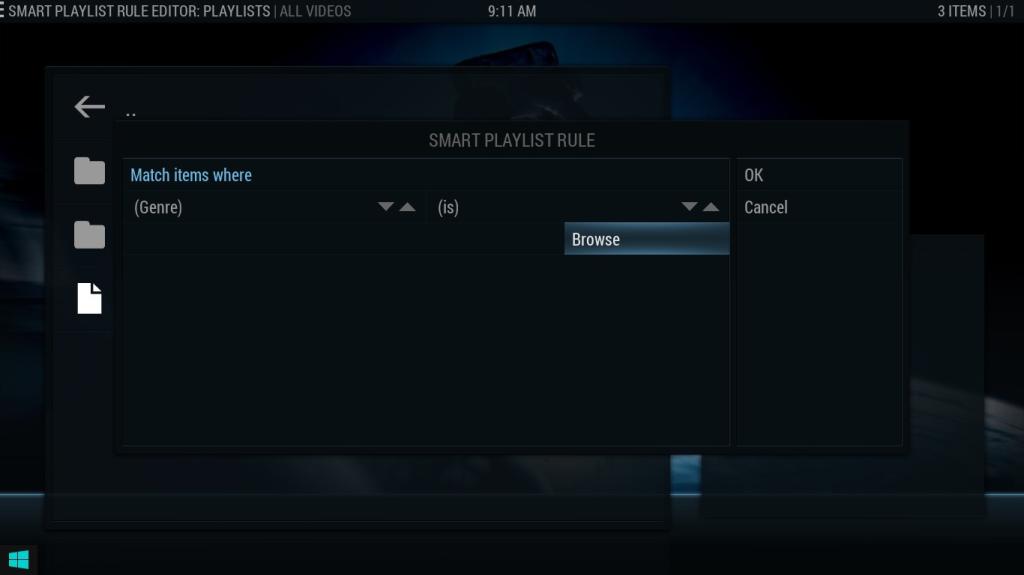
select animation then ok
Click here to view the original image of 969x544px.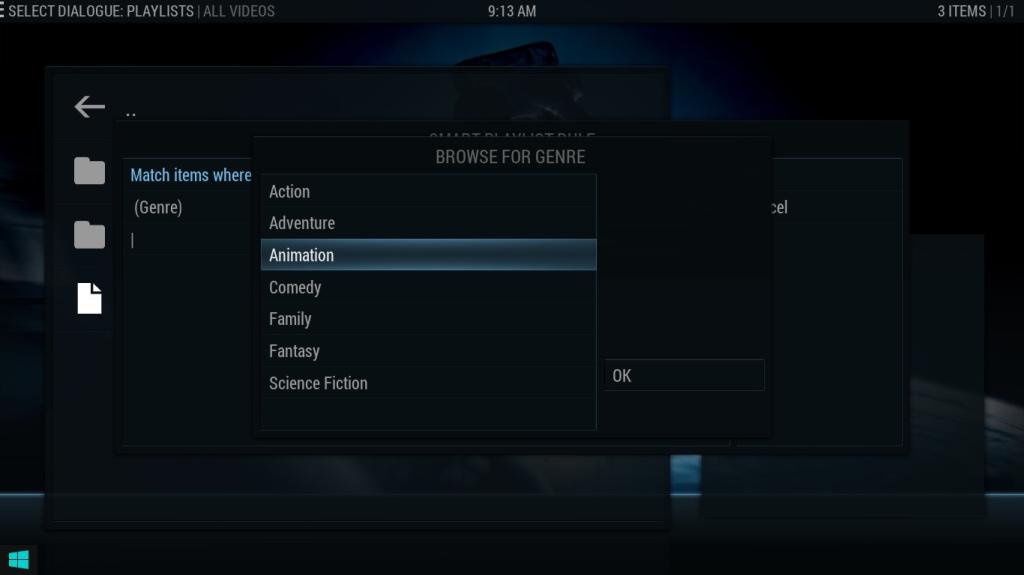
give your playlist a name eg ANIMATION press ok, all done
now if you look in video>playlist you will see your new list there
Click here to view the original image of 969x544px.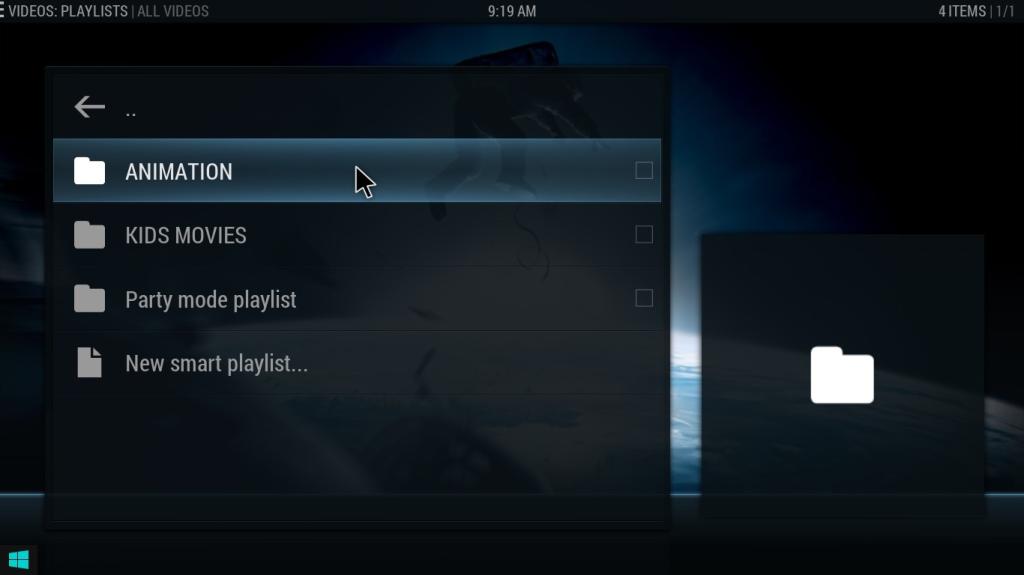
selecting the ANIMATION playlist will only have animated movies
Click here to view the original image of 969x544px.
remember you can choose the way the list is presented and you want the wow factor
Click here to view the original image of 969x544px.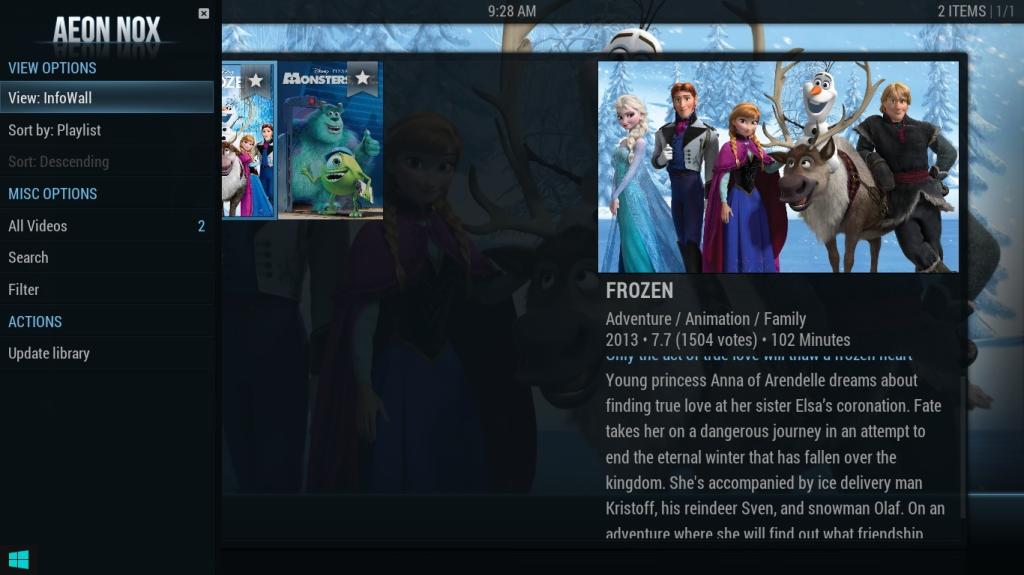
This is another step towards the goal of personalizing our kodi install
- - - Updated - - -
Super Favourites
In effect this addon lets you create a custom addon in which you can add bits from other addons.
Super Favourites is a Kodi / XBMC add-on that offers a better way of managing your XBMC/Kodi favourites.
Just about any menu item within XBMC/Kodi can be added to Super Favourites, even from addons that don't normally provide this feature.
You can create sub-folders where your Kodi favourites can then be copied or moved into.
The add-on allows you to create your own custom addon with just the best bits of your favourite addons. Search your favourite addons, play your favourite music, read your favourite comic strips, select your favourite playlists, browse your favourite movies, listen to your favourite radio stations, watch your favourite cartoons, the possibilities are endless, all from within one easy to use addon.
Open Kodi / XBMC
Select SYSTEM > Settings (depending on the skin you are using it may just be Settings)
Click here to view the original image of 640x400px.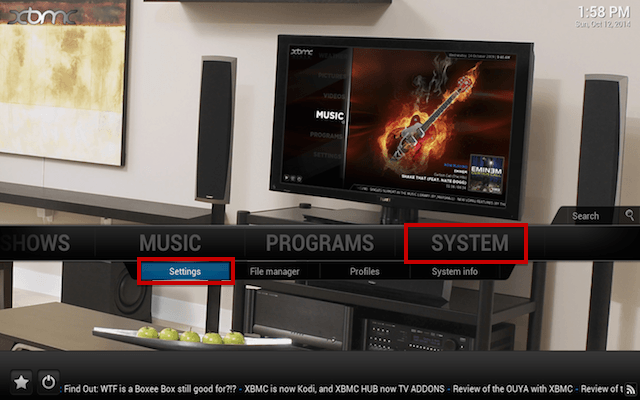
Select Add-ons
Click here to view the original image of 640x400px.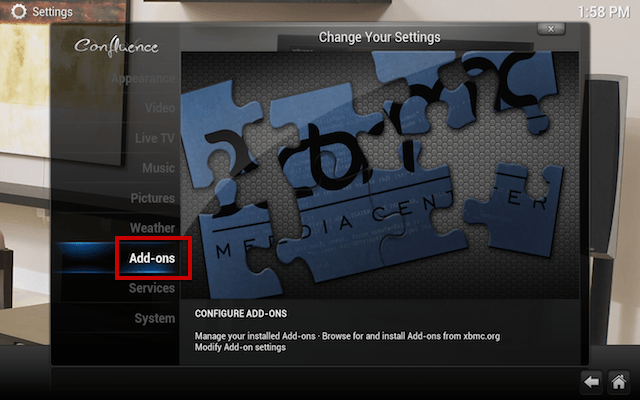
Select Get Add-ons
Click here to view the original image of 640x400px.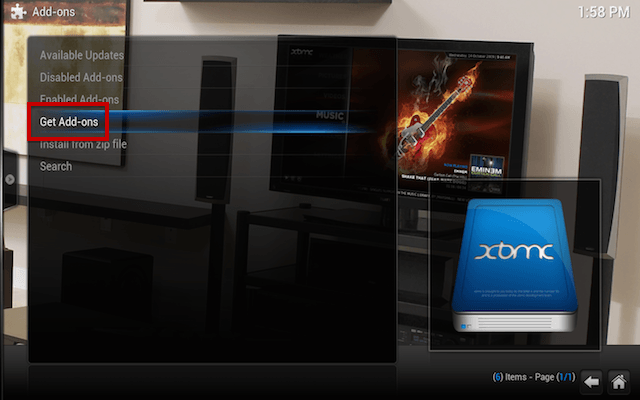
Select XBMC.org Add-ons or Kodi Add-On Repository
Click here to view the original image of 640x400px.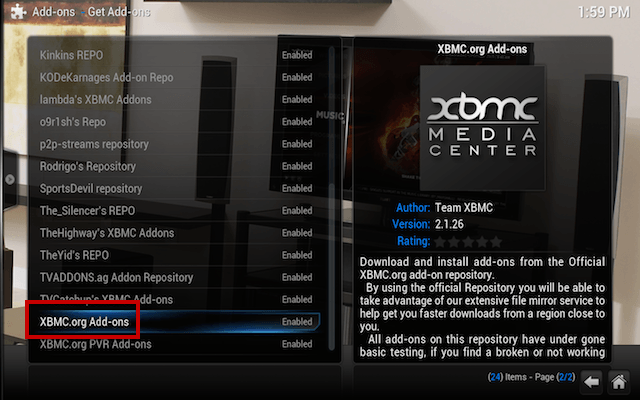
Select Program Add-ons
Click here to view the original image of 640x400px.
Select Super Favourites
Click here to view the original image of 640x400px.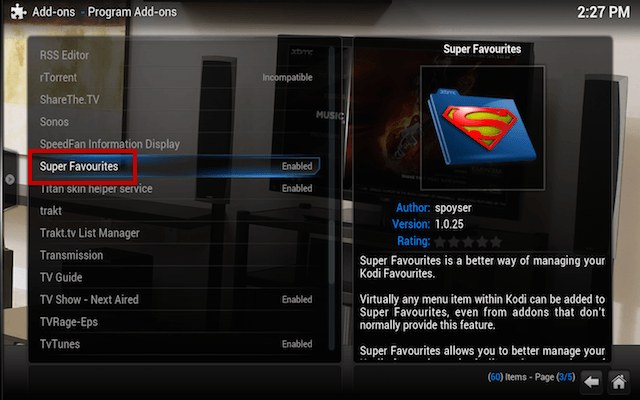
Select Install
Click here to view the original image of 640x400px.
Super Favourites is now installed. So now I will show a quick example of how it can be used.
On your home screen select PROGRAMS
Click here to view the original image of 640x400px.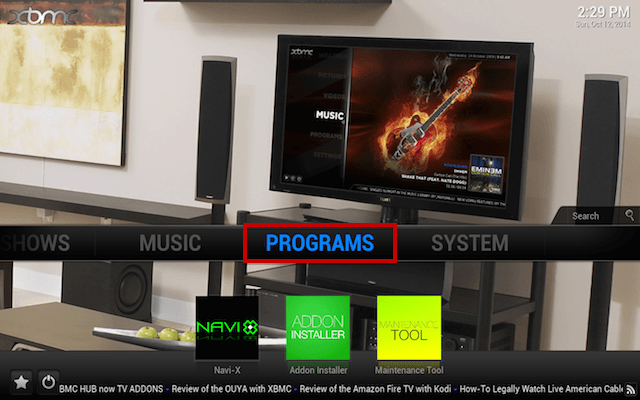
Select Super Favourites
Click here to view the original image of 640x400px.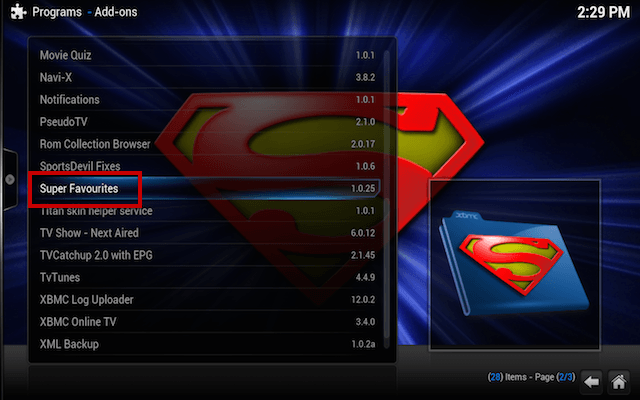
Select Explore Kodi Favourites
Click here to view the original image of 640x400px.
The next screen will now show a list of everything you have ever added to favourites. The more you favourite, the more will appear in this location and the better you can tweak this with Super Favourites.
The next process is an example not something I am saying you need to do.
Highlight one of your favourites
Click here to view the original image of 640x400px.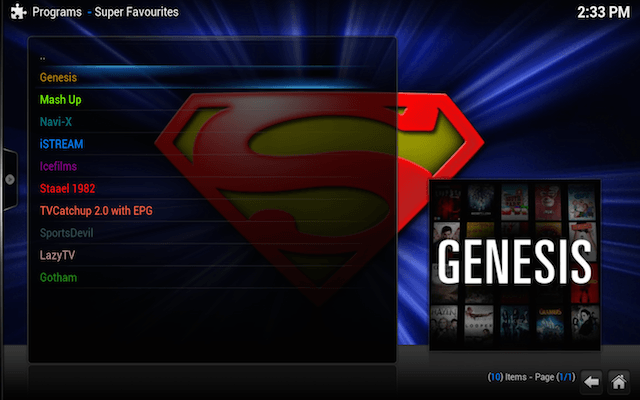
Press C to bring up the contextual menu
Click here to view the original image of 640x400px.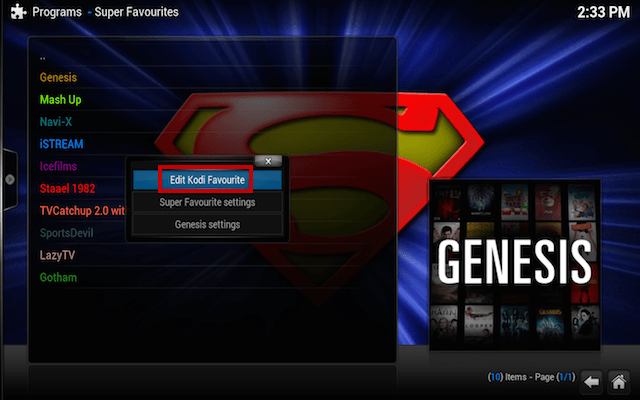
Select Copy favourite
Click here to view the original image of 640x400px.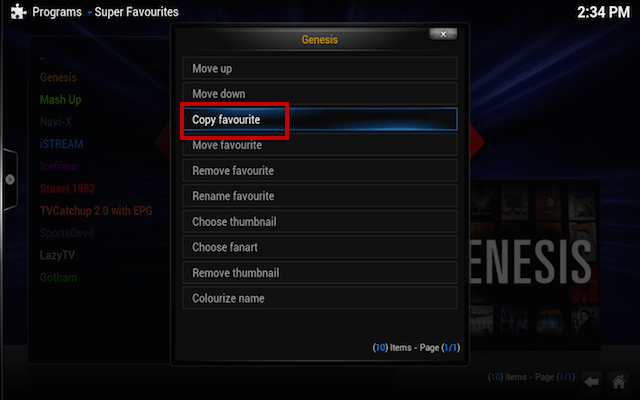
A new window will open and this is now asking you where you would like to copy your favourite to.
Select Super Favourites
Click here to view the original image of 640x400px.
Your Super Favourites directory is now open. What we will do is create a new folder inside here for the favourite.
Select New folder
Click here to view the original image of 640x400px.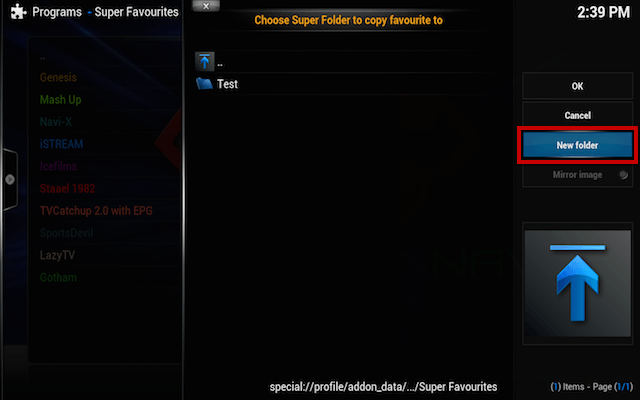
Type in any name you want for the new directory. This example if for testing purposes only. If you are wanting to create a collection to all your animated add-ons/favourites then you could name it Animated Collection or something similar. Press Enter or select Done
Select the new directory you have just created
Click here to view the original image of 640x400px.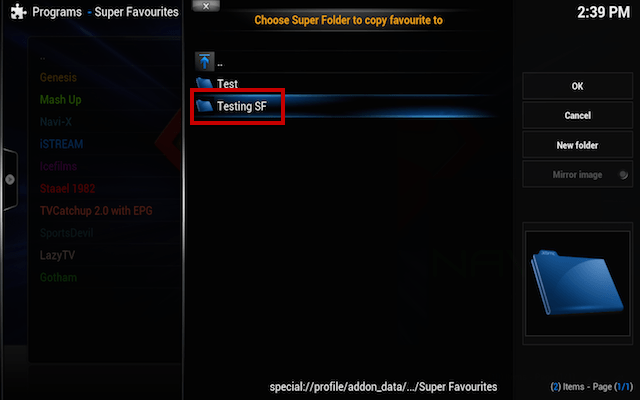
Select OK
Click here to view the original image of 640x400px.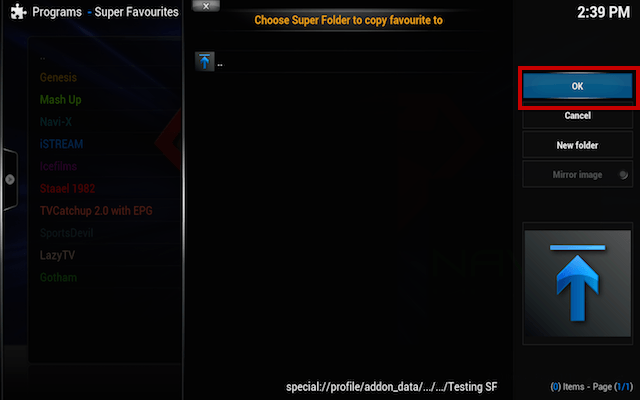
The favourite you just copied will now appear under the directory you created in the Super Favourites plugin. You can repeat the process adding just the favourites you want and can even create sub directories in the directories you create. There is much more that you can do with this add-on but the above was just a quick example. As with anything, the more you use it the more you will understand just what you can do with it.
Thanks to MJD for the tutorial.
- - - Updated - - -
Ok if you followed my tutorial so far then we are ready to start customizing our KODI install no matter what it was installed on Windows or Android etc..
Lets start with something simple with the weather addon hopefully by now you have set it to your region.
system>appearance>settings
Setup Aeon Nox main menu

highlight weather then try to use my settings click on the item and a sub menu will open eg clicking on 'set item background' a sub menu opens pick conditional weather (off course you can download your own backgrounds and use them instead).

And this the effect you get on your home screen.
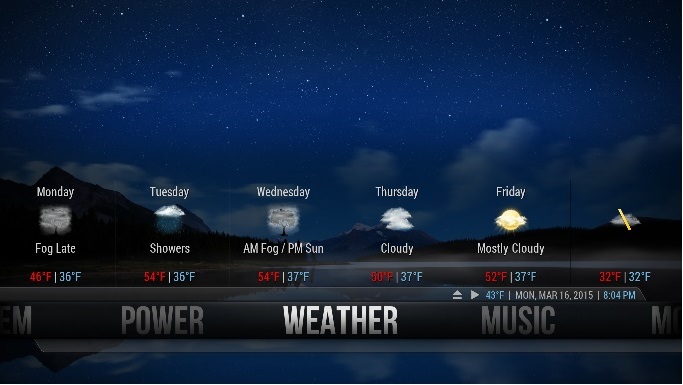
and when you click on weather

now doesn't that enhance your KODI install.
I use Hotspot shield Elite which was £20 for a years sub which I think is pretty cheap to view 3pm matches in HD I do have fiber broadband and its has been glitch free and another advantage is you can access other addons like 1 channel and ice films without looking for fixes.

