


Help Correctly Aligning My 1.2M Channel Master Dish and moteck H-H180 motor
- FUCKYOUALL
- Closed
- Thread is marked as Resolved.
There are 244 replies in this Thread which was already clicked 31,697 times. The last Post () by supwiddiss.
-
-
 Display More
I requested photos also. Why?
I searched for your H-H mount and came up with several different brands of dished mounted to them.
And every single one had the geometry setup differently. Every offset dish does not have the 22.5 degree offset like your does.
I saw one with a prime focus dish mounted. It was the easiest setup of all.
I stayed up late compiling a set of graphics. This is as clear as it can be.
You will need an accurate way to measure angles. As mentioned I have one. A nice little digital angle gauge with magnetic base.
So far so good?
Here we go. Going to start with comparisons of a Prime focus dish and yours. "Same, but different"Here is a prime focus dish bolted to your H-H motor. The motor shaft will be set to the 0 reference. It is assumed you have the mount aligned to true south.
With the declination adjuster set at 0.
The degree indicator by the ground pole is set for your latitude.
Measuring the indicated red angles and the black dish mounting plate angles have to equal the latitude settings. Also indicated on the latitude setting bolt by the ground pole.
The red angles and black mounting plate angle has to be set for your latitude. As close as you are able to.
Nothing else matters right now.Here the latitude angles have been set and all of the adjustable mounts are tightened.
Look at the satellite arc. The dish is aimed above the satellites in it. We haven't added declination yet.
When we do add the proper declination angle, the dish will lower and should now be aimed at the satellite arc when it is moved East to West.
So. We now need to add declination.Using the declination adjuster we look at the scale and lower the dish look angle. It would be a very good idea to put your digital angle gauge on the dish mounting plate for this. Because the stamped numbers on the declination scale will "get you there". A digital gauge will put you spot on.
After declination is added and the bolts(s) tightened. Your geometry should be very very close.
Look at the diagram upper right. See how declination put the bullseye right on the satellite arc?
Exactly what we want. We're ready to look for a satellite signal. Since Thor is your target satellite. It's time to start findng it.
Now. Let's go to setup your offset dish.
Here we go.
Here we have your offset dish mounted to the H-H motor.
Red is still set for your latitude. The black dish mount plate is set at your latitude angle.But look. The dish look angle is way up there in the sky. See it?
We need to now adjust the mount to compensate for your dish offset.
With the declination indicator set at 0 and tightened. We need to loosen the bolts that will allow the dish to tilt down.
See it? It's "looking" way up in the sky.So now. Lower the dish angle. Remember. Not with the declination adjuster. With the slotted mounting bracket .
Lower it using your latitude degrees minus the offset angle of 22.5 degrees.
The next graphic shows the results.Here we have what you need after the offset adjustment. The blue wedge represents where the black dish mounting plate should be after using the slotted brackets.
Now we have an offset dish properly setup. The black mounting plate will be angled where the blue wedge is at the back of the dish.
Look at the dish arc graphic. Just like like the polar mount dish. We are tracking above the satellite arc.
We need to now add the correct declination angle.Here we go. What is your correct declination angle? You now need to adjust that.
Using the declination adjustment bolt and scale. Plus your digital gauge. Turn the declination adjustment so the dish lowers an additional 7.5 degrees from where it is right now. Tighten the declination adjuster. Double check your math.
Look at the satellite arc graphic now. Your dish is very close to tracking the arc and the bullseye shows the effects of the angles at the dish.
You are ready to find your target satellite signal.
Every angle you set is correct. But still a little "Fuzzy".
You will move the dish in very small incements. East and West.
Every time you move it just a very little. Lift up and push down on the dish rim.When you finally locate Thor. Use the E-W movement to get the highest signal.
If the dish need to be raised or lowered. Use the declination adjustment.
But......if the declination adjustment would have to moved a lot. It would be better to loosen the slotted adjustments to do that.
You really need to keep the declination adjustment scale within only a few degrees.As you try to locate other satellite. Start at ones the closest to Thor first.
Expect to find tracking errors. Use the chart below and think what is happening.You may find that Thor signal is the highest it can get after you tweak the adjustments.
And the next satellite you locate. You may have to pull up or push down on the dish rim.
It will get worse as you get further away from Thor.
Get a pattern. "Do I have to pull up or push down on the dish to get a better signal?".
A few tips to remember. It's in many polar mount (the type you have) no matter who made them.
Tracking errors higher in the arc. Use the latitude adjustment.
Tracking errors at arc extremes. Use the declination adjusters.
You may have to loosen the whole mount on the pole and turn it a little bit.
It's a delicate dance.
And none of these types of mounts are plug and play. More like plug and patience.
And it's definitely nothing like being Neo and suddenly knowing Kung Fu.
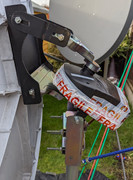
thanks but how can i tilt the plate? > editing my pics so i "understand" would make it better for me! if you look there isnt a way to "tilt the plate" due to the fact its impossible (LOOK AT MY PICS you will see that)
-

yes i mean if he edited my pics it would make more sense to me than just making other graphics
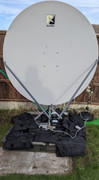
ps the black bags at the bottom of the dish mount have stones in them while i wait for slabs to be delivered, they are just on there temp
-
Display More
Display More
I requested photos also. Why?
I searched for your H-H mount and came up with several different brands of dished mounted to them.
And every single one had the geometry setup differently. Every offset dish does not have the 22.5 degree offset like your does.
I saw one with a prime focus dish mounted. It was the easiest setup of all.
I stayed up late compiling a set of graphics. This is as clear as it can be.
You will need an accurate way to measure angles. As mentioned I have one. A nice little digital angle gauge with magnetic base.
So far so good?
Here we go. Going to start with comparisons of a Prime focus dish and yours. "Same, but different"Here is a prime focus dish bolted to your H-H motor. The motor shaft will be set to the 0 reference. It is assumed you have the mount aligned to true south.
With the declination adjuster set at 0.
The degree indicator by the ground pole is set for your latitude.
Measuring the indicated red angles and the black dish mounting plate angles have to equal the latitude settings. Also indicated on the latitude setting bolt by the ground pole.
The red angles and black mounting plate angle has to be set for your latitude. As close as you are able to.
Nothing else matters right now.Here the latitude angles have been set and all of the adjustable mounts are tightened.
Look at the satellite arc. The dish is aimed above the satellites in it. We haven't added declination yet.
When we do add the proper declination angle, the dish will lower and should now be aimed at the satellite arc when it is moved East to West.
So. We now need to add declination.Using the declination adjuster we look at the scale and lower the dish look angle. It would be a very good idea to put your digital angle gauge on the dish mounting plate for this. Because the stamped numbers on the declination scale will "get you there". A digital gauge will put you spot on.
After declination is added and the bolts(s) tightened. Your geometry should be very very close.
Look at the diagram upper right. See how declination put the bullseye right on the satellite arc?
Exactly what we want. We're ready to look for a satellite signal. Since Thor is your target satellite. It's time to start findng it.
Now. Let's go to setup your offset dish.
Here we go.
Here we have your offset dish mounted to the H-H motor.
Red is still set for your latitude. The black dish mount plate is set at your latitude angle.But look. The dish look angle is way up there in the sky. See it?
We need to now adjust the mount to compensate for your dish offset.
With the declination indicator set at 0 and tightened. We need to loosen the bolts that will allow the dish to tilt down.
See it? It's "looking" way up in the sky.So now. Lower the dish angle. Remember. Not with the declination adjuster. With the slotted mounting bracket .
Lower it using your latitude degrees minus the offset angle of 22.5 degrees.
The next graphic shows the results.Here we have what you need after the offset adjustment. The blue wedge represents where the black dish mounting plate should be after using the slotted brackets.
Now we have an offset dish properly setup. The black mounting plate will be angled where the blue wedge is at the back of the dish.
Look at the dish arc graphic. Just like like the polar mount dish. We are tracking above the satellite arc.
We need to now add the correct declination angle.Here we go. What is your correct declination angle? You now need to adjust that.
Using the declination adjustment bolt and scale. Plus your digital gauge. Turn the declination adjustment so the dish lowers an additional 7.5 degrees from where it is right now. Tighten the declination adjuster. Double check your math.
Look at the satellite arc graphic now. Your dish is very close to tracking the arc and the bullseye shows the effects of the angles at the dish.
You are ready to find your target satellite signal.
Every angle you set is correct. But still a little "Fuzzy".
You will move the dish in very small incements. East and West.
Every time you move it just a very little. Lift up and push down on the dish rim.When you finally locate Thor. Use the E-W movement to get the highest signal.
If the dish need to be raised or lowered. Use the declination adjustment.
But......if the declination adjustment would have to moved a lot. It would be better to loosen the slotted adjustments to do that.
You really need to keep the declination adjustment scale within only a few degrees.As you try to locate other satellite. Start at ones the closest to Thor first.
Expect to find tracking errors. Use the chart below and think what is happening.You may find that Thor signal is the highest it can get after you tweak the adjustments.
And the next satellite you locate. You may have to pull up or push down on the dish rim.
It will get worse as you get further away from Thor.
Get a pattern. "Do I have to pull up or push down on the dish to get a better signal?".
A few tips to remember. It's in many polar mount (the type you have) no matter who made them.
Tracking errors higher in the arc. Use the latitude adjustment.
Tracking errors at arc extremes. Use the declination adjusters.
You may have to loosen the whole mount on the pole and turn it a little bit.
It's a delicate dance.
And none of these types of mounts are plug and play. More like plug and patience.
And it's definitely nothing like being Neo and suddenly knowing Kung Fu.
thanks but how can i tilt the plate? >

Please. Look at my illustrations. With due diligence. Be Neo.
Your dish mounting plate is already way way too low compared to the latitude indicators shown in red.
Read. Read. And read again. Please. 5 minutes to reply tell me you did not digest all of the steps needed by your.Do you see how the dish mounting plate that the dish is fastened to is nowhere close to the angle of the motor pivot shaft?
-
Dan I saw all the pics that's why I asked for ones with a spirit level
 . That dish is only secure when the pole supporting it is bolted to the ground and I can assure you its not level and that's from your pic. I cant see the end of your garden so have no idea if there are any obstructions so a pic from just behind dish would be perfect. Any trees in the way? or houses. I would never install a dish that low down unless it was in a field. And I would struggle to align yours in present state.
Can I ask why did you buy a channel master???
-
Display MoreDisplay More
Display More
I requested photos also. Why?
I searched for your H-H mount and came up with several different brands of dished mounted to them.
And every single one had the geometry setup differently. Every offset dish does not have the 22.5 degree offset like your does.
I saw one with a prime focus dish mounted. It was the easiest setup of all.
I stayed up late compiling a set of graphics. This is as clear as it can be.
You will need an accurate way to measure angles. As mentioned I have one. A nice little digital angle gauge with magnetic base.
So far so good?
Here we go. Going to start with comparisons of a Prime focus dish and yours. "Same, but different"Here is a prime focus dish bolted to your H-H motor. The motor shaft will be set to the 0 reference. It is assumed you have the mount aligned to true south.
With the declination adjuster set at 0.
The degree indicator by the ground pole is set for your latitude.
Measuring the indicated red angles and the black dish mounting plate angles have to equal the latitude settings. Also indicated on the latitude setting bolt by the ground pole.
The red angles and black mounting plate angle has to be set for your latitude. As close as you are able to.
Nothing else matters right now.Here the latitude angles have been set and all of the adjustable mounts are tightened.
Look at the satellite arc. The dish is aimed above the satellites in it. We haven't added declination yet.
When we do add the proper declination angle, the dish will lower and should now be aimed at the satellite arc when it is moved East to West.
So. We now need to add declination.Using the declination adjuster we look at the scale and lower the dish look angle. It would be a very good idea to put your digital angle gauge on the dish mounting plate for this. Because the stamped numbers on the declination scale will "get you there". A digital gauge will put you spot on.
After declination is added and the bolts(s) tightened. Your geometry should be very very close.
Look at the diagram upper right. See how declination put the bullseye right on the satellite arc?
Exactly what we want. We're ready to look for a satellite signal. Since Thor is your target satellite. It's time to start findng it.
Now. Let's go to setup your offset dish.
Here we go.
Here we have your offset dish mounted to the H-H motor.
Red is still set for your latitude. The black dish mount plate is set at your latitude angle.But look. The dish look angle is way up there in the sky. See it?
We need to now adjust the mount to compensate for your dish offset.
With the declination indicator set at 0 and tightened. We need to loosen the bolts that will allow the dish to tilt down.
See it? It's "looking" way up in the sky.So now. Lower the dish angle. Remember. Not with the declination adjuster. With the slotted mounting bracket .
Lower it using your latitude degrees minus the offset angle of 22.5 degrees.
The next graphic shows the results.Here we have what you need after the offset adjustment. The blue wedge represents where the black dish mounting plate should be after using the slotted brackets.
Now we have an offset dish properly setup. The black mounting plate will be angled where the blue wedge is at the back of the dish.
Look at the dish arc graphic. Just like like the polar mount dish. We are tracking above the satellite arc.
We need to now add the correct declination angle.Here we go. What is your correct declination angle? You now need to adjust that.
Using the declination adjustment bolt and scale. Plus your digital gauge. Turn the declination adjustment so the dish lowers an additional 7.5 degrees from where it is right now. Tighten the declination adjuster. Double check your math.
Look at the satellite arc graphic now. Your dish is very close to tracking the arc and the bullseye shows the effects of the angles at the dish.
You are ready to find your target satellite signal.
Every angle you set is correct. But still a little "Fuzzy".
You will move the dish in very small incements. East and West.
Every time you move it just a very little. Lift up and push down on the dish rim.When you finally locate Thor. Use the E-W movement to get the highest signal.
If the dish need to be raised or lowered. Use the declination adjustment.
But......if the declination adjustment would have to moved a lot. It would be better to loosen the slotted adjustments to do that.
You really need to keep the declination adjustment scale within only a few degrees.As you try to locate other satellite. Start at ones the closest to Thor first.
Expect to find tracking errors. Use the chart below and think what is happening.You may find that Thor signal is the highest it can get after you tweak the adjustments.
And the next satellite you locate. You may have to pull up or push down on the dish rim.
It will get worse as you get further away from Thor.
Get a pattern. "Do I have to pull up or push down on the dish to get a better signal?".
A few tips to remember. It's in many polar mount (the type you have) no matter who made them.
Tracking errors higher in the arc. Use the latitude adjustment.
Tracking errors at arc extremes. Use the declination adjusters.
You may have to loosen the whole mount on the pole and turn it a little bit.
It's a delicate dance.
And none of these types of mounts are plug and play. More like plug and patience.
And it's definitely nothing like being Neo and suddenly knowing Kung Fu.
thanks but how can i tilt the plate? >
Please. Look at my illustrations. With due diligence. Be Neo.
Your dish mounting plate is already way way too low compared to the latitude indicators shown in red.
Read. Read. And read again. Please. 5 minutes to reply tell me you did not digest all of the steps needed by your.Do you see how the dish mounting plate that the dish is fastened to is nowhere close to the angle of the motor pivot shaft?
I Read it yes......
FYI I CANT SEE THE MOUNT IN THEM PICS YOU POSTED!!
replied fast yes......
still understand it........ NO
if you LOOK AT MY PICS YOU WILL UNDERSTAND WHAT I MEAN!!
I TRIED TO TILT IT BACK IT WONT TILT BACK..... so how do u expect me to "tilt it back"????
-
Dan I saw all the pics that's why I asked for ones with a spirit level
. That dish is only secure when the pole supporting it is bolted to the ground and I can assure you its not level and that's from your pic. I cant see the end of your garden so have no idea if there are any obstructions so a pic from just behind dish would be perfect. Any trees in the way? or houses. I would never install a dish that low down unless it was in a field. And I would struggle to align yours in present state.Can I ask why did you buy a channel master???
already tried that, ground is flat, everything is level, fence opposite side of dish yes, hence it on a pallet now, i brought the cm dish and im going to use it for feed hunting!
-
Dan. Nope. Not cool.
If you cannot attain the angles needed.
Try removing the dish mounting bracket and turn it over 180 degrees. -
Display More
Display MoreDisplay More
Display More
I requested photos also. Why?
I searched for your H-H mount and came up with several different brands of dished mounted to them.
And every single one had the geometry setup differently. Every offset dish does not have the 22.5 degree offset like your does.
I saw one with a prime focus dish mounted. It was the easiest setup of all.
I stayed up late compiling a set of graphics. This is as clear as it can be.
You will need an accurate way to measure angles. As mentioned I have one. A nice little digital angle gauge with magnetic base.
So far so good?
Here we go. Going to start with comparisons of a Prime focus dish and yours. "Same, but different"Here is a prime focus dish bolted to your H-H motor. The motor shaft will be set to the 0 reference. It is assumed you have the mount aligned to true south.
With the declination adjuster set at 0.
The degree indicator by the ground pole is set for your latitude.
Measuring the indicated red angles and the black dish mounting plate angles have to equal the latitude settings. Also indicated on the latitude setting bolt by the ground pole.
The red angles and black mounting plate angle has to be set for your latitude. As close as you are able to.
Nothing else matters right now.Here the latitude angles have been set and all of the adjustable mounts are tightened.
Look at the satellite arc. The dish is aimed above the satellites in it. We haven't added declination yet.
When we do add the proper declination angle, the dish will lower and should now be aimed at the satellite arc when it is moved East to West.
So. We now need to add declination.Using the declination adjuster we look at the scale and lower the dish look angle. It would be a very good idea to put your digital angle gauge on the dish mounting plate for this. Because the stamped numbers on the declination scale will "get you there". A digital gauge will put you spot on.
After declination is added and the bolts(s) tightened. Your geometry should be very very close.
Look at the diagram upper right. See how declination put the bullseye right on the satellite arc?
Exactly what we want. We're ready to look for a satellite signal. Since Thor is your target satellite. It's time to start findng it.
Now. Let's go to setup your offset dish.
Here we go.
Here we have your offset dish mounted to the H-H motor.
Red is still set for your latitude. The black dish mount plate is set at your latitude angle.But look. The dish look angle is way up there in the sky. See it?
We need to now adjust the mount to compensate for your dish offset.
With the declination indicator set at 0 and tightened. We need to loosen the bolts that will allow the dish to tilt down.
See it? It's "looking" way up in the sky.So now. Lower the dish angle. Remember. Not with the declination adjuster. With the slotted mounting bracket .
Lower it using your latitude degrees minus the offset angle of 22.5 degrees.
The next graphic shows the results.Here we have what you need after the offset adjustment. The blue wedge represents where the black dish mounting plate should be after using the slotted brackets.
Now we have an offset dish properly setup. The black mounting plate will be angled where the blue wedge is at the back of the dish.
Look at the dish arc graphic. Just like like the polar mount dish. We are tracking above the satellite arc.
We need to now add the correct declination angle.Here we go. What is your correct declination angle? You now need to adjust that.
Using the declination adjustment bolt and scale. Plus your digital gauge. Turn the declination adjustment so the dish lowers an additional 7.5 degrees from where it is right now. Tighten the declination adjuster. Double check your math.
Look at the satellite arc graphic now. Your dish is very close to tracking the arc and the bullseye shows the effects of the angles at the dish.
You are ready to find your target satellite signal.
Every angle you set is correct. But still a little "Fuzzy".
You will move the dish in very small incements. East and West.
Every time you move it just a very little. Lift up and push down on the dish rim.When you finally locate Thor. Use the E-W movement to get the highest signal.
If the dish need to be raised or lowered. Use the declination adjustment.
But......if the declination adjustment would have to moved a lot. It would be better to loosen the slotted adjustments to do that.
You really need to keep the declination adjustment scale within only a few degrees.As you try to locate other satellite. Start at ones the closest to Thor first.
Expect to find tracking errors. Use the chart below and think what is happening.You may find that Thor signal is the highest it can get after you tweak the adjustments.
And the next satellite you locate. You may have to pull up or push down on the dish rim.
It will get worse as you get further away from Thor.
Get a pattern. "Do I have to pull up or push down on the dish to get a better signal?".
A few tips to remember. It's in many polar mount (the type you have) no matter who made them.
Tracking errors higher in the arc. Use the latitude adjustment.
Tracking errors at arc extremes. Use the declination adjusters.
You may have to loosen the whole mount on the pole and turn it a little bit.
It's a delicate dance.
And none of these types of mounts are plug and play. More like plug and patience.
And it's definitely nothing like being Neo and suddenly knowing Kung Fu.
thanks but how can i tilt the plate? >
Please. Look at my illustrations. With due diligence. Be Neo.
Your dish mounting plate is already way way too low compared to the latitude indicators shown in red.
Read. Read. And read again. Please. 5 minutes to reply tell me you did not digest all of the steps needed by your.Do you see how the dish mounting plate that the dish is fastened to is nowhere close to the angle of the motor pivot shaft?
I Read it yes......
FYI I CANT SEE THE MOUNT IN THEM PICS YOU POSTED!!
What mount can't you see.replied fast yes......
still understand it........ NO
if you LOOK AT MY PICS YOU WILL UNDERSTAND WHAT I MEAN!!
I TRIED TO TILT IT BACK IT WONT TILT BACK..... so how do u expect me to "tilt it back"????
Look at my reply with photos.
You are given all of the information needed to setup your mount and dish properly and correctly.
You need to put in a lot more effort and thought in your task.
We can show and explain things exactly how the entire task shall be done.
We cannot do it for you. But an experienced installer or a person with better comprehension could. -
Dan. Nope. Not cool.
If you cannot attain the angles needed.
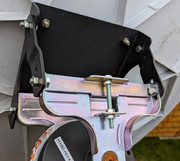
Try removing the dish mounting bracket and turn it over 180 degrees.Cant take the 2 brackets off as the dish plate will NOT REACH THE TOP AND BOTTOM Plates i already tried it!! Dont ask why they wont reach because i already tried it and it wouldn't reach (see this pic)
 and
and 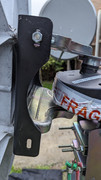
-
-
yes i mean if he edited my pics it would make more sense to me than just making other graphics
ps the black bags at the bottom of the dish mount have stones in them while i wait for slabs to be delivered, they are just on there temp
I understand FFS as much as the IDGAF biker tee shirt I have.
And the chickies shirt that reads "it won't lick itself".
Pallets and bags for a dish mount is super lame btw. Perhaps for a fixed dish where a nudge here or there is marginally acceptible.
But for a polar mount. No frikkin' way. -
yes i mean if he edited my pics it would make more sense to me than just making other graphics
ps the black bags at the bottom of the dish mount have stones in them while i wait for slabs to be delivered, they are just on there temp
I understand FFS as much as the IDGAF biker tee shirt I have.
And the chickies shirt that reads "it won't lick itself".
Pallets and bags for a dish mount is super lame btw. Perhaps for a fixed dish where a nudge here or there is marginally acceptible.
But for a polar mount. No frikkin' way.Well for a start being off the ground is better due to it being away from the shed (so it can move left and right) aka east and west), and so i can get round it aswell you know
-
yes i mean if he edited my pics it would make more sense to me than just making other graphics
ps the black bags at the bottom of the dish mount have stones in them while i wait for slabs to be delivered, they are just on there temp
I understand FFS as much as the IDGAF biker tee shirt I have.
And the chickies shirt that reads "it won't lick itself".
Pallets and bags for a dish mount is super lame btw. Perhaps for a fixed dish where a nudge here or there is marginally acceptible.
But for a polar mount. No frikkin' way.see this picture from underneath the dish? see it wont reach the bottom mounting plate thats because i took the mounting brackets off and attached the plate to the motor and as u can see it DOESNT REACH thats why they are needed!
& also FYI They dont reach the other way either !! (small bit at the top, big end on the motor mounting arm aka the gold part, already tried that!!!!
so how am i ment to correct it exactly?
-
Holy Moley!!!
-
Holy Moley!!!
ok thanks will do that! (possibly tomorrow, possibly Saturday - depending on weather) < Currently -1 here
-
Holy Moley!!!
ok thanks will do that! (possibly tomorrow, possibly Saturday - depending on weather) < Currently -1 here
Be Watney.
"Science the s**t out of it" -
Holy Moley!!!
ok thanks will do that! (possibly tomorrow, possibly Saturday - depending on weather) < Currently -1 here
Be Watney.
"Science the s**t out of it"so something like this then? Varnished Cold-pressed steel Equal L-shaped Angle profile, (L)1m (W)27mm | DIY at B&Q
-
Holy Moley!!!
ok thanks will do that! (possibly tomorrow, possibly Saturday - depending on weather) < Currently -1 here
Be Watney.
"Science the s**t out of it"so something like this then? Varnished Cold-pressed steel Equal L-shaped Angle profile, (L)1m (W)27mm | DIY at B&Q
The good Lordeth gaveth you a braineth in your gourd. You figure it out.
Make it work. Then make it pretty. It ain't-a-gonna'-lick-itself.
I can think of 47 ways to get the preliminary alignment done.
Screw the L-shaped stuff. That's why God gave us washers and spacers.
Mine works perfectly from 131 W all the way out to 30 W. -
Display More
Holy Moley!!!
ok thanks will do that! (possibly tomorrow, possibly Saturday - depending on weather) < Currently -1 here
Be Watney.
"Science the s**t out of it"so something like this then? Varnished Cold-pressed steel Equal L-shaped Angle profile, (L)1m (W)27mm | DIY at B&Q
The good Lordeth gaveth you a braineth in your gourd. You figure it out.
Make it work. Then make it pretty. It ain't-a-gonna'-lick-itself.
I can think of 47 ways to get the preliminary alignment done.
Screw the L-shaped stuff. That's why God gave us washers and spacers.
Mine works perfectly from 131 W all the way out to 30 W.well thats nout like mine is it
-
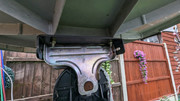
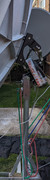
Is that spring on your rig to take up freeplay ? I had thought about doing similar, but ultimately replaced the ram as found good deal on a super jack
-
Master your satellite setup with expert installation support.
