

Posts by master G
-
-
-
-
-
The latest VTI image has a problem with starting mgcamd from the VTI panel - VTI Cam Center
You can download it, and it will show up in the panel, but selecting it will NOT activate it.
Unlike CCcam which starts fine, mgcamd can be started only with the telnet command/usr/bin/mgcamd_xxx &
or, and this is easier for most users, use the VTI panel to "start" it and then do a reboot. It will then start.
At the moment, there seems to be no fix for this issue.xxx represents the version number. It is not the command.
-
OoZooN Image lean for DM8000 v2.8.4 stable updated on 2010.09.24
:download: -

Peter Pan Neverland 2.0 - the fairytale continues
Our enigma2 adventure started long ago and its been time to give enigma2, dreambox and PP menu a needed overhaul
in order to get better functionality and better use of the new opportunities that Enigma2 offers now.
The new Neverland menu structure has got the same simplicity as you know from Peter Pan Menu
its works much quicker and together with some useful extensions it makes using the dreambox more logical.
New PP stuff: AutoCam - BoxKey Genarator - Satellite XML Generator - InfoCenter - Password Reset - Save TimeShift
Redesigned PP Plugin manager and download - default skin work with all CVS skins - WebInterface with Neverland WebTV 16:9
New integrated addons are: Merlin EPG - Rytec EPG Import - File Browser - Network Browser
- ExtremeInfo - ServiceOrbitalPosition - MaxTemp - ChannelSelectionExtraInfo - Picon2
Images comes with our new PP mod of Kerni-HD1R2 skin, with new renders and with a lot of plugins screens.
Big Thanks goes to all you addon developers - please keep it coming.
General Images Information:
Peter Pan Neverland v2.0 oe1.6
based on dmm experimental image:
DMM plugins from 25.09.2010
DMM skin from 25.09.2010
PP-Plugins from 25.09.2010
DM800 HD PVR
# Enigma2: 2010-09-22-experimental
# DVB-modules 2.6.18-7.3-brcmstb-20100623-r0
# Frontprocessor vNone
# Secondstage v76r1
Preinstalled:
# 2SUB Subtitles 3.01.00
# CCcam 2.1.4
# Cutlist Editor
# EPGImport
# Graph Multi EPG PPmod
# HOME MediaCenter PPmod
# IMDb Details
# M-xmltv-EPG
# MerlinEPG
# Mplug e2
# Movie Tagger
# My Tube Player
# Picture Player
# WebInterface 1.6rc3 PPmod
# Permanent Timeshift
# ShoutCast
# VLC Video Player
# WeatherPlugin
System plugins:
# AIO-Grab
# Autofs
# Busybox 1.0.1
# CDRkit
# CommonInterface Assignment
# Frontprocessorupgrade
# Genuine Dreambox
# GraphMultiEPG PPmod
# Hotplug
# Keyboard EN, DE, DK/NO on DE
# Media Scanner
# Network Wizard
# Network Browser
# Mount Manager
# Parental Control
# Positionersetup
# Satfinder
# Screen Adjustment
# Skinselector
# Software Manager
# Tuxtxt 1.95
# Video Fine-Tuning
# Wirelesslan
-
Stolen Dreamboxes
Dream publishes serial numbers
Dream Multimedia, the leading supplier of Linux-based set-top boxes, has warned consumers not to buy stolen goods. 128 Dreamboxes model DM8000 HD PVR were stolen in a burglary recently. Dream has reported the matter to the authorities, who are investigating.
It can be assumed the stolen Dreamboxes will be offered for sale at particularly attractive prices. Consumers are therefore advised to be wary if they come across offers for a DM8000 at far below the usual market prices.
Here on this page you will find the serial numbers of the stolen Dreamboxes, in order to provide consumers with the greatest possible degree of confidence when purchasing a DM8000 HD PVR.
In addition, Dream advises of possible legal consequences arising from the purchase of stolen goods. Should the police find a stolen Dreambox in the hands of a consumer, the Dreambox must of course be returned, and the consumer risks a criminal prosecution for aiding and abetting a theft by turning a blind eye to the possibility of purchasing stolen goods.
Dream spokesperson Alpaslan Karasu: ?We will do everything in our power to ensure the thieves gain no benefit from the stolen Dreamboxes. Specifically, we want to warn consumers not to buy extremely cheap Dreamboxes on offer without first checking against the list of serial numbers of stolen items on our homepage.?A52010160028448, A52010160028457, A52010160028415, A52010160028416, A52010160028424
A52010160028460, A52010160028459, A52010160028455, A52010160028452, A52010160028450
A52010160028451, A52010160028445, A52010160028444, A52010160028442, A52010160028440
A52010160028436, A52010160028434, A52010160028431, A52010160028428, A52010160028427
A52010160028426, A52010160028430, A52010160028429, A52010160028433, A52010160028435
A52010160028437, A52010160028438, A52010160028439, A52010160028443, A52010160028446
A52010160028447, A52010160028449, A52710160029310, A52610160029102, A52610160029104
A52610160029105, A52610160029108, A52610160029109, A52610160029112, A52610160029114
A52610160029117, A52610160029116, A52610160029120, A52610160029121, A52610160029125
A52610160029127, A52610160029129, A52610160029130, A52610160029131, A52610160029132
A52610160029134, A52610160029172, A52610160029174, A52610160029175, A52610160029178
A52610160029185, A52610160029182, A52610160029187, A52610160029188, A52610160029190
A52710160029362, A52610160029195, A52610160029199, A52610160029191, A52610160029200
A52610160029201, A52610160029203, A52710160029365, A52710160029388, A52710160029401
A52710160029397, A52710160029396, A52710160029394, A52710160029393, A52710160029390
A52710160029386, A52710160029373, A52710160029376, A52710160029383, A52710160029382
A52710160029385, A52710160029372, A52710160029348, A52710160029374, A52710160029377
A52710160029375, A52710160029379, A52710160029380, A52710160029381, A52710160029391
A52710160029384, A52710160029387, A52710160029392, A52710160029395, A52710160029398
A52710160029499, A52710160029282, A52610160029124, A52610160029123, A52610160029122
A52610160029119, A52610160029118, A52610160029115, A52610160029113, A52610160029111
A52610160029110, A52610160029107, A52610160029106, A52610160029141, A52610160029139
A52610160029133, A52610160029173, A52610160029176, A52610160029177, A52610160029180
A52610160029181, A52610160029183, A52610160029184, A52610160029186, A52610160029189
A52610160029192, A52610160029194, A52610160029197, A52610160029198, A52610160029193
A52610160029196, A52610160029202, A52610160029205
-
GUIDE TO MOTORISED DISH SETUP Enigma2 TUNER FOR USALS
Image Used -Blackhole V0.12
If your using DiSEqC 1.2 you will have to set-up the dish positions manually. If your using USALS it should be automatic.
Here's the USALS procedure that I used.
First make sure the dish is correctly aligned on a satellite, eg Astra 28.2EPress Menu
Set Up
goto
Service SearchingTuner Configuration
Choose Tuner ALPS BSBE2 (DVB-S2) - Press OK
Now for my configuration??..
Configuration Mode: Advanced
Satellite : Astra 2A/2B/2D/Eurobird 1 (28.2e)
Change LNB to LNB 1
Priority : Auto
LOF: Universal LNB
Voltage Mode: Polarization
Increased voltage: yes
Tone Mode: band
DiSEqC Mode: 1.2
Toneburst: None
Committed DiSEqC: None
Fast DiSEqC : no
Sequence repeat : no
Command order : committed toneburst
Uncomitted DiSEqC command : None
DiSEqC repeats : noneLongitude: Set this to the correct Longitude for your area.
To find the correct longitude settings for your area go to the following website
multimap HERE
In the "Find a Map" box at the top left of the page, enter your post code.
Select your country in the drop down box below it and click on the "Find" button.
This will display a map on the screen and below the map at the bottom right you
will see your Latitude information, example below for Postcode district:NE39 1
Lat:54:55:09N (54.91913)
Lon:1:44:55W (-1.74859)
So in this example in the Dreambox menu you'd set
Longitude: 001.748
West
Latitude : 54:550
North
Use USALS for this Sat: Yes
PRESS OK TO SAVE
Once this is set up on one satellite its easy to sort the rest.
Go back into reception settings
Highlight satellite and choose the satellite you want
The example here shows Hellas on 39.0ENow select LNB and right to LNB 1
This will fill in the configuration with your previously set configuration
PRESS OK TO SAVE
then scroll back up to satellite
scroll left or right to another satellite
goto lnb scroll right this will automatically set that satellite up
keep repeating this on all satellites needed -
What you need to update the firmware:
You need a image for the DM 500HD that has the extension *. NFI.
Connect your Dreambox to your Switch / hub / router.
Turn off the dreambox, use the switch on the rear of the receiver.
1. Press the button on the front panel and hold it down with one hand Then turn on the Dreambox via the switch on the back with the other.
3. your Dreambox now get the next free DHCP IP address from your router.Go to your Browser Firefox etc, Enter the Next IP address on your Router, if your PC IP address is 192.168.1.101 then the next will be 102 then 103 104 and so on
This screen will then appear
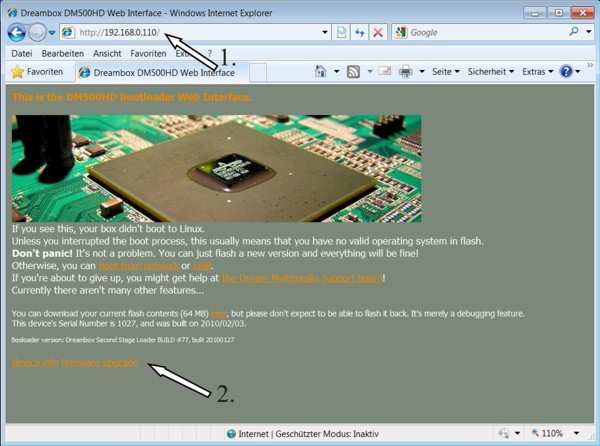
Select your Image
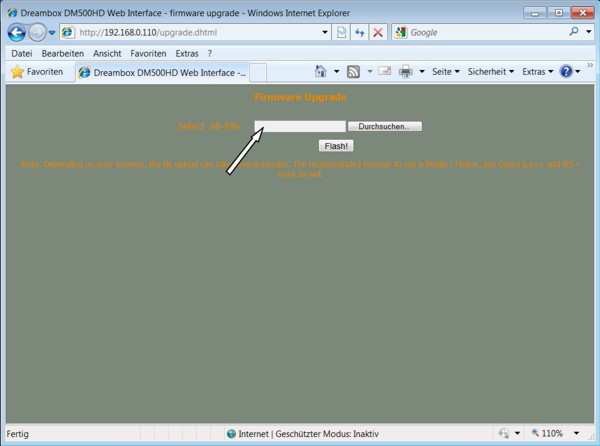
And select Flash
-
Gemini2 Project 5.1 DM500HD
Gemini2 v5.1
Enigma vom 21.07.2010Die meisten Funktionen sind im Gemini-Wiki nachzulesen.
Gemini-WikiFunktion Buttons:
* BLAU - Blue Panel (BP)
* lang BLAU - Bild in Bild (DM7025, DM8000)
* 2x BLAU - BP -> Gemini Extras
* BLAU ROT - Datei-Manager
* ROT - Aufnahme (nicht f?r die DM8000)
* GR?N - Quickbutton / Subservices
* GELB - Timeshift (nicht f?r die DM8000)Extras:
* Addon und Plugin Server
* Cryptinfos der Sender oder Cams, Zuordnung der Sender zu einzelnen Cam's
* Manager um viele Daemons / Server zu verwalten (BP->Dienste/Daemons)
* optische Verbesserungen wie HD-Skin, zus?tzliche Icons oder Anpassungen der Senderliste
* Manager zum Formatieren, Einrichten oder Einbinden von Ger?ten (BP->Ger?te-Manager)
* zus?tzliche EPG-Funktionen, wie Autosave, Refresh oder Zuschalten verschiedener EPG-Formate
* eigene Addons z.B. Dreamnetcast, Jukebox, Kalender, eMail oder eTorrent um nur Einige zu nennen
* Quickbutton, um die Funktion der gr?nen Taste per Men? zu bestimmen
* ausf?hrliche Infos ?ber deine Dreambox (Men?->Informationen)
* Datei-Manager, handelt alle m?glichen Formate, egal ob nun Bild-, Ton-, Filmmaterial, Playlisten, Torrents, Scripte oder DVDs (BP->Datei-Manager)
* Komplettes Handling von Festplatten, DVD-Laufwerken, USB-Sticks auf "udev" umgestellt (System k?mmert sich selbstst?ndig um das Einbinden solcher Medien)Viele weitere Funktionen k?nnen im IHAD-Board oder unserem Wiki nachgelesen werden.
Neu:
* HFS- und HFSPlus- Filesystem mit aufgenommen
* Anzeige ob ein neues Release verf?gbar ist. Aktivieren ?ber BP->Einstellungen->Allgemein. Es blinkt dann ein "R" in der Infobar, wenns was Neues gibt. Check erfolgt zwischen 24:00 und 01:00 Uhr.
* Partitionen kann nachtr?glich ein neuer Name Vergeben werden (BP->Ger?teManager->Device ausw?hlen->OK->Men?)
* Datei-Manager kann immer mit gleichen einstellbaren Ordner starten
* Unterst?tzung f?r OpenVPN, im Wiki von uns ist schon ein Beitrag, wie man die Dream als Server einsetzen kann
* Webinterface f?r ctorrentFix + Update:
* bessere Unterst?tzung f?r Unicable
* update auf ctorrent 3.3.2, Addon ?berarbeitet
* L?nder / St?dte Listen im Wetterplugin erweitert
* siehe CVSWichtig:
F?r die Skiner unter euch...
?nderungen in der Netzwerk?bersicht und im Skin_Config2Button (siehe BPskin.py)Dieses Image enth?lt keinerlei Keys oder Softcams.
Backups und sonstige modifizierten Images sind nicht
von uns und werden somit auch nicht supportet!!!Gemini2 v5.1
Enigma from 21.07.2010An overview over most functions can be found here
Gemini-WikiFunction Buttons:
* BLUE - Blue Panel (BP)
* BLUE long - Picture in Picture (DM7025, DM8000)
* 2x BLUE - BP -> Gemini Extras
* BLUE RED - File-Manager
* RED - Recording (not for DM8000)
* GREEN - Quickbutton / Subservices
* YELLOW - Timeshift (not for DM8000)Extras:
* Addon and Plugin Server
* Cryptinfos of the channel or Cam, Stick Cam to certain channels
* Function for managing many daemons / server (BP -> Services/Daemons)
* optical enhancements like HD-skin, additional icons or modification of the channel list
* Manager for format, setup or mount devices (BP -> Device-manager)
* Additional EPG-functionality like Autosave, Refresh or different EPG-format view
* Particular addons like Dreamnetcast, Jukebox, Calendar, eMail or eTorrent, just to name some of them
* Quickbutton, to define functionality of the Green button via menun
* Detailled information about your Dreambox (Menu -> Information)
* File-Manager, which can handle different format-types, regardless whether it is a picture-, audio-, videoformat, playlists, torrent, scripts or DVD-files (BP -> File-Manager)
* complete handling of hard disks, DVD-drives, USB-Sticks changed to udev (system handels those devices by itself)Information about many other functions can be found at the IhaD-Board or our Wiki.
New:
* HFS- and HFSPlus filesystems included
* Info about new release. Atcivate over BP->Settings->General. Then will blink a "R" in the Infobar, if something new is out. The Check will be done between 00:00 and 01:00.
* Partitions can be named anytime now.
* The Filemanager can start everytime with the same selectable folder now.
* OpenVPN now supported, in our wiki is already described, how to use the dream as server.
* Webinterface for ctorrentFixes + Updates:
* better support for Unicable
* Countries/Cities lists extended in the Weatherplugin
* update to ctorrent 3.3.2, addon revised
* see CVSImportant:
For the Skiners:
A Change in the network-overview and in Skin_Config2Button (have a look at BKskin.py)This image doesn't contain any keys or softcams!
Backups or other modified images are not released by us
and won't be supported in any way!!! -
OoZooN-Image-dm500hd
dm500hd Image from
Enigma? "experimental" OE 1.6 branch.# Enigma is of 31.07.2010
# the plugins are of 31.07.2010
# the drivers are of 23.06.2010
# new kernel 2.6.18-r5
# secondstage is 79# changes at oe:
# own bootlogo's, artwork by clumsy and BVB01
# with satellites.xml - enigma? by Reinh@rd
# changes of dccamd start
# dccamd not included in image, can be installed via plugin download# (*) included
# (**) only via plugin-download available# systemplugins:
# automatictimerlistcleanup (**)
# autoresolution (**)
# cleanupwizard (**)
# crashlogautosubmit (**)
# defaultservicesscanner (*)
# diseqctester (**)
# hotplug (*)
# ledmanager (**)
# networkbrowser (*)
# networkserver (**)
# networkwizard (*)
# positionersetup (*)
# satelliteequipmentcontrol (*)
# satfinder (*)
# setpasswd (**)
# skinselector (*)
# softwaremanager (*)
# startupservice (**)
# tempfancontrol (*)
# videoenhancement (**)
# videomode (*)
# videotune (*)# plugins:
# aihdcontroller (**)
# ambx (**)
# antiscrollbar (**)
# audiosync (*)
# autotimer (**)
# b00k (**)
# babelzapper (**)
# barryallen (**)
# buliticker (**)
# bwmon (**)
# captain-shell (**)
# cdinfo (**)
# covermanager (**)
# cronmanager (**)
# cutlisteditor (**)
# crossepg (**)
# cvsnews (**)
# dccamd (**)
# dreamexplorer (**)
# dreamirc (**)
# drwatson (**)
# dvdbackup (**)
# dvdburn (**)
# dvdcontroller (**)
# dvdplayer (*)
# dyndns (**)
# emailclient (**)
# epgrefresh (*)
# epgsearch (**)
# fancontrol2 (**)
# fantastic (**)
# filebrowser (**)
# flashbackup (**)
# flashcheck (**)
# fritzcall (**)
# ftpbrowser (**)
# genuinedreambox (**)
# googlemaps (**)
# graphmultiepg (*)
# growlee (**)
# hdmon (**)
# httpproxy (**)
# imdb (*)
# iprec (**)
# kiddytimer (**)
# lastfm (*)
# ledctl (**)
# letterbox (**)
# livescore (**)
# logomanager (**)
# lottoextended (**)
# lottozahlen (**)
# mediacenter (**)
# mediadownloader (**)
# mediaplayer (*)
# mediascanner (*)
# merlinepgsearch (**)
# merlinmusicplayer (*)
# merlin-pg (**)
# meteoitalia (**)
# modem (*)
# mosaic (**)
# mountie (**)
# mountie-light (**)
# moviecut (*)
# moviejukebox (**)
# movielistpreview (**)
# movieplayer (**)
# movieretitle (*)
# movieselectionquickbutton (**)
# movie-splitter (**)
# movietagger (*)
# multquickbutton (**)
# multirc (**)
# mytube (**)
# netcaster (**)
# nfsserver (*)
# noipclient (**)
# ofdb (*)
# off (**)
# openpanel (**)
# orfat (**)
# partnerbox (**)
# pauli (**)
# passwordchanger (**)
# permanentclock (**)
# permanentrecording (**)
# permanenttimeshift (**)
# pictureplayer (*)
# pluginlist (**)
# podcast (**)
# puremp3player (**)
# quickbutton (**)
# quicktv (**)
# reconstructapsc (**)
# remotetimer (**)
# remotetv (**)
# rsdownloader (**)
# sambaserver (*)
# screensaver (**)
# secondinfobar (**)
# seekbar (**)
# sherlock (**)
# shoutcast (*)
# simplebitrate (**)
# simplerss (**)
# socketmmi (*)
# spinnerselektor (**)
# sportinfos (**)
# startuptostandby (**)
# suduko (**)
# suomipoeka (**)
# swapscript (**)
# tageditor (*)
# timeshiftsave (**)
# timeupdate (**)
# trafficinfo (**)
# translator (**)
# tuxcom (*)
# tversity (**)
# unwetterinfo (**)
# updatecheck (*)
# userscripts (*)
# valixdcontrol (**)
# virtualzap (**)
# vlcplayer (*)
# wetherplugin (**)
# wethersat (**)
# webbrowser (**)
# webcamviewer (**)
# webinterface (*)
# webradiofs (**)
# werbezapper (**)
# xmltvimport (**)
# youtubeplayer (**)
# zaphistorybrowser (**)
# zapstatistic (**)
# zdfmediathek (**)# Skins:
# basic hd (**)
# blackbox (**)
# blueline (**)
# blueline.extended (**)
# blueline.single (**)
# brushed alu hd (**)
# chromeline (**)
# chromeline.cobolt (**)
# dmconcinnity-hd (**)
# dmm-hd (**)
# dreammm-hd (**)
# dreamtv-hd (**)
# dtv-hd (**)
# dtv-hd-reloaded (**)
# elgato-hd (**)
# kerni-hd1 (**)
# kerni-hd1r2 (**)
# lt6-hd (**)
# flatline (**)
# flatline.blue (**)
# glassline (**)
# greenline (**)
# greenline.extended (**)
# greenline.single (**)
# greyline (**)
# greyline.extended (**)
# greyline.single (**)
# shadowline (**)
# simple (**)
# swain (**)
# swain.hd (*)
# ultraviolet (**)
# valihd (**)
# valixd (**)
# yads-hd (**)
# picon 07.0e 3d (**)
# picon 09.0e 3d (**)
# picon 13.0e 3d (**)
# picon 16.0e 3d (**)
# picon 19.0e 3d (**)
# picon 39.0e 3d (**)
# picon 42.0e 3d (**)
# picon 01.0e 3d hd (**)
# picon 04.8e 3d hd (**)
# picon 07.0e 3d hd (**)
# picon 09.0e 3d hd (**)
# picon 13.0e 3d hd (**)
# picon 16.0e 3d hd (**)
# picon 19.2e 3d hd (**)
# picon 23.5e 3d hd (**)
# picon 28.2e 3d hd (**)
# picon 39.0e 3d hd (**)
# picon 42.0e 3d hd (**)# my changes at enigma:
# MHW epg active
# load patch for crossepg
# bouquet button patch
# .recordings patch
# authenticity certificate check (by Dr.Best) <- this image
will only work on original dmm hardware!# this image is updateble via plugins -> softwareupdate over internet!
# OE Build Configuration:
# BB_VERSION = "1.8-dream"
# TARGET_ARCH = "mipsel"
# TARGET_OS = "linux"
# MACHINE = "dm500hd"
# DISTRO = "opendreambox"
# DISTRO_VERSION = "1.6.0"
# TARGET_FPU = "soft"# md5: 1f3cbf76ac7efc58c3200789be681f57
-
Guys here's a simple util that you can use to remove the channel numbers from the channel names in my Sly UK bouquets. Simply run the util and point it at your bouquet folder.
Once it's finished , open the bouquets in DBEDit and FTP to your box.Channels are shown as follows :-
As released..
101 101 - BBC1
408 408 - Sly Sports HD1After running the channel number remover..
101 BBC1
408 Sly Sports HD1 -
The program can quickly add lines C and F in CCcam.
When open, the program automatically connects to the FTP CCcam.cfg.
Then you can add lines C lines and F received to give more.F lines are added CCcam.cfg and the C line will say you need to send in
your turn. Hop options, and Reshare EMU level are present.After you add lines C and F can automatically save your file as.
I think this tool will help beginners in particular,
but also those "experts" can use to ease the exchange lines.Version 1.3 :
Multiple bugs fixed. -
I've just had a go of this and get a lot of Remote ECM errors!
Anything to worry about?
Check your sid assign is working you should see a list of assigned sids in the entitlements page of cccam info. -
-
Thanks gerry
Must be doing something wrong there no warning.txt in the folder tmp do i need to insert warning.txt into the tmp folder.
Cheers
peter
You need debug mode enabled in your cccam.cfg -
Open DCC, then FTP, next the folder tmp, right click on the file warnings.txt.
-
Right click on it then open or edit with notepad.
-
try reducing the stream quality, sounds like your upload is a little slow to handle the stream.
