

You can flash a new firmware image onto your Dreambox DM8000 HD from a web browser. The steps below use the serial bootloader to reach the second-stage loader, then upload the image over the network.
What you'll need
- The firmware image you want to flash — it must have a .nfi extension (you can't flash .img or other formats).
- A DHCP server, a configured bootloader, or a serial cable and a terminal program such as HyperTerminal.
- A browser and a network cable — a crossover cable if you connect the box directly to your PC, or a normal cable through a switch/hub/router.
- A working, intact second-stage loader.
These steps assume you have a DHCP server. If you don't, set up an IP address in the bootloader's serial setup. 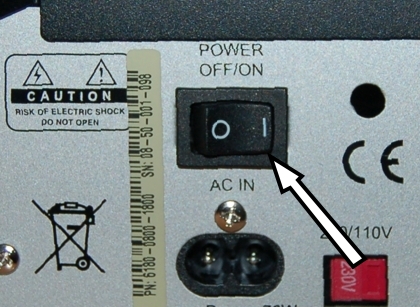
Entering the bootloader
- Power the Dreambox down fully — use "shutdown" (deep-standby) or the power switch. Standby is not enough.
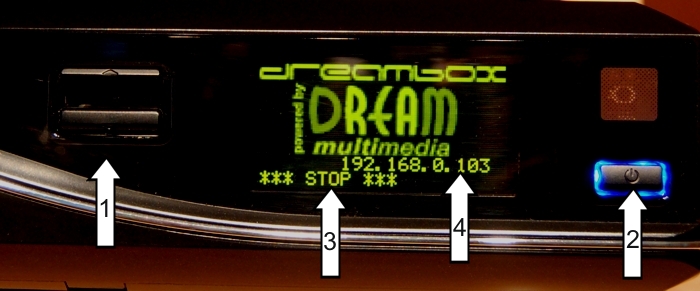
- Press and hold the lower front-panel button.
- Switch the Dreambox on — via the power switch, or if it's in deep-standby press the power button — while still holding the lower button.
- The text "*** STOP ***" should appear. (If you see something like "/flash" instead, you held the wrong button.) Release the button — the bootloader is now in "waiting" mode.
- Above the "*** STOP ***" text an IP address appears (four numbers separated by dots). If it shows "dhcp" instead, the box is still searching for a DHCP server — wait a moment. If it doesn't change, check the network cable is plugged in. If it still won't work, set an IP using the serial terminal.
Uploading the image
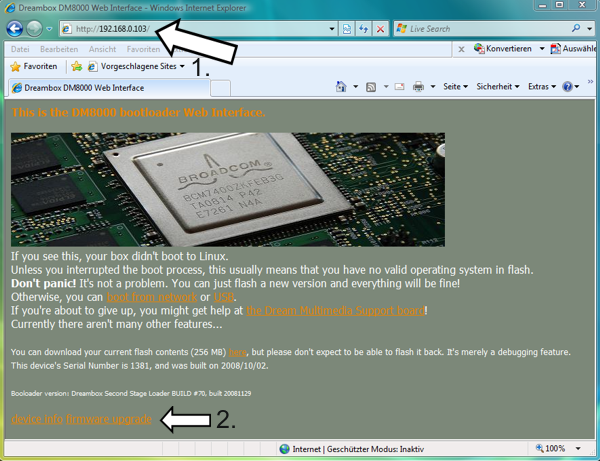
- On your PC, open a browser and enter
http://ip/"in the address bar (replace "ip" with the value shown on the LCD). - At the bottom of the page, click the firmware upgrade link.
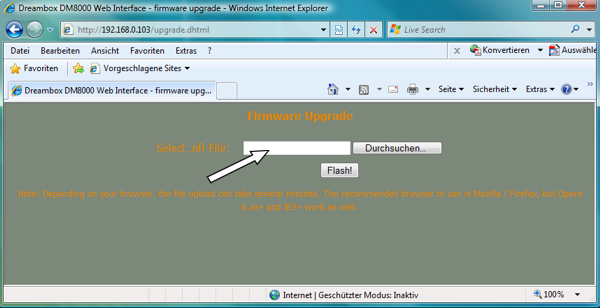
- On the next page, select the .nfi flash image (other formats such as .img won't work), click FLASH! and wait.
- Switch the box off and on again. The new image should now be flashed and working.
⚠️ Don't interrupt the flash. Once flashing starts, do not power the box down until it completes — interrupting it can corrupt the firmware.



Replies 2
Enzo57
Hi Admin,
I rpovato and tried again with DreamUP_1_3_2_1 with this it does not connect at all with the Drambox 8000!
After it has finished loading the image with any version of DreamUp I tried to flasciarlo with the brouser it goes to the end but then the decoder does not restart!
And IP that I get and only through the serial!
And therefore not obtaining IP I cannot carry out the exact procedure!
What can I do Admin are there other procedures to be able to bring it to life?
Or should I throw it out the window?
Hello Enzo57
Hannibal_Lecter
Flashing a new firmware with Browser
What you need to flash
You need the image file you want to flash. Image files have the extension *.nfi. You can't flash other images like *.img files. Don't try it - it won't work.
You need either a DHCP server, a configured bootloader or a serial cable and a terminal program like HyperTerm.
You need a browser, and a network cable. If you connect the Dreambox directly to the PC, you need a cross cable, if you connect trough a switch/hub/router you need a normal (non-cross) cable.
To flash a new image, you can use the second stage loader. It must be present and not broken.
The following steps assume you have a DHCP server. If you don't have one, you have to setup an IP address (klick) in the bootloader's serial setup.
- Power down the Dreambox, either using "shutdown" (to enter the deep-standby mode) or by using the power-switch. Standby is not enough!
(1.) Press and hold the lower frontpanel button.
(2.) Switch on the dreambox, either by using the powerswitch or, in deep-standby mode, press the power button. Still, hold the lower button.
(3.) A text "*** STOP ***" should appear. If something like "/flash".. appears, you didn't hold the right button. Now you can release the button. The bootloader entered the "waiting" mode.
(4.) Above the "*** STOP ***" text, there should appear an IP-address (four decimal values with a dot in between). If there appears the string "dhcp" instead, the box still searches for a DHCP server.
Wait a bit. If it doesn't change, something doesn't work with the DHCP server. Check wether network cable is plugged in etc.
#############################################################################################################
And another trick to flash with the browser, but not using the front push button and forcing the box ip to your own chosen ip in your network.
Also handy if your front display or panel does not work.
1. Connect the box with the network and serial cable.
2. Use startup DreamUp and set it to the correct com port, enable the Use Network, be sure that the Local IP and select one are the same, keep the Remote IP in the same ip area.
Example, Local/select one are both 192.168.0.5
Remote IP 192.168.0.10
With other words use DreamUp as you always did.
3. Press the Connect button, switch on the box.
If all goes well you see a connection to the box in the Log screen.
4. Let DreamUp as it is and use the Remote IP in your browser etc.